Before we compare
RunCloud vs
ServerPilot vs Forge, let us understand the cloud market first.
Cloud has been the top trending thing these days. Whether
hosting, productivity solutions or for that matter anything related to IT – we find the importance of cloud being all pervasive. Looking at the development that is taking place in the realm of cloud computing, one thing is sure – cloud is replacing all the in house IT tasks. We would see it to be the future of the IT industry.
What Is the Real Cause for the Shift towards Cloud Computing?
Well, it has everything to do with the cost-effectiveness that cloud computing offers you. You would need to spend enormous capital cost for the hardware and then on their maintenance. Of course, outsourcing your requirements may be one of the right options, but eventually migrating to the
cloud would indeed be the best you can go with.
Shared hosting can be one of the options that can compensate for the cost, but what if your website outgrows the limitations of the shared hosting capabilities? When that happens, you have no other option than moving to cloud or
VPS.
Another option that can be helpful in these circumstances is the SaaS tools that can be helpful in deploying your sites on any VPS and cloud-based platforms. You can use them for configuring, monitoring and managing your sites on cloud hosting services. Prime among a host of services available is
RunCloud,
ServerPilot, and Forge. Let us compare the functionalities of these three tools in finer detail.
How do these three competitors fare against each other? We will analyze each of these players for a clear understanding of the features and functionality that they offer.
RunCloud – The New Entrant
 RunCloud
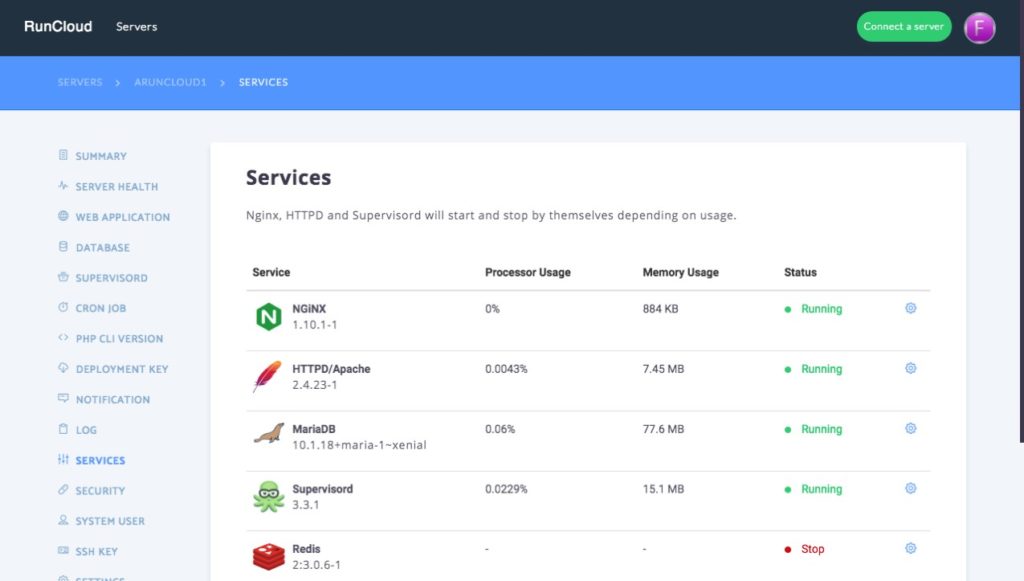
 has been one of the capable web management application that has its origins in Malaysia. It has been one of the upcoming players in the realm of cloud management applications and has gained a name for itself in PHP and web hosting management.
With over 4500 servers globally, it hosts more than 10000 databases and 23500 domains across the world. What makes it one of the best options is the ease of functionality that you can work with it. It is quite familiar and offers you the similar appearance like the older cPanel for your shared hosting accounts. Moreover, it has been one of the cheapest options you can go with.
 ServerPilot
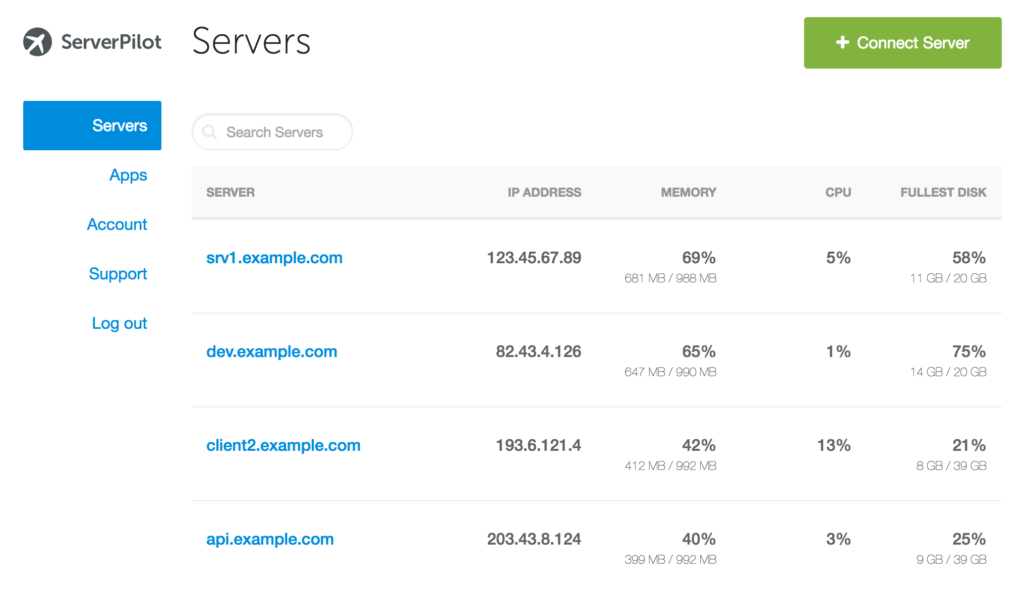
 is probably one of the oldest options for VPS and web site management tools. However, we would consider them a little slower regarding development and opting for the newest improvements or updates.
Their Admin panel has remained the same over the years. However, they have recently tied up with
Lets Encrypt, and that could be one of the excellent options. The interface is quite quick, easy and straightforward to navigate. Setting up WordPress should be one of the most straightforward options with
ServerPilot.
Forge – Can it Beat the Competition?
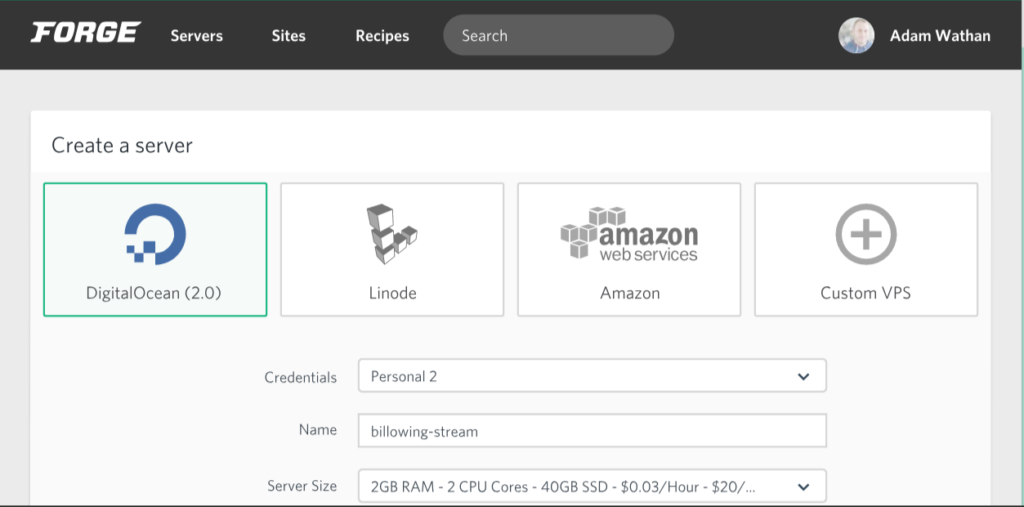
Well, not to be left behind – the Laravel Forge is one of the capable web management application in its own right. The strongest point that goes in their favor is the server performance. Among the three competing platforms we are reviewing today, Forge offers you the server performance far better than the rest two.
The service works with the API integration, and Forge offers you a high degree of API integration. The panel and other features can be a little difficult and not accurately at par with the ones observed on
RunCloud. However, we found it better than the options on
ServerPilot.
The Actual Comparison
We will compare the services based on a few key parameters. This will help us understand the functions in a better manner.
Connecting with the Tool
Well,
RunCloud simplifies the task altogether. You can register quite easily. You do not need to share your credit or debit card details while signing up. You can sign up with your Facebook, Google or any other social profiles. If you not keen on them, go with your email address as usual.
ServerPilot has been one of the long-standing web management tools. What makes it quite a good option is the fact that it offers you a free account to work with. No, we are not talking about the trial account, but a full-fledged free account that would be available as long as you wish to use it.
Connecting with the server is similar across both
ServerPilot and RunCloud. You will need to install an Ubuntu 16.04 VPS server from the start. Server deployment on both of them is simple and easy to work with.
Forge, the third option we are discussing here does not offer you a free or trial account, to begin with. Connectivity is in sharp contrast to RunCloud and
ServerPilot is it works through the means of API integration. You need not deploy the server in your cloud hosting provider before connecting to it. Forge will do it for you and currently supports DigitalOcean, AWS, and Linode.
Server Management
Creating and working with your RunCloud application should be ideally quite simple. The interface is quite easy to follow and simple to operate with. It offers you script installers for WordPress, Joomla, Concrete5, PHPMyAdmin and a few other PHP options. If you are aware of PHP development and want to use Git, RunCloud lets you deploy your script using GitHub, Bitbucket, and Gitlab efficiently.
Server Management is one of the best on ServerPilot when compared to RunCloud. However, it does support WordPress alone. There is no support for other tools like Joomla. You do not have access to GitHub as well. Of course, even when you have GitHub and looking to install it, you will need to do it through SSH.
Managing your server is a most simple task in Forge when compared to RunCloud and ServerPilot. You can make use of WordPress. Being developed by a PHP developer makes it one of the best options for installing your applications through GitHub. When setting up your site, you can configure domain name in addition to the wildcard subdomain as well.
Our Thoughts On Comparison
When it comes to the features, we will treat RunCloud to be one of the best options. It has the best in class web panel that is comparable to the old cPanel and thus quite simple and easy to work with. It offers you a great deal of information across different genres. Some of the worthy inclusions include Git implementation, information on server health, virtual host, database management, file manager and multiple domains.
It can also be quite cost-effective in more ways than one. You spend just $ 10 per month for unlimited server deployments. One of the missing options is the team management. Even regarding the overall performance, it leaves a little to be desired.
ServerPilot disappoints when compared to RunCloud regarding performance. Lack of features in the web panel interface is yet another issue you may be disappointed with. You would not find many features available. There is no support for many PHP tools except for WordPress.
Pricing can be a massive concern for ServerPilot. You are charged at $ 10 per server deployment. If you are opting for multiple server deployments, it can be quite expensive. Imagine spending $ 100 for ten servers. This is in sharp contrast to $ 10 per month pricing for multiple servers deployment.
If server performance is your sole deciding factor, Forge should ideally be the best you can go with. They beat both ServerPilot and RunCloud regarding performing your server to the fullest of your capabilities. The API integration is one of the excellent features for installing server. It helps you work with ease as almost all the tasks are completed without you having to do anything as such. As long as you have been trying to install your servers on AWS, DigitalOcean or Linode, the service will help you install it easily without any issues.
If you are looking for the features, they can be quite basic – but way better than what you are getting with ServerPilot. There is an option for Git deployment and scheduling as well. However, if you are looking for server health information, you may be at a loss.
The Parting Thoughts
That was a complete comparison between the three capable options for web management applications. Of course, ServerPilot is one of the long-standing services, but RunCloud and Forge to are competent enough. They offer Serverpilot a more robust competition.
Check out the features of each of these services and choose the one that best meets your exact requirements. If you are using any of them, share your thoughts, experiences, and opinions with us.

 RapidWeaver is, undoubtedly, one of the simplest tools you can use to create your websites. In our opinion, what makes RapidWeaver an excellent option is the lack of need for coding. That would best suit those who want to share their ideas through their sites, but do not have the requisite technical knowledge to create websites.
The tool comes with preset webpages. You need to use them as the base for creating your pages. There are a host of themes available on the software so that you can personalize your website to your liking. You also have access to a host of plugins for further improving your web pages.
One of the advantages that site developers claim to get for RapidWeaver is the standard code generated by RapidWeaver and Search Engines can easily index the codes. You will be able to edit the code if you are aware of the HTML and CSS coding.
RapidWeaver is, undoubtedly, one of the simplest tools you can use to create your websites. In our opinion, what makes RapidWeaver an excellent option is the lack of need for coding. That would best suit those who want to share their ideas through their sites, but do not have the requisite technical knowledge to create websites.
The tool comes with preset webpages. You need to use them as the base for creating your pages. There are a host of themes available on the software so that you can personalize your website to your liking. You also have access to a host of plugins for further improving your web pages.
One of the advantages that site developers claim to get for RapidWeaver is the standard code generated by RapidWeaver and Search Engines can easily index the codes. You will be able to edit the code if you are aware of the HTML and CSS coding.
 SiteGround is one of the prominent players in the web hosting arena that has good support for the Mac operating system. Launched in 2003, the service currently has over 150,000 satisfied clients.
Some of the features that would make it an exceptional choice for hosting your RapidWeaver websites can be summed up as
SiteGround is one of the prominent players in the web hosting arena that has good support for the Mac operating system. Launched in 2003, the service currently has over 150,000 satisfied clients.
Some of the features that would make it an exceptional choice for hosting your RapidWeaver websites can be summed up as
 If appearance is what you are looking ahead to, Eleven2 should be the best you can opt for. But yes, it isn’t only about look. You can be assured of a host of other features as well.
One of the most positive aspects that Eleven2 offers you is the world-class customer support. What would you think of the 60-day money back guarantee? That is indeed much more than the industry standard practice of 30 days! And that should speak of their confidence, right?
What makes Elven2 one of the top choices? Here are our reasons –
If appearance is what you are looking ahead to, Eleven2 should be the best you can opt for. But yes, it isn’t only about look. You can be assured of a host of other features as well.
One of the most positive aspects that Eleven2 offers you is the world-class customer support. What would you think of the 60-day money back guarantee? That is indeed much more than the industry standard practice of 30 days! And that should speak of their confidence, right?
What makes Elven2 one of the top choices? Here are our reasons –
 Have you heard of them? If you are on Mac and a die-hard Mac fan, you should be aware of the hosting provider. Little Oak is a perfect Mac OS web hosting service by any standard.
What makes it so important and outstanding is the fact that it has been created explicitly for Mac by the Mac users. They guarantee you a 100 percent uptime guarantee. What’s more, they would offer you 10 percent off on your monthly fee if your site goes down for ten minutes! Given the fact that Little Oak is a conventional shared hosting service, that should be a great promise and confidence.
What are the other features worthy of consideration? Well, some of them can be pointed out as –
Have you heard of them? If you are on Mac and a die-hard Mac fan, you should be aware of the hosting provider. Little Oak is a perfect Mac OS web hosting service by any standard.
What makes it so important and outstanding is the fact that it has been created explicitly for Mac by the Mac users. They guarantee you a 100 percent uptime guarantee. What’s more, they would offer you 10 percent off on your monthly fee if your site goes down for ten minutes! Given the fact that Little Oak is a conventional shared hosting service, that should be a great promise and confidence.
What are the other features worthy of consideration? Well, some of them can be pointed out as –


 Well, not to be left behind – the Laravel Forge is one of the capable web management application in its own right. The strongest point that goes in their favor is the server performance. Among the three competing platforms we are reviewing today, Forge offers you the server performance far better than the rest two.
The service works with the API integration, and Forge offers you a high degree of API integration. The panel and other features can be a little difficult and not accurately at par with the ones observed on RunCloud. However, we found it better than the options on ServerPilot.
Well, not to be left behind – the Laravel Forge is one of the capable web management application in its own right. The strongest point that goes in their favor is the server performance. Among the three competing platforms we are reviewing today, Forge offers you the server performance far better than the rest two.
The service works with the API integration, and Forge offers you a high degree of API integration. The panel and other features can be a little difficult and not accurately at par with the ones observed on RunCloud. However, we found it better than the options on ServerPilot.