You are a website owner and have been creating websites after website. You would carefully develop content and post it on the site. However, the web content you create using WordPress or any other CMS solutions will be intelligible and useful only for human beings.
Search engines may find it a little difficult to understand it properly. That is precisely where the sitemap comes to the fore. You are expected to submit your sitemap to Google or other search engines for being able to rank better and let search engines understand it correctly.
What is a Sitemap? Before you Submit Sitemap to Google!
Well, the name should in itself let out what is it. A sitemap is a map of all the content on your site. It provides a complete idea about your website and its contents for the search engines and humans alike.
A sitemap can be beneficial for both search engine optimization and usability. There are two types of sitemaps – XML sitemaps and HTML sitemaps. Each of the sitemap types come with their own set of benefits. Let us check out the functionality in more exceptional detail.
XML sitemap and HTML Sitemap – An Overview
An XML sitemap is an option that can help search engines find all the content on your website. It includes the URL addresses of all the content on your website that is publicly visible. However, your human visitors will perhaps not have a look at it.
An XML sitemap lists all the URLs of your website and a select list of other elements. The additional information would involve the number of images on each of the URLs. It also includes details on when the content was modified. You can even have a separate sitemap for the photos and other media types. The XML Sitemap is specifically designed for the search engines alone.
The HTML Sitemap is more useful for human visitors than the search engines. However, that should not mean that it does not serve any useful purpose from the SEO point of view.
While the XML sitemap is a mere collection of codes, the HTML sitemap is an actual page designed on your website. It is created for making it helpful for the site visitors to navigate through the website. The HTML content will help find the most famous content in an easily accessible manner.
In sharp contrast to the XML sitemap, the HTML sitemap consists of links to all your content on the site. This can be ideally useful for human visitors to reach your favorite content right away. It is purely in a human-readable format and does not need you to know any coding.
Which one should you prefer? Well, both of them have their advantages. The XML sitemap is an excellent option from the SEO point of view. It is used to tell Google or other search engines about all your content.
This can help rank your content because the sitemap is quite useful enough in letting Google know about all the content on your site. Though not all your content is inserted in the search results, it can help you improve the chances of better ranking.
It also lets you share the additional information on the content and any metadata changes to it to Google and other search engines such as Bing or Yahoo. Some of the additional information shared with search engines would include how often the page has been changed when the page was updated etc. Also, are there any alternative languages used on the site.
The HTML sitemap, on the other hand, is beneficial for humans. It is an option for human visitors to understand the structure of the site and access the content with ease. It may not be mainly be directed towards the SEO benefits in its entirety.
An HTML sitemap can be considered to be a group of internal links and can be an excellent option to spread the link juice (Authority) accordingly around the site. It can also provide access to Google crawlers to find the content more positively for quicker indexing.
From the Google point of view, Google recommends creating a sitemap but does not make it a penalizable offense if you have not created a sitemap.
How to create a Sitemap on WordPress?
Well, that was how sitemaps could be beneficial on a website. However, how would you create a Sitemap in WordPress? The tutorial should provide you with an input into the best options and tips to create an XML sitemap.
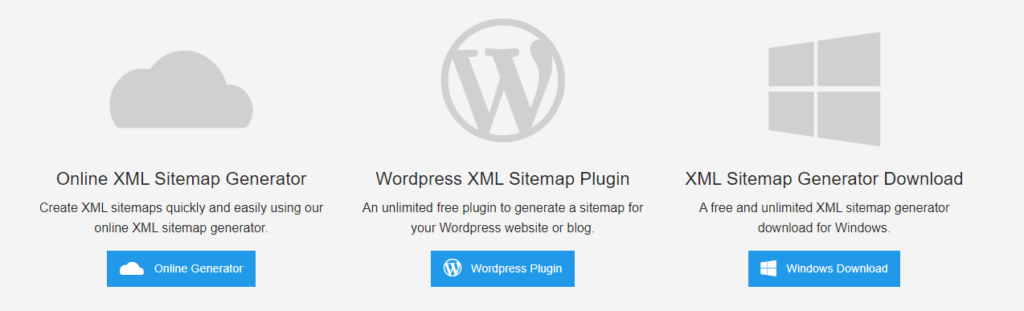
There are several options to create a sitemap on WordPress, but since we are not interested in creating a sitemap with the use of plugins, we will use the other route. WordPress does provide you access to a Sitemap Generator Tool.
You can make use of the functionality through the multiple options like a cloud-based option, desktop programs, and through a WordPress plugin.
Here are the steps involved in the creation of sitemap on WordPress –
Scroll down and click on Online sitemap generator option.
Enter the details like your site URL and other aspects of your site on the online generator.
Enter the following details inappropriate places –
Enter the URL of your website homepage
Choose the option to calculate the modified date
Choose the change frequency
Choose the default crawl priority
Enter your Email address
Click on the option Generate Sitemap.
You may also click on the option More Settings to toggle and configure the more advanced options. Do note that it would be advisable to opt for the advanced settings only if you are confident enough of handling them. For most of the generalized performance, it may not be needed to opt for the More Settings option.
The generation of the sitemap will take time depending upon the size of the website. If your site is smaller enough, it should take a while for generating the sitemap. If your site is more extensive enough, it may be needed to wait a little longer.
Once the sitemap is created, you have the option to download the requisite sitemaps. The online sitemap generator lets you the sitemap in four formats – XML sitemap, HTML sitemap, RSS sitemap, and Text Sitemap.
Once the sitemap is downloaded, you will need to upload it to the root folder of your website. Then, submit it to Google or any other search engines of your choice.
How to submit Sitemap to Google or other search engines?
That completes the task of creating a sitemap is much simple and more straightforward. Creating a sitemap is just a part of the job. Unless you submit the sitemap to Google, it would not be a good option. The best option is to submit the sitemap to most of the major search engines.
You will need to have a Google Search Console account for submitting your sitemap to Google. We assume you also have access to a similar webmaster tool of their own. We will not go into the details of how to set up a Google Search Console account. How to set up a Google Search Console account is beyond the scope of this post.
Here are the steps involved in submitting your sitemap to Google Search engine –
Login to your Google Search Console.
Click on your website. If you have multiple web properties under one Search Console account, you will need to choose the account you would want to add the sitemap to.
Choose the Dashboard for the site
Locate and find the option Crawl under the left side pane.
Click on Sitemaps
Once on the page, click on the option Add/test sitemap. You should find the option at the top right corner. Now add the location for your sitemap and click on Submit.
That does it. You have successfully submitted your sitemap to Google Search Console.
Please note that there are several options in the form of plugins that can help you get the best out of the sitemap creation. Some of the excellent plugins that can assist you in adding and submitting a sitemap to search engines include the following:
Yoast SEO plugin,
All in One SEO Pack,
XML Sitemap &
Google News Feed
They would indeed simplify the task of creating a sitemap.
A Few FAQs on Sitemaps for the WordPress Site
Well, even after understanding the differences and basic concepts involved in creating your sitemaps and submitting it to your search engines, here are a few questions that you would want to answer –
Q – Is there any need for updating the sitemap manually? A – Not necessarily. The sitemaps – whether XML and HTML are updated regularly. There is no need for updating the sitemap on a manual basis.
Q – Will Google index all the content on your sitemap?A – Sitemaps are used to make google find all the content, but that should not mean all your content will be indexed. The decision ultimately rests with Google (or for that matter, any other search engine).
Q – Is there any specific number of pages that a sitemap supports?A – A single sitemap supports only up to 50,000 pages or URLs. However, you need not worry if your site exceeds that number. You can always create multiple sitemaps and collect them through a sitemap index file.
The Concluding Thoughts
In essence, the sitemaps are designed to be one of the best options for use with the SEO improvement of your site. They do come with several advantages, most of which have already been explained in the previous paragraphs.
Make sure that you are using at least one XML sitemap and one HTML sitemap for your site. The former will serve you the best from the SEO point of view, while the later will be beneficial for the human visitors to your website would benefit from.
Of course, that should not mean your site will achieve the best search engine rankings just because you have a sitemap, but it does serve you in that quest.
We run our sites and blogs either as a hobby or to make money. Popular Ad networks such as Google AdSense is perhaps one of the most widely used options for monetizing your website. Adding your Ad codes should be an easier task and the perfect way to monetize your website or blog. However, where would you ideally want to place your ads? There are several advantages and disadvantages of using the ads on the landing page or the homepage of your site. Let us examine how to place the ads on your WordPress homepage.
Where should you place your ads on a WordPress blog?
You have been able to achieve the task of getting your Ad account approved. However, where should you actually place your ads?
Most of the times, your themes will let you choose the exact location for the ads. However, not all the suggestions put forward by the themes may not be the right options. While most of the themes let you choose the exact positions for finding the best possible options for placing your ads, some of them may not have the widget support.
Your earnings can be severely affected if you are not careful enough in choosing the right placement of the ads.
The exact locations you would want to put the ads for a practical functionality would be to place them inside your content. In fact, if you want your visitors to notice your ads and click on them, the right option would be to put them inside your articles! Of course, you should choose the right ad size and type. There are three major areas that it may be an excellent option – above the article, below the article and between the paragraphs within the post.
Why does this position work best? Because it offers you an excellent option to notice your ads and perhaps click on them. These ads do not annoy the visitors, nor do they cover the content due to which the visitor is visiting your site.
Another option is to use your ads only on your homepage and not on any other pages of your website. This, too, has been observed to be a great way to improve the possibility of your enhanced earning.
How to place your ads Only on Homepage?
There are times where you have some code, ad, or some text you would want to show on the homepage alone. You do not want to show it on any other page of your website.
How would you do it? Well, there are several ways you would be able to do it. We will discuss the two most widely used options that can help you place the ads on your homepage right away. Both the methods work skillfully, and you should be able to handle it without any issues even if you are not an expert.
Method 1 – Using a PHP Code
The first method for placing the ads on the homepage of your site involves opting for a PHP code. This code shows the ad content only on the home page and blocks it from appearing on other internal pages of your website or blog.
One of the methods is to check If Is_Font_Page. This is considered to be one of the best options to use. Just insert this code, and if the conditions are met, you can enter your ad code or whatever that you would want to add inside the page.
Insert the following code –
Another option is to go for the method that involves checking if the current page is homepage and then insert your code.
You can insert the following code and check how it works –
In both the above examples, you should note that the Your code here refers to your code or item – text, ad or anything else – that you want to add to the homepage alone and not in any other page.
What is the difference between the two options we shared above? The “front_page” and “home“ are slightly different. A front-page refers to the very first page of your site, and home refers to the page where your latest posts are shown. The ideal option should be to choose the front page irrespective of whether it is a static page or the page where your most recent posts are displayed.
Another excellent option is to use a separate sidebar specific to the homepage. You may also check out the options like home page only header or footer.
Method 2 – Using a Plugin
This should be something quite easy and straightforward. Check out the most suitable plugin that should help you arrive at the best options available. One of the best choices you would want to go with would be Whydowork Adsense or Ad Inserter.
Of course, you can go with any of the choices that best meet your needs.
Create Homepage specific Sidebar, footer or Header to place ads on the Home page
Another most suitable option to create homepage ads on your WordPress site is to use a homepage specific sidebar, header or footer. These footers and other elements will include the code, text, and ad code that you would want to show on the homepage of your site.
Here is how you would be able to do it –
Create a file that is specific to the home page. You can create sidebar-home.php, footer-home.php or header-home.php
Add what would you want to show on your homepage to these custom-built pages.
Add the newly created files to PHP of index.php files. Doing it should be quite easy and straightforward. Use the following codes –
<?php get_header( home ); ?><?php get_sidebar( home ); ?><?php get_footer( home ); ?>
This may be a method that may not be quite easy if you are not an expert yourself. However, if you can achieve the task and configure the functionality, it should be one of the best and simplest options to work with. In fact, having a separate file will help you keep your homepage ads and other things organized on your theme files.
A few Recommended practices for placing ads on your WordPress Homepage
We have covered almost all the functions and features of working with the WordPress homepage and other essential details.
Check out a few questions that should provide you with an insight into how to place ads and what to do with the ads on your Home page or elsewhere.
Q – What should be the optimum Ad Size?
A – Ad placement should be a deciding factor to make sure you are earning correctly. The ideal ad size should be 336×280 or 300×250. These have been known to have a better pay rate.
Q – What is the best placement?
A- A perfect placement of the ads will be dependent upon your site and the theme. Your site layout will also have a bearing on the exact ad placement. You should place it at a prominent place. Like we have already outlined in the above discussion, you will find that the ad placement just above the content tends to get a better pay rate.
Q – What happens if you click on your ad?
A – Never click on your own ad or ask your family members to do so. Google’s algorithms are smarter enough and can detect it when you click on your ads. This can result in your account getting banned if you are using Adsense.
Q – How are Google AdSense payments made?
A – Google does calculate the earnings for the previous month and displays them in your transactions section under your profile. Ideally, the payments are made on the 21st of every month. Google makes the payment through several modes – direct electronic transfer, wire transfer, check, and Western Union are just a few of them.
Those were just a few questions that should answer most of your concerns and questions you may have.
In Conclusion
Those were a few tips that should assist you in arriving at the right options for placing your ads on the front page of your WordPress blogs and other websites. Use the tips and methods we have outlined here and shared your thoughts about what you liked the most concerning the options described in this compilation.
More on WordPress.com
In this article, we are going to understand what are the Unlimited Hosting Plans Limitations and restrictions from the top Web Hosting companies. In this article, we are primarily going to focus on three hosting companies given below:
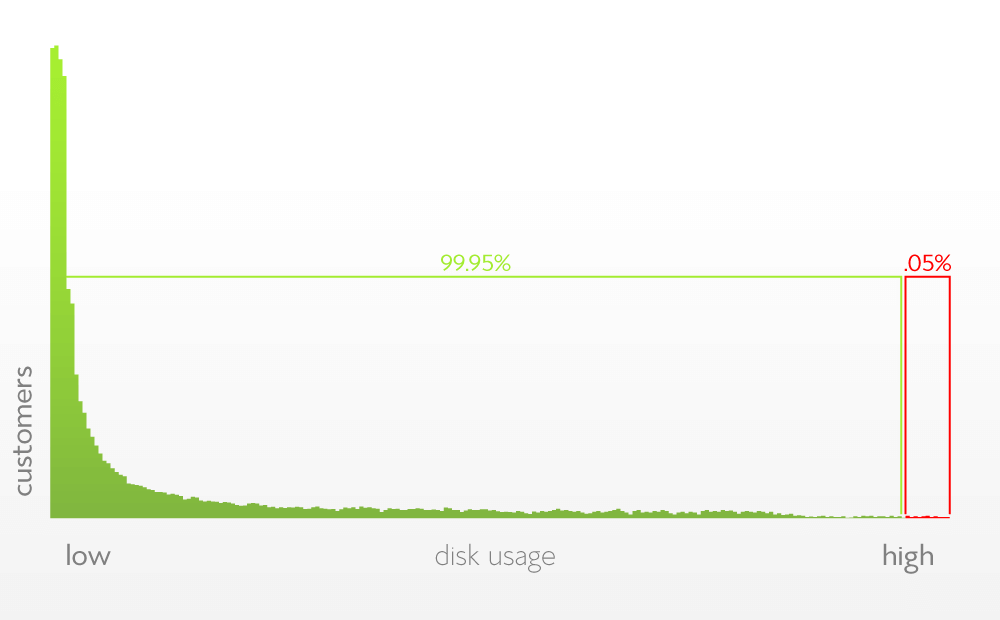
Typically, when we talk about unlimited hosting, we think about unlimited resources. However, from the hosting companies perspective, they generally speak about unmetered disk space & data transfer (bandwidth).
It means that there are no hard limits on these parameters and you will not be billed on predefined threshold values. Does this say that you have unlimited resources? Well, no! Does this mean that the offer is not good? Absolutely not! The offer should suffice 99.95% of the customers who are merely looking for an online web presence.
Unlimited Hosting Plans Limitations
So let’s talk about the 0.5% of the workloads where customers intend to hit the limits of the shared host that these hosting companies offer.
For those of you who are not aware, the company hosts 2 million websites, most of which are using WordPress. They are also one of the few hosting companies officially recommended by WordPress.Org. Most of their support personnel are in-house and provide 24/7 online and phone assistance.
Now, let’s look at a snapshot of their unlimited plans below:
Source: Bluehost.com
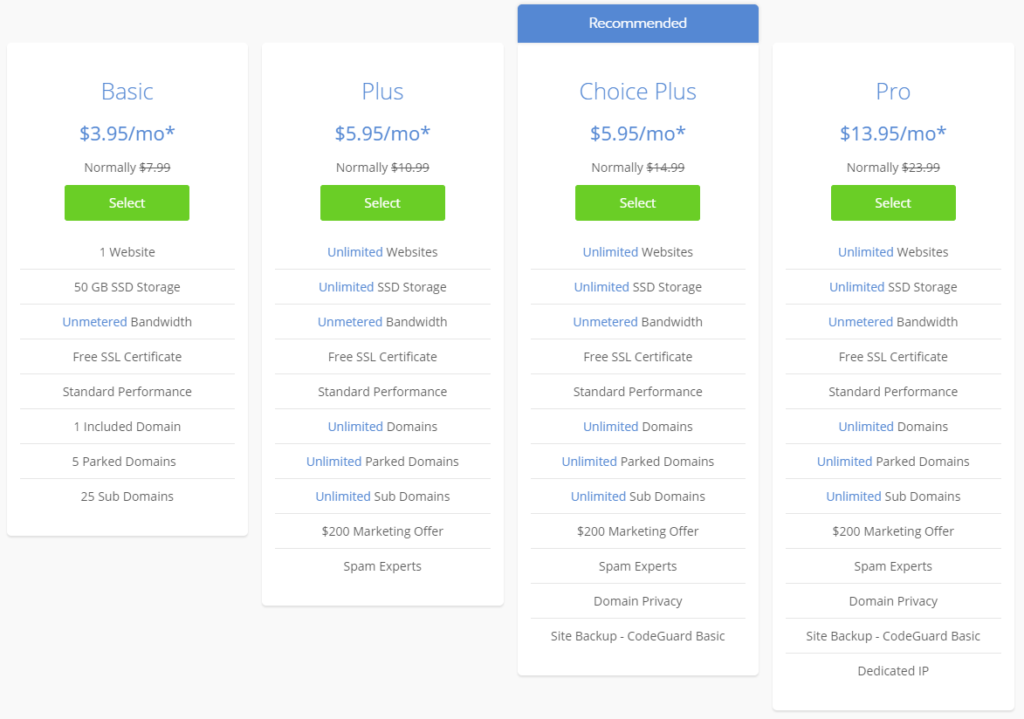
The Plus, Choice Plus, and Pro plans offer the following:
Unlimited Websites
Unlimited SSD Storage
Unlimited (Unmetered) Bandwidth
Unlimited Domains (Primary & Parked)
Unlimited Sub-Domains
However, you will need to be careful with the terms and conditions that Bluehost offer. On a high-level, the company cites the following:
Disk Space usage should be by a normal usage running a website. Any anomaly or deviations might impose restrictions on normal operations.
Bandwidth usage should be consistent with the size of the Website.
Storing large media files on your cPanel account is against the terms of usage.
However, based on our experience, we saw that you would run out of system resources and iNode usage much before you hit those upper limits.
Siteground is a smaller company compared to Bluehost. However, they host a lot of WordPress sites and specializes in a highly optimized shared hosting for maximum performance. The company also provides an in-house caching and performance plugin called “SG Optimizer” which helps you minify JS, CSS and HTML files to reduce load times.
Now, with regards to unlimited hosting, the company only provides unlimited Website hosting and unmetered bandwidth for the GrowBig and GoGeek plans.
As you can see from the screenshot, you do not get unlimited storage or Inodes. So, you are constrained to system resources and would imply restrictions if you are over-utilizing the server resources.
There are also some hard limits on CPU usage and account executions, but this should not affect your regular website operations for small to medium-sized businesses.
Typically, these websites with the correct cache settings can service hundred and thousands of hits on a given day.
We always got better performance from a GoGeek account on Siteground hosting as compared with a Bluehost shared hosting. Overall, highly recommended for shared hosting places.
Just like Bluehost, Hostgator is also owned by Endurance International Group and offer similar web hosting and with similar restrictions on their unlimited shared-hosting plans.
As you would expect, there are no hard limits on the storage, and the bandwidth is unmetered. You can also link unlimited domains (Baby & Business Plans) and are restricted to system resources such as iNode usage, account executions, CPU usage, etc.
Now, let’s identify the conditions and restrictions:
Unlimited Domains:
It means that customers are not charged for adding multiple domains to your Hostgator cPanel account. This, of course, means that you will have to own these domains before adding them to your account.
Since domain names are not free, there is a recurring charge associated with it.
Email Policy and Limits:
Each addon & subdomains get a separate 500 outgoing emails per hour with a hard limit.
There is a 30 times check limit on your POP Servers exceeding which will likely get a password error indicating that the login is incorrect. The login error will subside within an hour, and the email check will automatically unlock.
If you have more than 900 email addresses on your mailing lists, Hostgator only allows your emails to be sent during off-peak hours to prevent high server loads. For greater than 5000 email lists, you will require a VPS or a Dedicated Server.
Number of Visitors per Day
Your shared hosts support up to 7,000 – 8,000 users per day based on estimated average CPU usage over some time. In case if your traffic spikes are too high and for too long, you can exceed your resource limitations, and your account can be suspended.
So what’s unlimited about this plan? The Hostgator plan offers infinite disk space and bandwidth, and they are genuinely unmetered.
Conclusion
I hope this article helped you in understanding the Unlimited Hosting Plans Limitations in more details.
Questions or suggestions are welcome in the comment section below. Thanks for visiting!
Web hosting is one of the most critical aspects of launching your website. However, one of the most challenging tasks is choosing the best hosting option. It may not be that easy as it may appear to be. Most of us look for the unlimited bandwidth options when looking for the best hosting plans. Let us today check out the best web hosting plans with unlimited bandwidth.
What is Unlimited bandwidth web hosting?
Well, that should be quite obvious. But if you are one of those who would want to understand the concept in more detail, this can be the right option for you.
Bandwidth refers to the maximum rate that the data can be transferred over a specific period. The bandwidth is ideally measured in terms of bits per second. The data transfer takes place whenever someone visits the website and performs any of the tasks like uploading, downloading and streaming anything over the internet. Higher bandwidth will ensure that you will be able to consume more data.
An unlimited hosting comes with unlimited disk storage, unlimited data transfers and perhaps a free addon domain name registration. In essence, an unlimited web hosting plan is the one that lets you host as many websites as you would want to at an affordable fixed price.
Are the web hosting plans with Unlimited bandwidth real?
Well, an unlimited plan will offer you an excellent performance when it comes to providing you the best-unlimited functionality. However, that would not be a truth in the absolute sense of the word.
There is a massive difference between what you understand the term UNLIMITED and how a web hosting company sees it. The companies will want to have their profits in view, and an unlimited plan will not be infinite in the real sense of the word.
However, the unlimited plan should offer you a better bandwidth that should get almost all your requirements met, even when it comes with limitations (what the service providers call exceptions).
The Best Web hosting plans with Unlimited bandwidth
Here is a list of the best web hosting service providers known for their exemplary service quality. Most of the service providers we list here offer you a lot of services at an excellent price point.
Bluehost
Source: Bluehost.com
Bluehost is known to be an excellent service provider and packs in a host of features and functions. The service providers provide you access to a wide range of hosting plans ranging across multiple genres like Shared, Dedicated, Reseller, and VPS Hosting plans.
A few plans with unlimited bandwidth offered by Bluehost include
Basic Plan
The web-hosting plan lets you host one website. With a website storage space of 50 GB. You get unlimited bandwidth and standard performance with your site.
A few other salient features of the plan are
Domains include – 1
Parked domains – 5
Subdomains – 25
Email accounts – 5
Email storage per account – 100 MB
The plan comes with a subscription of $ 2.95 per month
Plus Plan
If you are hosting multiple websites, the Plus plan can be one of the prominent options for you. The proposal comes with an unlimited number of sites, infinite storage space, and bandwidth. It also offers a standard performance level.
Other aspects of the plan include
Domains included – 1
Parked domains – unlimited
Subdomains – unlimited
Email accounts – unlimited
Email storage per account – unlimited
The plan also offers special marketing features worth $ 200 included. The plan costs you $ 5.45 per month.
Choice Plus Plan
Available at the same price band as the Plus Plan, it packs in a host of other features also. You have access to the unlimited number of websites, unlimited web storage, and bandwidth. It also offers you a standard performance.
Some other features include
Domains included – 1
Parked domains – unlimited
Subdomains – unlimited
Email accounts – unlimited
Email storage per account – unlimited
Other options that the plan comes with include $ 200 marketing offers and over $ 80 per year in extra benefits. The additional benefits include SpamExperts, Domain Privacy, and CodeGuard Basic.
HostGator
Source: Hostgator
One of the features that makes HostGator an exceptional choice in terms of web hosting is the trustworthy support system in place that works 24 x 7 x 365. The 45-day money back guarantee and 99.9 percent uptime are the two features that make it a great choice. Each of their plans come with unlimited storage and bandwidth.
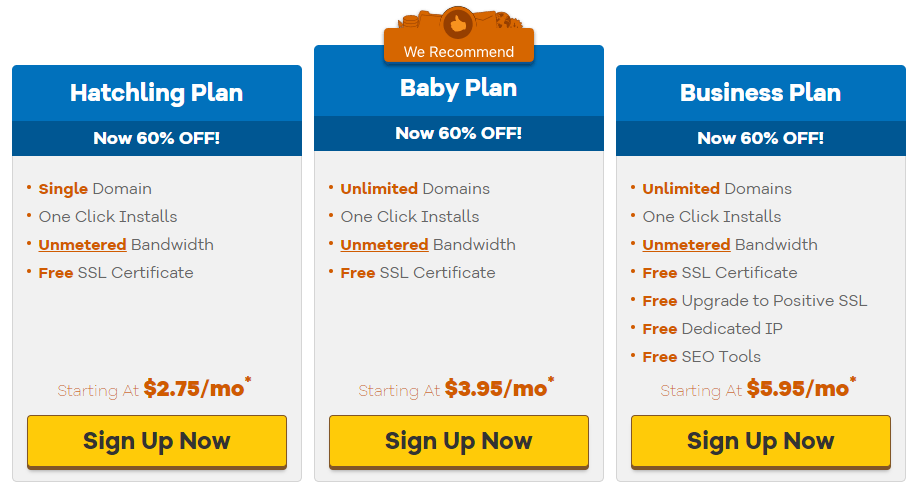
Hatchling Plan
The plan offers you excellent functionality and features. The plan comes with the option for a single domain. The unlimited bandwidth and free SSL certificate should be the other two options that make is a formidable choice.
Some of the features offered by the plan are
Unlimited bandwidth
Unlimited storage
An unlimited number of email accounts.
Free cPanel and PHP 7.1
The plan is available for $ 2.75 per month.
Baby Plan
The plan lets you work with three domains and unlimited bandwidth. Rest of the features are similar to those on the Hatchling plan. The plan charges are $ 3.95 per month.
Business Plan
The plan should be one of the best and affordable ones if you are looking to host multiple websites. It offers you access to multiple domains and unlimited bandwidth.
A few features of the plan are
Source: Siteground
SiteGround is one of the most favored web hosting service that the newbie website owners prefer. The fact that WordPress recommends it as the top hosting service in itself should be indicative of the functionality and features that it offers you. It has been one of the most innovative hosting services you can go with and has been a pioneer in providing custom software solutions.
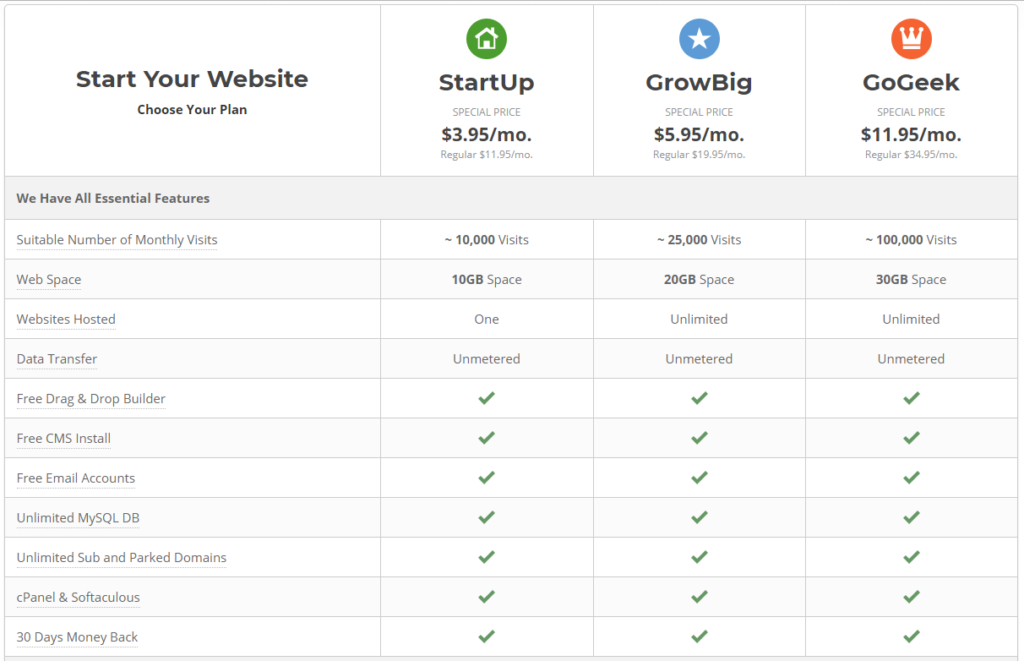
Startup Plan
It should be one of the best plans for making a great start in terms of an excellent web start. The service comes with access to one website and 10 GB of website storage space.
Some of the best features that the plan comes with include
Free website builder support
Unlimited bandwidth
A 24 x 7 support channels.
Free SSL and HTTPS
Free email accounts
30-day money back guarantee
The plan is offered at $ 3.95 per month
GrowBig Plan
If you are looking to grow your websites, then the plan, as the name itself is indicative should hold a key for your intentions. The plan offers you access to multiple sites and unlimited bandwidth.
A few features worth the mentioning can be summed up as
Unlimited websites
20 GB web space.
All the features available on the StartUp plan are available on this plan as well including support channels, 30-day money back guarantees, free SSL and HTTP and other features.
Other extra features include free site transfers, free backup and restore options, Supercacher for enhanced site performance and priority technical support.
The plan comes with a price point of $ 5.95 per month.
GoGeek Plan
Specifically tailored for the advanced users over the web hosting, the plan comes with exceptional features. The plan offers you all the features included in the two basic plans already discussed. Also, it also provides you additional geeky features as well.
Some of the best options offered by the plan include
Unlimited websites
30 GB web space
Access to all the essential features available on the StartUp plan.
Access to the premium features available on the GrowBig plan.
Additional geeky features that include PCI compliant servers, free backup on demand and WordPress/ Joomla staging.
The plan will come with a price bracket of $ 11.95 per month.
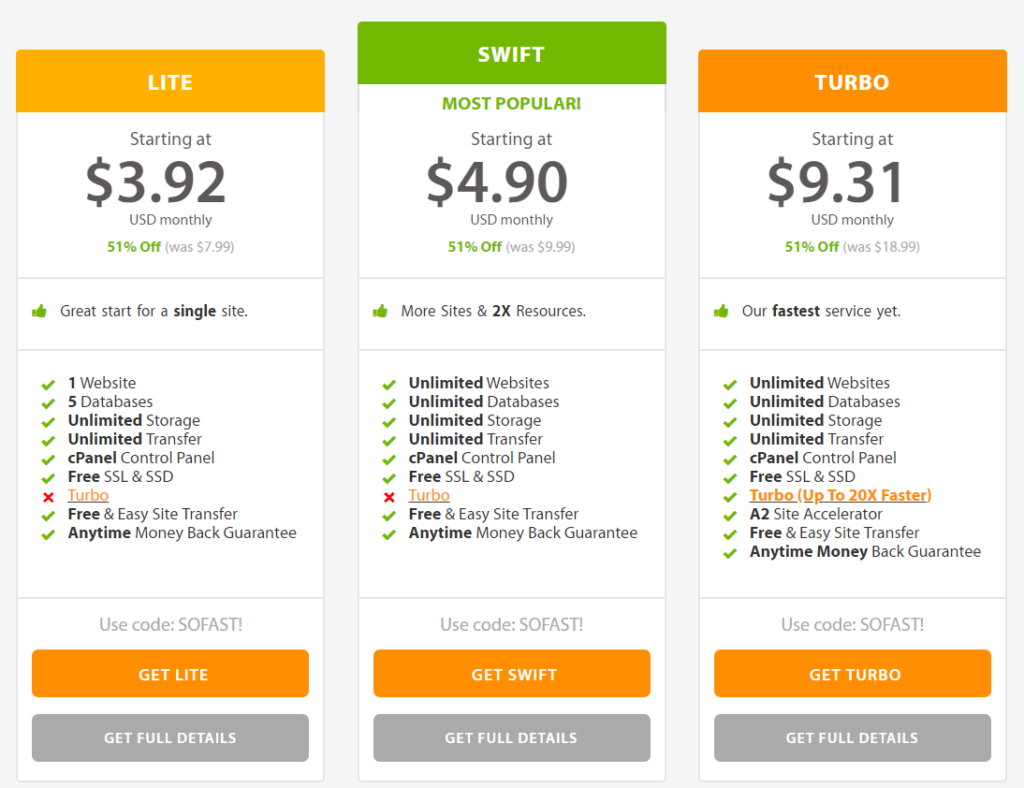
A2Hosting is one of the excellent options for speed, performance, high-end support, and security functionality. The A2Hosting can be an attractive option for those requirements. Moreover, it offers you outstanding affordable pricing compared to most of the other hosting services.
This is one of the best options to get started with. If you are launching with one website, opt for the plan right away. Available at under $ 4 for access to the best options, it should be the best options to start a career with.
A few plans offered by the plan include
This is one of the most popular plans available from A2Hosting. It offers you some websites and dual resources. Some of the advantages that the service provides you can be summed up as
Unlimited sites
Unlimited storage space
Unlimited bandwidth
Unlimited databases
Rest of the features remain similar to those on the Lite Plan. The plan charges are $ 4.90 per month.
This is one of the fastest web hosting plans you can go with. The plan, of course, comes with most of the features that the rest of the plans offer you. Some of the functions provided by the plan include
Unlimited Websites
Unlimited Databases
Unlimited Storage
Unlimited Transfer
cPanel Control Panel
Free SSL & SSD
Turbo (Up To 20X Faster)
Other features are common to the Lite and Swift plans. The plan charges are $ 9.31 per month.
The Concluding Thoughts
The unlimited hosting plans are the best options if you do not want to face the issues concerning the increased traffic heavy surfing. If you are looking for the best risk management functionality on your website, nothing can beat the choice of the best unlimited hosting plans.
We assume the choice of plans we have outlined in the above compilation should help you choose the best options for plans off your choice. If you have used or using any of those plans, do share your thoughts and inputs with us through the comments here below.
Hosting a website is not exactly an easy task. There are several aspects and factors that you need to take care of when you host a website. One of the issues you may face is that your site may or may not work and go inaccessible when you or your visitors try visiting your site. We found one of the issues that your visitors may complain about is they are not able to access your site with www. How would we able to sort out the problem? Let us check out the options in this post.
What causes the issue Unable to access Website with WWW?
There can be several causes that can cause this issue. One of the most common reasons that can bring up this issue can be the fact that your website may not have a proper or correct corresponding CNAME. Another aspect can be the site’s DNS settings may have a wrong CNAME record.
However, it may not be easy to pinpoint the exact reason for the issue. While the DNS may be the primary culprit, there can be a few other reasons as well. However, analyzing the exact causes need to be on a case to case basis.
How to Fix Update to access the website with WWW?
Now that we have assumed that the DNS settings are the culprit for the issue, it may be a good idea to narrow down your troubleshooting to this particular arena. The easiest option to sort out the problem should be to go to your DNS setting s and add a CNAME for your site. This should solve your problem by every standard.
One of the other solutions can be to use the Hosts file to check if it is the DNS issue. Launch the Hosts file and add both the names with or without to the “Hosts file.” Ping them to check what results do you get. If it works fine, you can navigate to the browser and check if it works fine.
A few other options will include the following options –
Use www subdomain
Most of the website hosting services offer you the selections to use the www subdomain or not use it. However, a wiser approach should be to use an option to leave it off altogether. This option will accept the site with both www and without it.
Here are the steps involved in sorting out the issue –
Visit the page for managing your domains. This will be dependent upon the website hosting service you have opted for.
Find the option for editing the domain settings.
You should find the option for managing your domain.
You would get three options here –
Leave it Alone – both the versions with or without www will work
Add WWW – site without www will redirect to the one with www
Remove WWW – site with www will redirect to the one without www.
Save these settings, and you are good to go. The exact descriptions may differ from one hosting service to another. However, the functionality should remain almost similar.
Using the .htaccess file to address the issue
One of the alternative options is to use the .htaccess file and edit to introduce the functionality of using www while accessing your website. The CPanel is one of the best choices you can use for the purpose, but if you are not comfortable or do not want to use the option for solving the issue – you can use the opportunity for editing .htaccess file.
If you want to remove the www from the site or the site requests, use the following code to your .htaccess file.
This is called adding the mod_rewrite rule to your .htaccess file.
You can also force www subdomain inside the .htaccess file. Follow the same example as above to include the following code to your .htaccess file. This is referred to as removing the link to mod_rewrite.
Add the following code to your .htaccess file.
Whenever someone uses the address without www, this code redirects them to the site with www.
Please note that removing www can have severe issues with WordPress. WordPress expects the URL to either have it force www or remove www without any conflicts. In case the database is forcing www, and your cPanel does force for its removal, you may face the redirect loop issues.
Make sure that there is no such conflict between the hosting panel and your WordPress configuration.
Several reasons may affect your functionality. Under standard conditions, the solutions we have outlined above should sort out most of the issues you may come across. Ideally, the web hosting services and DNS settings within the service handle this effectively. In case of any problems, you may find the resolutions outlined above should sort out the issue in most cases.
The Concluding Thoughts
That was all we have for the issues you may be having concerning the inability to access your site with www. Under ideal circumstances, you should be able to address it with the help of cPanel or your domain hosting services. The primary culprit that can affect you for the said error is the DNS settings and treating it should not be much difficult. Consulting your hosting service provider – in case you are not proficient enough can help you address the issue.
Have you come across the issue concerning your site? What are the fixes you applied and which among them worked for you? Share your thoughts, inputs, and experiences with us. This can go a long way in promoting the horizon of our knowledge concerning the issues.
Have you been an administrator on any of those Facebook group? It may so happen at times that you have been not active in a group or a business or a page – but remain an admin on the page. This happens with most of us. There can be several reasons for it. So are you looking for the options to remove yourself as an administrator for a business that you no longer manage on Facebook? Let us guide you through a step by step procedure for the same.
Why do You need to remove yourself as an admin from a page?
If you are into the digital marketing arena or handling community management – you may have come across these situations in your day to day work life. You may find yourself as an admin of a business or a page that you no longer manage or are responsible for.
This can happen due to several reasons. Maybe you had been associated with the businesses long ago as part of your activities or services you provide. The contract may have expired, but the client may not have removed you as yet. This can continue to send you notifications as Facebook still thinks you are an admin and thus these obnoxious notifications can get annoying.
More than that, you may not be active on the site or page or business anymore, but in case something unsavory happens – you will remain one of those liable for the fiasco. That is precisely why it would be practical enough to get your name removed as an admin from the page or business.
How to remove yourself as an administrator for the page or business?
There are easy options to remove yourself as an admin from a Facebook page. However, the instructions may differ slightly depending upon whether you want to remove yourself as an administrator from the desktop application or the mobile app. Of course, the result will anyways be similar. Let us check out both the options one by one.
Remove yourself as an admin of a Facebook page
The task can quickly be completed within four steps. Here are the steps involved in the exact solution to your issues and resolution thereof.
Go to the page that you want to remove yourself as the administrator on Facebook.
Click on Settings option at the top right.
Now on your left, click on the option Page Roles.
Locate the admin area and find your name under the admins. Please note that if you are listed as the only administrator, you will not be able to remove yourself as an admin. You will need to add a new admin and then can remove yourself as an admin.
Next, you will need to confirm the removal when prompted. Under ideal circumstances, you should receive a confirmation message on your email asking you to confirm if you wanted to remove as an admin.
If you are the sole administrator, you cannot be removed as every page needs to have an account associated with it. You can ask someone from the organization and ask them whether you can add them as an admin. Once that done, you can remove yourself as an administrator from the page or group or business as the case may be.
That is precisely how you can easily remove yourself as an administrator from the page. But, what if you are on the mobile app and have no access to the desktop application? Well, it should not be difficult in any way to remove yourself as an administrator on the Facebook page or business.
Remove yourself as an admin of a Facebook page Using the Mobile App
Most of us do not use the Facebook desktop application in many cases. If you have do not have access to your desktop application and looking for the ways to remove yourself as an administrator from a business or page from the mobile app, you do not need to worry. There is a way you can achieve it quickly.
Here are the steps involved in removing yourself as an administrator from a business you no longer manage. It should be quite smooth enough.
Launch your Facebook app and log in to your account.
Find the page you want to remove your administration rights.
Choose the program from which you want to be removed as an administrator.
Open the Page settings for the page.
Choose the option for Page Menu
Now choose Edit Settings
On the page Settings, accept Page Roles.
You should now find your profile under the page roles.
Click on the Edit icon and choose to Remove on the next screen.
That does it. You have successfully been removed from the page as an administrator. Once again, please note that if you are the sole administrator on the page, you will not be able to remove yourself from the administrator role. Ask someone from the organization if you can add them as the admin on the page. Once that done, you can remove yourself as an admin.
One of the best options would be to obliterate the page. However, this can only be possible if the page is no longer in use or the purpose for creating the page has already been fulfilled and the page is no longer valid.
The Concluding Thoughts
Well, that was how you could remove yourself as an administrator on a page that you are no more responsible for. This will be helpful in getting those notifications about the group or page activities that you may not be interested in. It should be a good idea to remove yourself as an administrator if you are no longer active on the page or the business concerned. This will also relieve you of the unneeded responsibility in business or the unsavory issues if any concerning the company that you are no longer managing.
Are you aware of any other options that can help you remove yourself as an administrator from a business or page that you no longer manage? Share your ideas with us.
Want to know what is ‘WP_DEBUG’ in WordPress? In this article, we will try to explain this in more detail.
WordPress has been one of the most widely used Content Management System widely used by the website owners and blog owners globally. Any good CMS for that matter needs to have its options for debugging the glitches or issues. In fact, WordPress makes it great practice for developers to use the WP_Debug whenever you are installing a theme or plugin. What exactly is WP_Debug and how should you be using it? We will uncover it and find the salient features that the debugging tool offers you.
What is WordPress WP_Debug?
WordPress has a Debug Mode. The specific debug system has been designed for simplifying the process of debugging and standardizing the code across the core WordPress files, themes, and plugins.
WP_Debug is a PHP constant used by WordPress that triggers the Debug mode on WordPress. The option is set to false by default, and it can be configured to True through the config file through the development copies of WordPress. You can configure it through the wp-config.php file through the following codes –
Please note that you should not use the WP_Debug or for that matter any of the debug tools on your live site. You are advised to use them only in a staging environment and for local testing of your site alone.
While WordPress suggests using the tool for a useful debugging of your system, but most of the developers out there seem to be paying no heed. There can be a few reasons for this to happen. They either tend to forget the need for the debugging tools or do not know how to use them.
Let us check out how to use WP_Debug for enhanced performance.
Debugging with WP_Debug
Like we have already outlined, WP_Debug is an important and essential debugging tool on WordPress. The tool is a Boolean constant and is used to trigger the debug mode throughout the WordPress installation. You should be able to locate it inside your wp-config.php in the WordPress install.
When you configure it to TRUE, you will find yourself receiving notifications and alerts. They need not be errors alone but can contain useful information for the developers. It also lets you receive the WordPress debugging messages and logs.
The logs also contain information about the deprecated functions. The deprecated functions are those functions that have been configured to expire at a particular date. If you are using a deprecated feature, the debugging log will provide you an idea into finding a replacement for such a role.
The WP_Debug should be an excellent option for troubleshooting any of the issues you may be facing on your site. This can be quite helpful in identifying and addressing any of the problems that you may be having on your WordPress site.
As we have already warned above, avoid using the WP_Debug on a live site. The option is designed for use for the development purposes alone. However, if you use it on a live site, it can pose serious security concerns for your website. It will give away the information about the code, path, and other relevant data to your visitors.
The Allied functions on the WP_Debug Tool
There are a few other allied functions you would be able to use with your WordPress site and the WP_Debug option. Let us check out a couple of these settings so that you can use the tool more efficiently.
Log Errors with WP_Debug
The WP_Debug tool also comes with the option to log the errors so that you can check them out and apply fixes as may be necessary. The tool can be used to log all your error messages in a single file so that you can check them out at your leisure and analyze the possible fixes.
The tool can be used in conjunction with the WP_Debug tool. Like WP_Debug, you will be able to configure it on the wp-config file. Check for the following file and set it to True. If you do not find the code, add it to the file.
define('WP_DEBUG_LOG', true);
The error notices are logged to the debug.log file. This can be an excellent feature for those who would want to review thee notices later or if you’re going to refer them to an expert for analysis.
How to access the debug.log file? The log should ideally be available under the /wp-content/ directory on your site. You should be able to access the file through FTP, SSH or your file manager from the cPanel. If any errors have been notified, you should see the debug.log file. You can either choose to view them or download them if you are trying to send them to an expert.
Display Errors or block them on your site
Of course, you do not want the error logs to be published to your site. For this, you can use the option WP_DEBUG_DISPLAY. One of the best constants, it can be used to prevent or allow the error messages to be added to the site pages in HTML.
The constant should be used along with WP_DEBUG_LOG. Once again, you will need to head on to your wp_config file and configure the code. If it is not already present, you can go ahead and add it. By setting it to True, it will display the errors on the site pages, while if you set it to false, no messages will be displayed.
Here is how you can do it –
define('WP_DEBUG_DISPLAY', false);
The Concluding Thoughts
Those were the insights into the WP_DEBUG and the allied features you can use for the enhanced performance of your WordPress site. Now that we have explained in detail how you can make use of the tools and improve your error detection to a greater effect, we assume nothing should stop you from being able to make use of the features.
If you have any other ideas that surround the concept of debugging in WordPress and want to share those ideas with us, feel free to do so through the comments here below.
If you are into blogging and using a shared server, you may have noticed that you are running out of your inodes limit rather quickly than you would like. Apart from your files, the WordPress themes or plugins can add up their additional data thus crossing the inodes limit can get a huge issue. How would you be able to reduce inodes usage for WordPress? Let us learn what exactly inodes are and how can you effectively reduce the inodes usage.
What is an inode?
An inode is a data structure generally used to represent a file system object. It can have multiple forms of composition, ideal among them being a file or a directory. Each of the files has their inode. They can have different names than the actual file that they belong to.
The number of inodes on your site will be equal to the number of files and directories that you have under your hosting account. To ensure that the optimal performance is guaranteed for the customers on the shared server, the hosting service providers restrict the total number of inodes each hosting plan use. Ideally, the restriction will range between 200000 to 250000 inodes per hosting plan. The exact standards will be dependent upon the hosting service you have opted for.
Where would you be able to find your inodes?
This would be something dependent upon the service provider you have opted for and their cPanel. The details should be available under the File Usage option under your cPanel. The exact location of the file usage statistic under your cPanel may be utterly dependent upon the hosting service provider you have opted for.
Most of the service providers have the option under the Statistics option. Locate Disc Space under Statistics option and find the setting for file usage. The file usage statistics available in this setting will indicate your inode usage. You can get the permitted inode usage from your service provider.
What causes more inode usage?
Well, it depends upon the files you have on your website or blog. If you have been using too many images on your site or opting for shared server, you are likely to end up hitting the limit of the inodes.
Several other reasons can cause the issue as well. The WordPress itself or the theme you have been using can create the problem as well. Some themes tend to save a thumbnail of their own for every image you keep to the site. This is done for the sake of ensuring responsiveness of the site but can have serious repercussions.
How to reduce the High inode Usage on your site?
There are several options you can employ if you want to reduce your inode usage. Please note that inode usage need not necessarily be as a result of the abuse of the file usage limits. Several genuine reasons can cause huge inode usage.
Depending on what is causing the issue, you can employ a few essential methods for controlling the over the use of inodes so that you will not cross the limits on your inode usage.
1. Reduce the use of thumbnails on your site
Thumbnails are one of the primary reasons that can cause considerable inode usage. Check your theme has any funky designs that indeed do not add any value to your site except unusual look.
If your theme has an option to disable the thumbnail creation, you can choose to activate it. WordPress 4.4 and later have a 728x thumbnail for every image you upload. In such cases, you will not need your theme to have its thumbnail. If you can not find an option to disable thumbnails on your theme, contact your theme developer.
2. Disable the Thumbnail creation on WordPress
WordPress generates typically three kinds of thumbnails. You can disable the settings under WordPress settings. If you are not using the thumbnails in your posts and are not using the gallery option quite often, it may be advisable to turn the setting off.
The setting will be available under Settings -> Media. If you do not want to set it off completely, you can consider setting the thumbnail size to default size at 150 x 150.
3. Remove Old and Unused Thumbnails
If you have already reached the inodes usage limit, it may be an excellent option to remove your unused thumbnails. That way, you will be able to free up the resources and ease your inode usage. Of course, it may not be an easy option to do it as a lot of manual work is involved in it.
Yes, checking each of the thumbnails and ensuring that they will not affect your site in any manner. However, we assume some plugins can get the work done. Using SSH terminal can leave the links and references intact. Using a plugin can sort out the issue in a better manner.
4. Clear Cache Files
WordPress or for that matter, any Content Management System uses the cache system for a responsive system. WordPress, for instance, creates huge cache files which can increase your inode usage to a considerable extent.
WordPress provides an option to clear cache. You can even clear cache on a per post basis. If your settings permit it, you can also configure your WordPress configuration to clear cache automatically after a predefined interval.
The Parting Thoughts
If you are still facing the issues of hitting the inode usage limits, you can opt for a higher plan. Another option is to go with the Virtual Private Server. The above steps should help you address the concern of hitting the inode limits to a greater extent. You can even opt for other options like archiving old emails, deleting old backups and useless files can be helpful to a greater degree.
Which options have you gone through among the ones we featured above? If you are aware of any alternatives that can help you address the concern of reducing inodes usages, do share your thoughts with us.
If you are a blogger, you know web hosting is what you would need if you want to make your blog go live. That is precisely where the question of choosing the right kind of hosting comes to the fore. No, we are not talking about the hosting provider, but the type of hosting you would need to check out. There are several hosting types available, and you need to choose the right option depending upon your exact requirements. In that context, we thought of bringing up the definite differences between shared web hosting and cloud hosting. How do they differ from each other and which one should you go with? Let us cover those subtle differences in more exquisite detail.
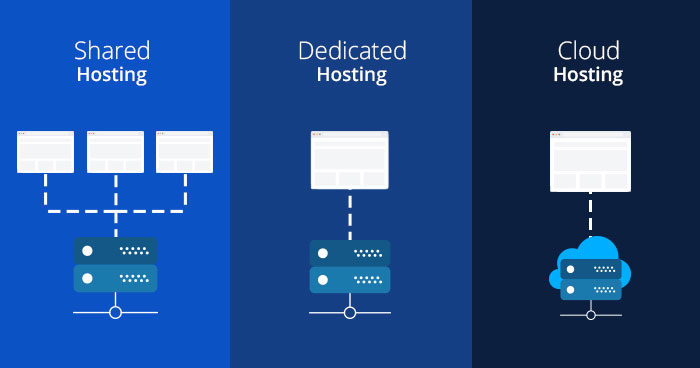
What is Shared Hosting?
Image: Hostgator
Well, the name itself should be indicative of it. It is the kind of web hosting where the resources on one server are shared between multiple websites and users. This shared nature of the hosting would make it one of the cheapest options for your hosting requirements.
Almost all web hosting service providers provide shared web hosting. One of the most widely used hosting services, it would have a single host server which shares resources dynamically amongst different tenants (users). Each of these websites on the server will get shared amount of bandwidth. One account will share multiple sites – at times it will take around thousands of sites on a single server.
You can use services like https://viewdns.info to see who else is hosted on your shared server. Now, here are some disadvantages to using a shared host:
Noisy Neighbour: If any of the other hosted sites is highly active, it might affect the performance of your website. Yes, all of the shared tenants have finite resources (inodes), but it could be a factor to consider.
Shared IP: Yes! you can opt for a shared host with a dedicated IP. But, in most cases, webmasters seldom go for it. Now, if any tenant on the same host is accused of SPAM, you might be affected as well.
Performance: Since resources are allocated dynamically, your host might not be able to keep up with sudden spikes of traffic, thereby affecting user experience.
What is Cloud Hosting?
Source: Cloudways
Cloud hosting is what can be defined as the stark opposite of shared hosting, while shared hosting is about hosting multiple sites on a single server, while cloud hosting is about the hosting your single site on various chunks of servers and resources like BLOB storage.
This can be one of the best options, and it lets you migrate your site to another server when there is an issue with one of the host servers. The hosting technology is based on cloud computing technology and offers a guaranteed SLA & uptime with the presence of a multitude of servers.
Cloud Hosting vs Shared Hosting – A One to One Comparison
Now that we are aware of what are cloud hosting and shared hosting and how they work, it would be much easy to understand the differences between them. We will compare the two hosting services based on a few key parameters.
The Uptime
Shared hosting services tend to provide you with an uptime of over 99.99 percent. However, achieving this uptime in practice may be quite tricky. The issues arise because of the shared nature of the hosting. If one of the sites hosted on a particular server experiences a spike in traffic, all the other sites on the server will face downtime or slower performance issues.
Cloud hosting can live up to the expectations of the core. It has the best uptime performance when compared to the shared hosting. The uptime performance is indeed quite excellent. Even when there are downtimes on one of the servers, you will end up migrating your site to another server almost automatically.
Security
Shared hosting offers protection based on databases and applications. This will make it more susceptible to security attacks. Since the hackers only need to access one server, it would be easy to hack into all the sites on it. In essence, security threats are much more prevalent on shared hosting.
Cloud hosting, on the other hand, offers excellent control over security issues. Hosting services opt for encrypted algorithms for enhanced security functionality. Since cloud hosting provides dedicated servers, the users tend to have complete control over security measures.
Support Channels
Again, cloud hosting offers you an incredible upper hand in comparison. You have access to everything unlimited. Whether storage, bandwidth, and database. Shared hosting does not come with this freedom. The resources are shared. And yes, even when the hosting service providers claim that they offer unlimited resources, you may not be able to use them genuinely unlimited.
Pricing
This is an area that is reserved for shared hosting. The sheer nature of shared resources makes it one of the best options for an affordable hosting. When the resources are shared, the cost will get distributed across multiple users. In fact, paying for more extended periods can even help you save more.
Cloud service can be a little expensive. But that is what you should pay for the exemplary service that cloud services would offer you. However, the cost would be dependent upon the way you build your infrastructure. If you are not using a particular app or service, you need not pay for it.
Speed
In shared hosting, the servers share several websites between them. This would ideally make all the servers running to its full capacity. And even if one of the websites gets unusually higher traffic, you will end up experiencing slower speed on all other sites. This can also result in considerably worst load times.
Cloud hosting negates this possibility. If you are using cloud hosting, you will get all the resources to yourself. Even when there is any hardware issue affecting your server, you will never end up with a non-working website. Your site is automatically migrated to another server, and you are up and ready. Ideally, you will never face any outage or slow speed instances.
Performance
The resources are shared on shared hosting, and this is bound to restrict the performance of individual sites to some extent. There can be frequent downtimes or outages. Of course, web hosting service providers take measures to control the issues you may face, but still, the sheer nature of the shared resources may not be able to provide you with optimum results.
Cloud hosting promises you an extremely fast, customizable solution for all your needs. The site will never go slow even in cases of high traffic. If you have a website that experiences more massive traffic, it should be the best option to go with cloud hosting alternative. It has a lot of resources offered to its users, and this is precisely what would help them live up to the expectations.
Is Cloud Hosting Better?
Of course, we would treat Cloud Hosting to be one of the excellent options for your needs in hosting. Of course, it may have a few cons that may go against it. But overall, cloud hosting is one of the best options you would go with.
A good option will be to make a beginning with the shared hosting if you are just starting off. Once your site begins getting traffic, it would be advisable to check your options to migrate to cloud hosting for better performance. There are a host of applications that are dependent upon cloud and service providers offering better pricing packages; we would consider that the future belongs to the cloud.
In essence, if you want to stay true to the future and stay tech savvy in the years to come, cloud hosting should be the ultimate goal by any standard.
A Few Good Cloud Hosting Services
Now that we have voted in favor of cloud hosting services, we thought that it would be apt to introduce you to a few top clouds hosting services for an insightful choice into the best facilities in hosting your sites on the cloud.
Offering scalable and reliable hosting services on the cloud, HostGator indeed provides you a few great plans. What makes it one of the prime choices is the fact that it provides you with the kind of services that are easy to work with in tune with the shared hosting services.
The user-friendly tools from HostGator make cloud hosting simpler for most non-technical users. Moreover, there are a few attractive pricing options that make it budget friendly to make a move to the cloud hosting bandwagon. Scalability is one of the excellent features that HostGator offers you. If you think your site is facing issues, you can up the ladder to use up to 8 cores and up to 8 GB of RAM without hassles. An extensive range of plans should be another excellent option for you.
If you are looking for a middle approach for the best cloud experience, Cloudways should be your prime option. While there are several entry-level options in the form of 1&1 and high-end options like Amazon, Cloudways should be your excellent option to choose between the two options.
You get a managed cloud hosting, unlike the full-fledged cloud hosting. You can make a choice between the popular cloud services among Amazon. Vultr, Google, Linode or Digital Ocean. You can configure them using the simple to use web portal. The service provides some of the excellent services and features including cloning, backup and restores, integrated Git and team collaboration tools. High-end performance at lower cost and more straightforward usability should make it one of the excellent services in its genre.
The Concluding Thoughts
Well, that is all we have concerning the comparison between cloud hosting and shared hosting. We assume that we have been able to address the queries you may have had. The exact choice of the hosting service that you would opt for should be dependent upon the requirements you may have.
We would recommend opting for shared hosting during the initial days of your starting and can migrate to cloud hosting later on. Make a learned choice, and we assume the discussion above should help you opt for your decision.
The Cloud infrastructure has been one of the prime important markets today. Explicitly “Managed Hosting” through the cloud has been taking over the other traditional hosting options you may have given a thought to previously. Though a little expensive, it has been able to capture a good percentage of the SME market. Two of the best cloud hosting services that have made a name for themselves in recent times include Cloudways vs RunCloud. How do these two services compare against one another? We will check out both of them and compare them for a good understanding of the two competing platforms.
Well, Cloudways is an excellent platform because it provides you with a host of caching options including VarnishCache and Memcached. Moreover, you can also choose multiple HTTP servers like Apache, NGINX and a host of other options.
Depending on the service that you choose, what makes it one of the excellent options in comparison to other products would be the fact that you get a 99.99 percent of uptime. And yes, we forgot to mention – you can make use of multiple hosting platforms for deploying your sites. Some of the services that Cloudways supports include Vultr, Google cloud engine, DigitalOcean, AWS, and KYUP containers.
Cloudways comes with over 25 server locations across the globe. You can change your site with just one click of a button. This will ensure that you will end up getting a better conversion & site availability rate.
Some of the features include the following:
Auto Scalability – This is one of the excellent features that would make it an attractive option. The automatic scalability ensures that your site continues to work without issues in spite of the spike in traffic. You will get practically zero downtime.
Free SSL certificate – You do not need to pay any money to get SSL certification with Cloudways. You can get a one-click deployment of SSL certification. You have a complete guide to deploying full SSL certification.
Cloning – You can replicate your entire website with just one single click. You should be able to create multiple copies of your site in just under a few seconds.
RunCloud would make it much easy to set up your web application. The application comes with its script installer that helps you in one click installation of most of the popular apps like WordPress, Joomla etc. Just like Cloudways, it supports a host of options like Dedicated servers, Digital Ocean, Linode, AWS, Vultr, Amazon Lightsail, and other KVM based VPS services.
It offers you a slightly more straightforward and seamless way to configure your websites. Server configuration is completed within a few minutes and saves your time so that you can focus on the development of your web application rather than wasting time on server configuration. With its best-optimized steps for server configuration, it should be one of the fastest, secure and straightforward app for end users to use.
Some of the features that RunCloud offers would include
Faster server deployment – It offers you a rather painless mode of server deployment. This would save you considerable time.
Install PHHP application through simple clicks – RunCloud offers you an easy to use option for installing the PHP applications within a few clicks. It supports a wide range of applications including WordPress, Drupal, and phpMyAdmin among others.
Instant Notifications – You can get instant notifications about the whereabouts of your server. You get notifications through Slack and telegram about what your server is doing. This will help you monitor your servers 24 x7.
Free SSL/TSL certificates – This is an area that RunCloud is at par with Cloudways. You do not need to spend any money on getting your SSL/TSL certification. The service has tied up with lets Encrypt for the SSL certifications.
Git Repository Support – RunCloud supports Git repository. This can be quite helpful in opting for an automated web application deployment on RunCloud.
Both RunCloud and Cloudways offer you almost similar functionalities. They can indeed be used interchangeably for most of the web deployment purposes. However, comparing them based on a few key features should yield the following inferences.
Ease of Use – This is an area that Cloudways indeed stays ahead of RunCloud. In case if you are someone who is not tech savvy, opting for Command Line Interface (CLI) can be a quite harrowing experience for you. Though RunCloud offers you easier implementation, from the simplicity point of view, we would consider Cloudways slightly better placed.
Developer friendliness – Well, though we would consider Cloudways, a better option for the newbies, if you are a developer, we would advise you opt for RunCloud. It offers you a cleaner UI and a more accessible interface for the developers.
Performance – Yet again, RunCloud should be a great option from the technical point of view. It supports both Apache – NGINX hybrid mode and NGINX only mode. Experts in the realm of cloud hosting and web development would be aware that Apache NGINX hybrid stack is quite outdated and not many of the developers opt for it. Cloudways offers hybrid mode alone.
The Pricing – Price is yet another aspect that RunCloud would take the upper hand. Cloudways can be a costlier option if you are choosing the plans above $ 12 per month plans.
What would We recommend?
Well, the choice should be dependent upon your requirements – as always. Analyze what you are looking for in your hosting application and make an educated decision based on your preferences.
Cloudways should be your prime choice if you are not enough tech savvy. If you are looking to move ahead to cloud hosting from shared hosting, and unable to work from the command line interface – Cloudways should be the best you should go with.
On the other hand, RunCloud should be your best choice if you are a developer and have a sound knowledge of advanced technical aspects of site development. If you are managing multiple servers and do not look ahead for a high degree of support, RunCloud can indeed live up to your expectations. Pure NGINX implementation should help you get the best out of your server management.
The Parting Thoughts
We assume we have covered enough information concerning the differences between Cloudways and RunCloud. Go through the tips and features that each of these two services offer you and make a wiser decision about your preferred deployment solution. Don’t forget sharing your thoughts with us.

 Enter the following details inappropriate places –
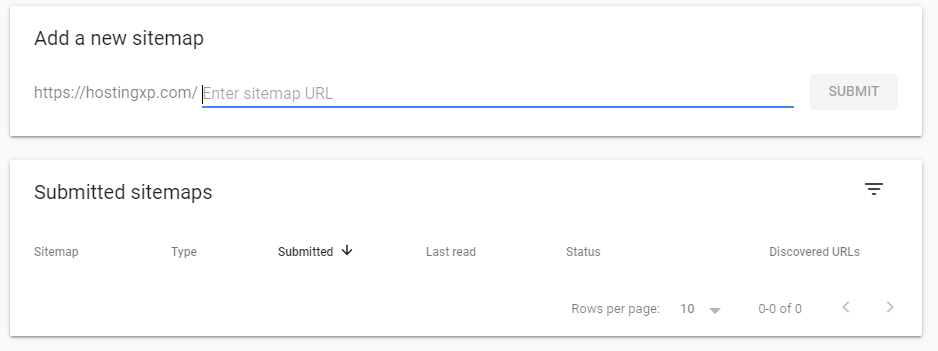 Once on the page, click on the option Add/test sitemap. You should find the option at the top right corner. Now add the location for your sitemap and click on Submit.
That does it. You have successfully submitted your sitemap to Google Search Console.
Please note that there are several options in the form of plugins that can help you get the best out of the sitemap creation. Some of the excellent plugins that can assist you in adding and submitting a sitemap to search engines include the following:
Once on the page, click on the option Add/test sitemap. You should find the option at the top right corner. Now add the location for your sitemap and click on Submit.
That does it. You have successfully submitted your sitemap to Google Search Console.
Please note that there are several options in the form of plugins that can help you get the best out of the sitemap creation. Some of the excellent plugins that can assist you in adding and submitting a sitemap to search engines include the following:


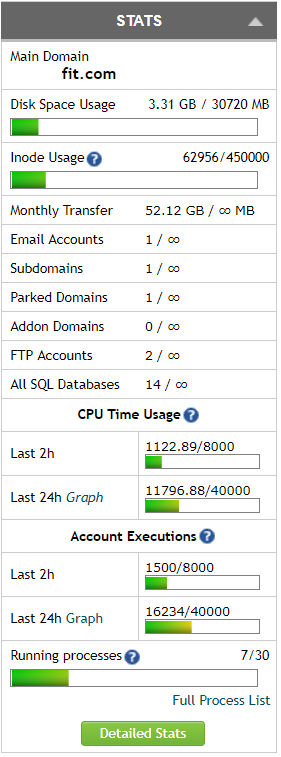
 As you would expect, there are no hard limits on the storage, and the bandwidth is unmetered. You can also link unlimited domains (Baby & Business Plans) and are restricted to system resources such as iNode usage, account executions, CPU usage, etc.
Now, let’s identify the conditions and restrictions:
As you would expect, there are no hard limits on the storage, and the bandwidth is unmetered. You can also link unlimited domains (Baby & Business Plans) and are restricted to system resources such as iNode usage, account executions, CPU usage, etc.
Now, let’s identify the conditions and restrictions: