
If you are looking to setup Cloudflare Cache for WordPress then you have landed in the right place. In this article, we will focus on optimizing WordPress with Cloudflare.
The following post is focused on how to use Cloudflare for the following:
-
Accelerate WordPress 22 worldwide without modifying your current hosting (for nearly all cases)
-
Easily enhancing TTFB
-
Dealing with traffic spike on viral content or event blog without expanding hosting resources
-
Speeding up the loading process of HTML similar to static content
-
Growing website availability
It is possible to work on all the above points without spending much. You may need to pay anywhere in the range of 0 to $30/month. It depends on the website as well as the approach of implementation.
Over the years, I found a remarkable feature entitled ‘Cache Everything’ through a newsletter of Cloudflare in my mailbox.
Accelerating WordPress on a limited budget can be difficult.
Owing to my profound interest, I began experimenting on this topic to comprehend how the entire theory works and how it can be utilized in a practical approach for WordPress.
-
I will share the whole method for deploying the Cache Everything page rule through WordPress. Also, I will share its advantages and disadvantages, potential issue, and everything necessary you may want to know.
The ‘Cloudflare Cache Everything’ is a special page rule which enables you to carry out Full Page Cache on CDN. The same makes sure that your origin server would use a fewer number of resources.
What is Cloudflare 9 Cache Everything Page Rule?
-
Mostly, when Cloudflare setup is done, it only caches the static files such as JavaScripts, Stylesheet, Images, etc. However, it does not work on vanilla HTML.
-
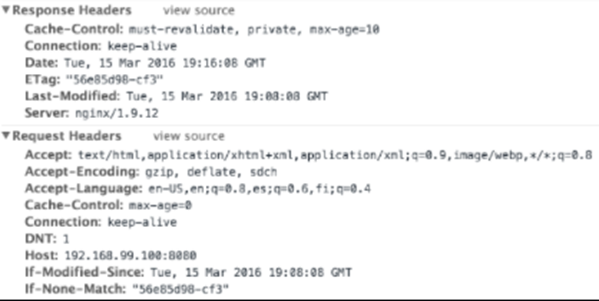
Due to the above reason, the static content loads rapidly; however, HTML always puts up with. Several users denounced that after they use Cloudflare, their TTFB got a boost. Look at an example here:
Now the question arises what the cause of this problem is?

-
Your website TTFB 52, relies on your location of Performance testing. It also depends upon the location of your website server, cache status, server load, DNS, etc.
-
For instance, if your website servers are positioned in the USA and test the performance from the exact location, the TTFB would execute faster than other regions. It is one of the most significant reasons why I always suggest picking server location according to your target audience nation”.
If you are an author of a blog that possesses a worldwide audience, you might want to accelerate WordPress performance globally.
The solution is as follows:
Full Site Delivery with Cloudflare is a method to run most of the website contents, chiefly HTML from the CDN. The same is possible through the Cloudflare Cache Everything Page rule. This rule is beneficial for enabling caching of HTML to boost web performance.
Prerequisite understanding to setup FSD with Cloudflare:
-
DNS – You should be familiar with the meaning of grey and orange record at Cloudflare on the DNS page 15
-
Cloudflare – You should be comfortable with its settings
-
W3TC 63 – It is an excellent help for FSD.
-
Cloudflare HTTP Header response – For this, you should know Cache-Control 12 header, status code, CDN HIT and MISS response, etc.
 When you accidentally enable only page rule, it will lead to some issue in your WordPress. Make sure to read this before proceeding further. This is because it needs specific logical settings to let things work efficiently.
The same is applicable just for a standard blog. Implement it if you understand the thing you are doing.
After successfully following this guide for several blogs, there remains the odd of committing errors. Also, it might not be suitable for every WordPress having a dynamic frontend, mainly I don’t suggest for the Forum or WooCommerce.
The present guide should not be implemented other than responsive theme where the mobile and desktop theme is varying. Moreover, you must not serve the WebP images via .htaccess coding using this method.
The Disqus Native WordPress comment application is likewise supported; however, it needs some extra steps to work more efficiently in a CDN scenario.
The same not function with specific web hosting that conveys its own cache. Firstly, disable it before proceeding with the implementation.
Not suggested for EZOIC users since they place a no-cache header.
How to properly enable Cloudflare HTML caching?
Step-1: Dealing with Page cache through W3TC using real-time purge Control:
-
Pro: Simpler for blogs that update frequently.
-
When combined along with a CDN, it offers excellent performance. It is recommended to try BunnyCDN. But if you do not use CDN, there will be an adverse impact on the static resource performance. This is because of the low cache HIT ratio and the full purge caused by W3TC Cloudflare extensions.
Now follow these substeps:

-
Setup W3TC plugin precisely as illustrated in this guide. Make sure not to modify anything within the Browser settings portion.
-
Follow the path: Extensions > Enable Cloudflare
-
You must use Cloudflare API key 3
-
Carry out all such necessary settings
Now you have the W3 Total Cache plugin ready to carry out an automatic purge of the Cloudflare page cache over the Post Modifications.
Step-2: Configure Cloudflare 9 Settings:
Aim: Configuration of cache such that it does not influence any other section.
-
Retain the Respect Existing Headers; do not override it. It is significant to follow the W3TC Browser cache settings.
-
Now, set up the Cloudflare Page rule.
(The below two are required for the most nuanced performance.)
The first one is for Login page security, whereas the second is for carrying out a Full page cache when following the origin header.
Note: Make sure not to use the ‘Edge Cache’ rule within the Cloudflare; else, it will supersede the origin header poorly. Moreover, it may serve internal page to the unidentified visitor.
The following settings are shown after careful tests on different websites.
Tip: For skipping Page cache for some URLs, set Cache Level: Standard.
Suggested things to carry out after following the present guide:
-
You might not wish to cache WordPress.com toolbar. So, it is better to conceal it for unidentified visitors.
add_action('after_setup_theme', 'remove_admin_bar');


function remove_admin_bar() {


if (!current_user_can('administrator') && !is_admin()) {


 show_admin_bar(false);


}


}
- The newest version of WordPress can better deal with the commenting. Hence, you can skip this step.
// First comment redirection


function redirect_first_time_commenters( $url, $comment ) {


// get count of user comment


$comment_count = get_comments( array
( 'author_email' => $comment->comment_author_email, 'count' => true ) );


// if this is the user first comment, redirect to the "Thank You" Page


if ( 1 == $comment_count ) {


$url = 'https://hostingxp.com/thank-you-for-commenting/';


}


return $url;


}


add_filter( 'comment_post_redirect', 'redirect_first_time_commenters', 10, 2 );
-
Remove Admin Traffic from the Google Analytics console.
-
Now configure the ‘BunnyCDN’ for improving the static content HIT cache ratio and maintain a good balance for the performance.
-
Conceal frontend Login/Sign up stuff. (You can avoid this method in the present case/)
FAQs:
1. Can Cloudflare FSD (Full Site Delivery)be used with any other plugin other than W3TC?
-
Not at all recommended for WP Rocket, WP Fastest Cache, WP Super Cache, and many, mostly may lead to cf-cache-status: MISS because of preventive Cache-Control header for that particular document. This is why I do not recommend anything other than W3TC to fulfill this need.
2. Help! My site is broken while purging cache
-
Discussed previously How to Fix W3 Total Cache Fatal Error that comes while Purge 14
3. How do debug things are functioning correctly?
-
The Chrome Developer tool proves to the best tool for this. You can use its Networking tab to supervise HTTP response.
4. Is Cloudflare free plan enough?
- In the majority of the cases, it is enough. For WooCommerce or some other cookie support, the need may arise to use its Business plan with a price of $200/month. If you need the most affordable option, go for ‘Sucuri 3’ WAF which simply offers identical features.
Summing-up:
After carefully following this guide, you can undoubtedly enhance performance. Also, there will be a significant reduction in server load.
When Cloudflare Cache Everything is used, the problematic things faced are:
-
Excluding cache on the exact time
-
Managing Cache-Control header to serve the web page efficiently
-
Balancing better HIT ratio
The aforementioned method is usually reliant on the W3 Total Cache Plugin that comes with below facts:
-
When you exclude Cloudflare HTML cache, there will be exclusion of Cloudflare whole cache (CSS, HTML, JS, images) similar to using the “Purge everything” button. Is this good? No.
-
Hence, I advised making use of the ‘BunnyCDN’ for maintaining a distinct hostname when you want to cache static content of WordPress.
This method with CDN is excellent for implementing on a news site that requires real-time purge functionality.
However, several bloggers might not need to update that excessively
The alternative approach is:
-
Maintain the Cloudflare configuration as well as rest function code as it is.
-
Prevent the use of ‘BunnyCDN.’
-
Make sure to configure Browser cache for all the static resources across long-term (for example 1 year)
-
Refrain from entirely using W3TC
-
Set Cache-Control plugin according to the one shown in the following screenshot. Every configuration is just for the Document web page working on HTML. The same is essential for setting up purge rules depending on the TTL. Read the below section to understand more:
max-age: It refers to browser cache: Since I believe that blog is dynamic, I will not recommend using Browser cache.
s-max-age: It is controllable according to TTL, so the content will automatically expire, and CDN needs to revalidate and automatically serve a new version.
How does it function?
-
Your cache is expected to terminate at a specific time.
-
It is always allowed to purge whether you are doing it manually or automatically. Why does it? Begin from 600 seconds TTL. Now gradually increase once you become an experienced one.
-
Now, what for the static content? Cache-Control, you need to know that it is variable according to HTTP requests. Hence, we can add an extra Browser Cache header, especially for the resources such as /wp-content/ as well as /wp-includes/ through a Page rule of Cloudflare. Alternatively, it is not required if you have already done with .htaccess and have used the respect existing header.
For page rule:
*example.com/wp-*
-
Make a rule where browser cache TTL: The time duration you can keep is 14 days or later. Generally, longer is better because it is the static content.
-
Make one more rule for Cache Level: Standard (Ensure to stay away from caching everything now.) It is used here since /wp-* will cover only static resources; it does not work on HTML.
