SEO is an essential aspect of working on your blogs and websites. Of course, most of us take care of the requirements of the
SEO related tasks, but there are a few aspects that appear to be unimportant and left out. One such error you may come across can be the Website crawl errors that go unnoticed. One such ‘error’ you may face concerning your
WordPress website is a soft 404. How to Fix Soft 404 Error in Google Webmaster Console? Let us take a look at this post.
What Are Soft 404 Errors?
The Soft 404 errors come under the category of the routine 404 Not Found errors. The only difference between the two would be that the 404 Not Found error is returned when the page does not exist at all. But, a soft 404 error does not answer the HTTP 404 status code but shows the ‘
page not found’ error.
The soft 404 error may also come up when a page that does not exist, redirects the user to a page that is not relevant to the search context. The request is redirected to any page like the Homepage, for instance. In other words, the contents of the web page returned are entirely irrelevant to the HTTP status response that the server responds. Meanwhile, it should also be noted that the Soft 404 error may appear if the page has a thin content.
What are the effects of the Soft 404 Error?
Well, there are not right issues as such. In the same way, as we discussed the 404 Page Not Found error, the soft 404 error may not have any direct consequences on the ranking of your website as such. However, it can be an issue in the long run.
A page may look like a ‘
404 Page Not found‘ issue, but it does not need to in the exact sense of the word. Google thinks it can be a concern from the users’ point of view. It is evident that the increased number of Soft 404 errors can be annoying, and disappointing from the visitors’ point of view and thus may need a quick fix.
Fix Soft 404 Error in Google Webmaster Console
How can you detect the existence of Soft 404 error? Well, that should be quite easy to find out. Google alerts you about the presence of soft 404 errors. You would stand to know it either through the search console or email directly.
How would you fix it then? The procedure would involve a few steps you need to go through. Let us find the solution step by step –
Step 1 –
- First, Login to your Google Search Console.
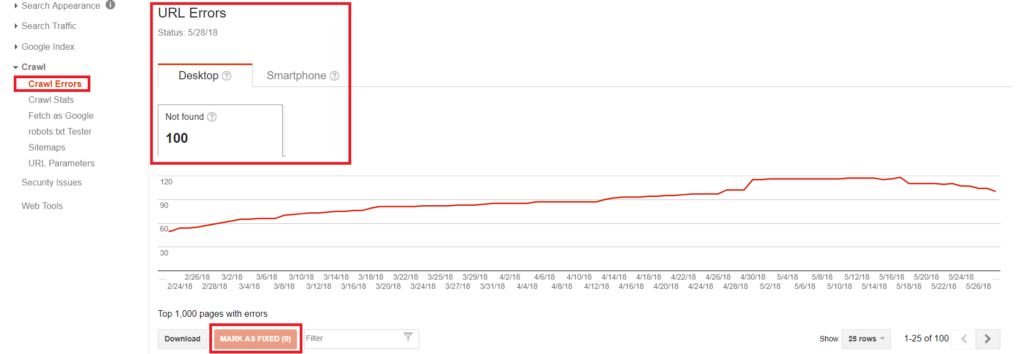
- Click on Crawl Errors and then search for “Soft 404 “ on the Crawl Errors tab. They should have separate tags for the errors.
- You will be shown the list of Soft 404 errors if any exist.
Step 2 –
- Click on any of the errors.
- Find what the source of the Soft 404 error is.
Step 3 –
Take corrective action based on the nature and source of the Soft 404 error.
It should be noted that there is no specific solution to the error as such. The fixes would depend upon the exact sources for the failure to appear. Some of the possible causes and solutions thereof can be summed up as explained here below.
Possible Fixes depending upon the Causes
The Soft 404 error can be caused due to a host of reasons. We will check out a few causes and arrive at the fixes that can be helpful.
If the Source for error is through WordPress Search
If the Soft 404 error originates from the Search functionality of your WordPress site, it can be due to a spammer trying to spam your site. The best fix to sort this out would be to disable the WordPress Search URL from being crawled.
You can do this by editing the
robots.txt file. It lists the data that Google can crawl and controls the access available to the Google Crawls. The file is at the root of your site. Download the robots file through FTP, edit it and then re-upload so that the issue would be fixed.
You would need to add the following lines to your robots.txt file
Disallow: /?s=

Disallow: /search/
If the page does not exist
You can follow any of the following fixes –
- Create a 404 or 410 error and suggest alternative pages that could be relevant to the search item.
- If you think the page is relevant, create a 301 redirect to a page that has relevant information.
- You may use the .htaccessfile and edit it or opt for a plugin that does the work right away.
If the Page Exist
If you have the relevant page already existing and carries value from the SEO point of view, it would be advisable to check if the page carries enough content. Google Crawls may show up the Soft 404 errors when the page has very little substance. This is referred to as ‘
thin content‘ as per the Google standards.
If you find the issue in your case is thin content, you can consider adding valuable content to the page. To ensure that the content added is worth the value you would want it to carry.
What should you do after sorting out the errors?
Well, once you have fixed all the Soft 404 errors, the next step you would need to follow would be to let Google know that you have solved the issue concerned. It involves a simple action.
Go back to your Google Search Console once again and choose the errors indicated one by one. Mark them as solved. Next, check for the errors once again as you did it in the first step once again. That would offer you the details of any Soft 404 errors left. You will need to perform the same steps once again if you find the similar errors still.
To Recap –
Well, those were some scenarios that can cause the Soft 404 error on your WordPress site. Studying the exact causes and solving them will need you to go through a complete analysis and expert advice. We have attempted providing the outline of the possible causes and fixes so that you can take care of the Soft 404 errors you may be facing.
Have you used any other means towards fixing the Soft 404 errors on your site? If you have any alternative solutions, do share your thoughts and experiences with us. Your inputs can help our readers get an added information apart from the one we have provided.
If you are a blogger or a website owner, most probably you may be using WordPress as the sole content management tool. Creating your content with WordPress is one of the most straightforward tasks you would be able to perform with WordPress. The sheer number and variety of tools and plugins within the CMS should make it one of the best options for your content management needs. However, some changes you make within site may bring up unwanted results. One such error you may come across is 404 Not Found error message. How would you fix the 404 error message on your WordPress installation? Let us check it out in the following paragraphs.
What causes 404 Not Found Error?
The 404 Error message is displayed when a user clicks on a link, and the page does not exist. In fact, the 404 error message is the default message for a page that does not exist.
It can come up as a result of a moved page or removed content. The website you create consists of several pages, posts, tags, categories and other aspects of the content on your WordPress page. You may decide to delete or move some content. There are cases wherein you might have selected to change the URL of a page. Eliminating a tag or category is yet another reason for the appearance of 404 Not Found errors.
When a user visits such a page, this is precisely what happens. The user would get a 404 Page Not Found Error. Several external and internal links point to the deleted or modified URL. All these scenarios can result in a 404 Not Found error.
What are the Consequences of 404 Not Found Error?
As a website owner, you may wonder whether the 404 Not Found error is terrible for your website. Well, it isn’t bad for the site as such, but the users who get those messages may get annoyed and leave your site with the inferior user experience.
Will it affect your search engine performance? Several views are indicating varied opinions. There are no direct consequences on search engines. However, having too many pages with error messages can be quite disturbing. That would necessitate the need to fix the 404 Not Found error.
How to fix 404 error on your WordPress sites?
Addressing the 404 Not Found error can be quite easy to fix if you can locate the error. Determining the error may not be a tough task as such. You should have access to the
Google Webmaster Tool, and it should be the best way to check the pages that have 404 Not Found error.
Here is how you can find the pages with 404 Not Found error.
- Log in to your Google Webmaster account.
- Click on the domain name that you want to analyze the 404 Not Found error for.
- Click on Crawl -> Crawl Errors.
- Click on Not Found. You should get the details of all the pages that return 404 Not Found error.
- Click on any of the URLs to find the information on the page with errors.
That way you would be able to find the number of pages that would return you the 404 Not Found error.
Make 301 Redirection
This is the best method to address the 404 Not Found error. The 301 Redirect is a permanent redirection from one of the URLs to another. This can be completely helpful if you have deleted or removed a page or category.
You would need to access your .htaccess file for using a 301 redirection. Just add the following code to the .htaccess file, and you are good to go.
redirect 301 /old.html new.html
The syntax should be quite simple to understand.
Redirect 301 is the command that asks the search engine that a particular page has been moved permanently.
Old.html would refer to the old URL of the page and
new.html would apply to the new URL to which you would want the page to redirect to.
Please note that a single code may not work with all the pages you have moved. If you have moved or deleted multiple pages, you would need to add a line for each of these changes. Having individual lines for each of the redirects can be the sure shot way to ensure that they are quickly picked up by the search engines.
In case you are sure that none of the pages and categories have been moved or deleted, the 404 Not Found errors would have been caused because of several other reasons including the incompatibility with themes or plugins. You can follow any of the following methods so that the error message can be appropriately addressed.
Modifying the .htaccess
You need to edit the .htaccess file and add a snippet code at the beginning of the code. There are several ways it can be achieved. One of the simplest ways to do it would be to use FTP client. Another option you can do it would be to download the .htaccess file and edit it on your word processor. Once done, you can easily upload it back through FTP server or edit it manually.
Please beware that changing .htaccess file should be done carefully. It could render your site useless if something goes wrong and fixing it may not be an easy task as such. Ensure that you have backed up the existing .htaccess file before you proceed to make any changes to it.
Whichever option you may use, add the following code snippet at the beginning of the .htaccess file.
# BEGIN WordPress


RewriteEngine On

RewriteBase /

RewriteRule ^index.php$ - [L]

RewriteCond %{REQUEST_FILENAME} !-f

RewriteCond %{REQUEST_FILENAME} !-d

RewriteRule . /index.php [L]


# End WordPress
Reset Permalinks
A permalink refers to the permanent URL link of the post, category and other files. It should be unique in its own right. A pretty permalink refers to the more specific URL. To do this, you can follow the steps here below –
- Access your Admin dashboard.
- Go to Settings ->Permalinks.
- Note the current setting.
- Select the radio button that reads Plain
- Click on Save Changes.
Now, once again click on original pretty permalink and click on
Save Changes. That should now reset the permalinks settings you had on your WordPress installation.
Change the Theme to Default
Even after performing the above steps, if you find that the error persists – it could be because of the theme plugin that could be causing the issues. You may go through the following steps to check it out –
- Activate the default theme for your WordPress installation.
- Go into Appearance -> Themes
- Hover your cursor on the default theme and then click on
This will activate the default theme for your site. Check if the 404 Not Found error is resolved. If the issue is resolved, you can safely assume that the theme you have chosen is the culprit. You may consider sharing the information with the developer of the theme.
Check The Plugins
AS we stated before, the Plugins you have installed may also cause some malfunctions and may result in 404 Not Found error. You may consider checking out each of the plugins installed on your system.
Follow the steps here below –
- Under your WordPress settings, go to Plugins -> Installed Plugins.
- Click on Deactivate for each of the plugins. You may also consider deactivating all the plugins in bulk.
- Check if the issue has been resolved. If it has, you can conclude that the one or more plugins could have been the root-cause of the problem.
- Now, activate the plugins one by one. Check the functionality after installing each of the plugins.
You can check each of the plugins and find if the issue reappears. If it does, the last plugin you installed is the culprit. You may decide to deactivate the plugin entirely until the issue is resolved. Alternatively, you can communicate the incompatibility with the plugin developer so that they can fix the problem in an update to the plugin.
The Concluding Thoughts
The first step in addressing the 404 Not Found error is to check if you have removed the page for any reason. In case you have done, you can make use of a 301 redirection method so that the issue will be addressed. If you are unable to find the exact reason for the appearance of the 404 Not Found error, and you are sure that you have not deleted any of the pages or categories – you may give a thought to the fixes we have featured here.
Please note that most of the fixes here would need you to have at least a basic technical knowledge. Employ all these methods and reboot your system. The issue should be fixed. If you are using any other way to correct the 404 Not Found error, you may share your views and options with us. Your feedback would prove to be helpful for our readers in dealing with the 404 Not Found error securely and straightforwardly.


 Click on What Credentials do I Need. You will be taken to the page where you can configure your API.


 By default, the .htaccess file should be created when you install WordPress site for the first time from your
 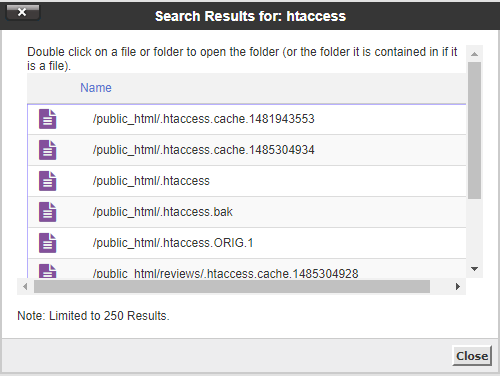 Where did my .htaccess file go? That is a question most of us would come across at times. You would you lose your .htaccess file and cannot easily trace it.
Why would that happen? Ideally, the file should not be gone anywhere. Your FTP settings can sometimes hide a few files. You would only need to configure it to show hidden files. Another possibility would be a faulty Plugin. One of the plugins you have recently installed on your site may have deleted the .htaccess file. This can happen with the plugins that have the writing permissions to the .htaccess file and can cause the file deletion in a few cases.
If you have recently updated your WordPress installation, check if the update has been completed successfully. Incomplete installation or upgrade can be one of the reasons for a missing .htaccess file.
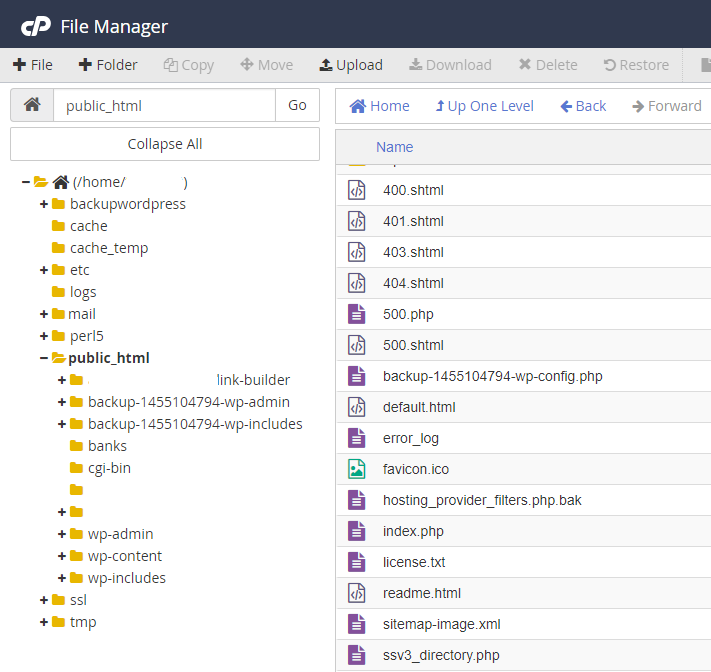
If you have found your .htaccess file missing or lost, the only way you would have at your disposal to get it back is to create a new .htaccess file. The best and recommended option to create a .htaccess file would be to use the File Manager option under your cPanel. Though there are several other options to build your .htaccess file, we would advise you to go with the cPanel option for creating the file as it would be the most safer and reliable option for the purpose.
Where did my .htaccess file go? That is a question most of us would come across at times. You would you lose your .htaccess file and cannot easily trace it.
Why would that happen? Ideally, the file should not be gone anywhere. Your FTP settings can sometimes hide a few files. You would only need to configure it to show hidden files. Another possibility would be a faulty Plugin. One of the plugins you have recently installed on your site may have deleted the .htaccess file. This can happen with the plugins that have the writing permissions to the .htaccess file and can cause the file deletion in a few cases.
If you have recently updated your WordPress installation, check if the update has been completed successfully. Incomplete installation or upgrade can be one of the reasons for a missing .htaccess file.
If you have found your .htaccess file missing or lost, the only way you would have at your disposal to get it back is to create a new .htaccess file. The best and recommended option to create a .htaccess file would be to use the File Manager option under your cPanel. Though there are several other options to build your .htaccess file, we would advise you to go with the cPanel option for creating the file as it would be the most safer and reliable option for the purpose.


