
If you are looking for instructions to setup a CDN on Cloudways for WordPress, read along.
WordPress has been one of the most widely used platforms for blogs and websites. What every website owner would want for his or her WordPress blog is the speed and security. A capable web hosting service is what you will need if you’re going to speed up the performance of your blog. But yes, there are several other aspects that you need to take care of – in addition to an excellent hosting service. A capable CDN is one of the factors that affect the performance of your site. Cloudways is one of the unique means of achieving this through the excellent CDN that they offer. Let us check out how you can install CDN for a WordPress blog in Cloudways.
What Is CDN?
A CDN or Content Delivery Network is one of those aspects that help you speed up your website performance. How? Let’s explain.
A website is hosted on shared hosting platform. All your files are hosted in a data center. Whenever a user opens your page, a request is sent to the data center, and the page opens up on the users’ browser. But, if the user is located far away from the data center, there can be latency and high ping rates that can take time for the page to load.
If your site is using CDN, the POP or Point of presence centers cache the data from the data center and thus whenever a user opens a page from your site, the data is communicated from the nearest POP. It can be described as the network of data servers spread around the globe. Content is delivered from the closest server.
Why Do You Need To Add CDN to WordPress?
The best way you can achieve the performance is a WordPress CDN integration. When a CDN is added to your WordPress site, all the content from your site is cached. Whenever a user launches a page, the content is delivered to the user’s browser without any visit to the server.
Cloudways has been a well-known player in the field of hosting and related aspects. Let us learn how to add Cloudways CDN to your WordPress site.
Setup CDN on Cloudways for WordPress?
You need to activate your CloudwaysCDN for integration with the WordPress before beginning the procedure. If you have already done it, move on to the step 2.
Step 1 – Activate CloudwaysCDN
To begin with, login to Cloudways Platform. Visit the <a href=”https://platform.cloudways.com/” target=”_blank”>login page</a>. You may need to create an account if you haven’t already.
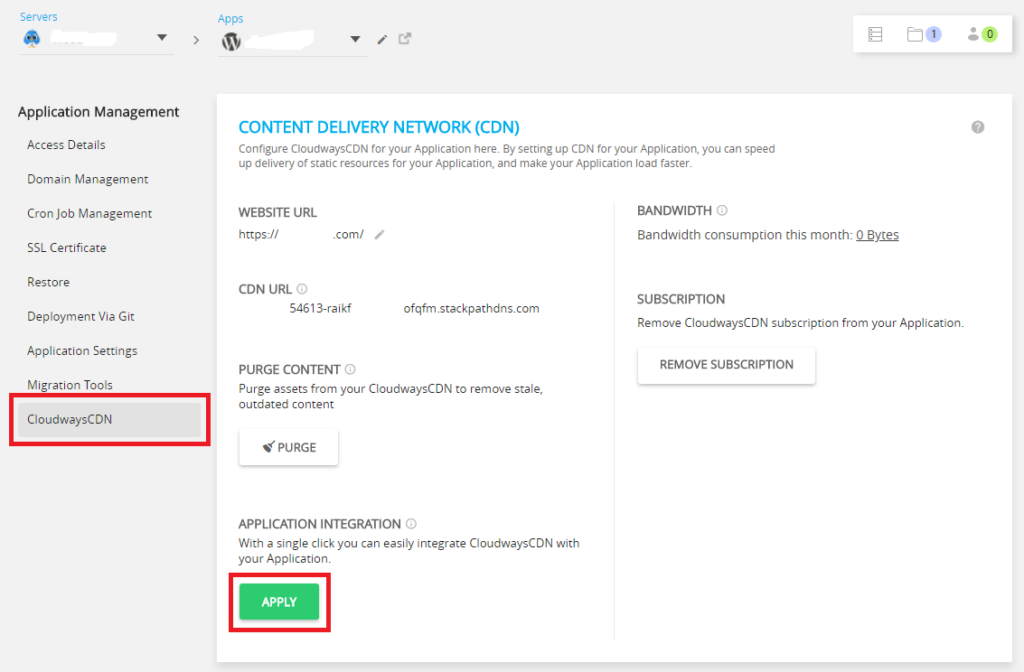
- Click on Applications on the top menu bar. Choose WordPress CDN.
- Locate Application management on the left sidebar and click on it.
- Enter the WordPress site URL with exact protocol and click on
That should do it. You should now find the details of your CDN.
Step 2 – Add CloudwaysCDN to WordPress
- Once your Cloudways CDN has been activated for your WordPress account, it is quite breezy enough to add it to your site.
- Click on Apply button under Application Integration
That does it, and you have successfully added and integrated Cloudways CDN to your WordPress CDN. The option of applying the configuration is when you have installed the Breeze plugin from Cloudways.
If you have any other plugin, you may need to get the details like Website URL, CDN URL, and bandwidth among additional information and use them in your plugin. Note these values down, even though they are automatically integrated if you are using Breeze cache Plugin. If, however, you are using any other plugin, you will need these details.
Step 3 – Configure the CDN
This should be the last step in installing and integrating CloudwaysCDN on your WordPress site.
- Login to your WordPress Admin panel.
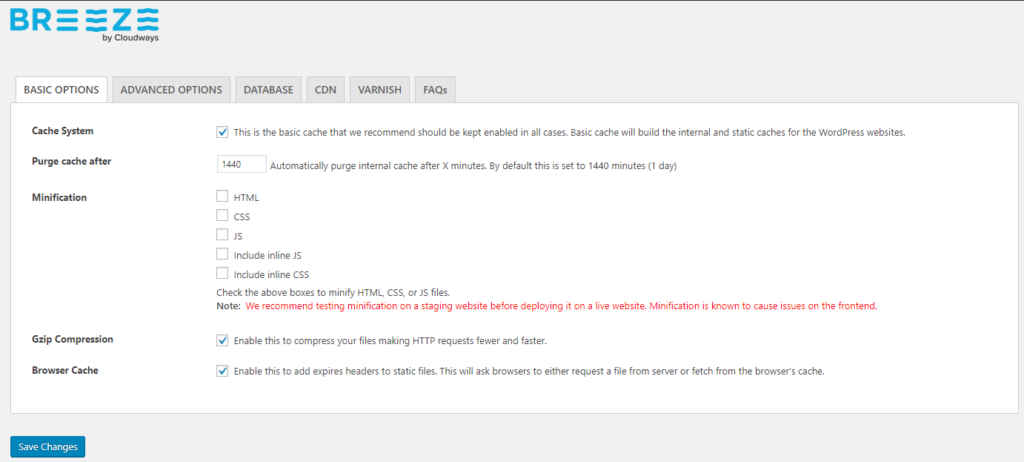
- Access Settings and then click
- Go to the CDN tab on your Breeze Cache Plugin.
- You should see the Activate CDN option is marked as checked.
- Verify the CDN URL and CDN CName. You can reconfigure if you find something amiss. Verify the options from what you have found in Step 2.
Step 4 –Verify If CDN is Applied
Follow these steps to verify if the CDN has been applied successfully. Follow these steps to check.
- Launch your site.
- Press CTRL+U.
- Look for You should get a few reports to indicate that the CDN has been applied successfully.
If you find if your site is broken, there is an option to take care of such an issue. Purge off all cache and then relaunch the website. This should sort out any problems you may have had, and the CDN will be integrated successfully on your WordPress site.
What If You Are Not Using Breeze Plugin?
Well, it should not be an issue even when you are using a different Cache plugin. You can enter them manually.
- Login to your WordPress account as you would do in Step 3.
- Access Settings and opt for the Cache Plugin you have installed.
- Go to the CDN tab and enter the corresponding values.
The exact procedure should be dependent upon the Cache plugin you are using.
The Concluding Thoughts
That should conclude our discussion on how you can add CDN in Cloudways for your WordPress Hosting service. Please note that we have covered the Breeze plugin in this tutorial. You can use any other plugin as well. You will just need to get the CDN URL and paste it in the CDN tab on your Cache plugin.
In case you are not using any other asset-based CDN service for configuring the setup, you can do that as well with Breeze. Breeze is not limited to Cloudways CDN alone. You may use any other CDN like CloudFront or KeyCDN if you wish. In those cases, you will need to get the CDN URL and paste it in the CDN tab on your Breeze settings page.
We assume that this tutorial has been helpful if you have been feeling lost out concerning opting for CDN in Cloudways on WordPress. Do let us know if you have any further doubts.