The smaller file sizes result in quick loading time on a WordPress site. It is possible to decrease the size of your webpage with the help of Gzip compression. The same helps reduce the size of JavaScripts, HTML files, XML files, and CSS stylesheets.
Additionally, Google warns for sites that are devoid of compression enabled. When the Gzip Compression is allowed in your WordPress with a plugin, there will be a data reduction in the range of 60%-80% of your website. The present article discusses how to enable Gzip compression into your WordPress website by editing the .htaccessfile:
The working mechanism of Gzip Compression:
The Gzip compression utilizes an algorithm that manages repetitive strings in one place only as an alternative to saving those strings repeatedly. Moreover, it controls such strings and their location values when compressing and recovering data from compressed files.
Generally, Gzip compression works well with stylesheets as well as web pages. This is because every such resource file contains several repeated strings. Due to its compression mechanism, Gzip can decrease the file size by 80 to 90%.
Steps to enable Gzip compression a WordPress website through .htaccess file
Step-1: Firstly, login into your cPanelusing your username and password.
Step-2: Now click on File Manager in the Files section.
Step-3: Find out the .htaccess file present in the public_html directory. Alternatively, you can use the Filezilla client application to find out the .htaccess file.
Step-4: Now right-click the .htaccessfile and then click on ‘Edit.’ This will show the Edit menu as it popped up. Now click on the ‘Edit.’Button.
Step-5: Include the below line of codes at the bottom of your .htaccessdocument:
# BEGIN GZIP COMPRESSION

<IfModulemod_gzip.c>

mod_gzip_onYes

mod_gzip_dechunkYes

mod_gzip_item_includefile.(html?|txt|css|js|php|pl)$

mod_gzip_item_includehandler^cgi-script$

mod_gzip_item_includemime^text/.*

mod_gzip_item_includemime^application/x-javascript.*

mod_gzip_item_excludemime^image/.*

mod_gzip_item_excluderspheader^Content-Encoding:.*gzip.*

</IfModule>

# END GZIP COMPRESSION
If your website is hosted on an Nginx server, include the below lines of codes:
Step-6: To save all your changes, click on ‘Save Changes.’
Step-7: Use the W3 Total Cache plugin:
There are WordPress plugins accessible to let you enable the Gzip compression to your website. The W3 Total Cache is one of the widely used and famous caching plugins on WordPress. With the help of this plugin, it is easy to enable Gzip compression.
Go to the settings page to enable Gzip compression through the W3 Total Cache. Next, enable the HTTP compression option and finally click on ‘Save Changes.’
Website speed optimization is key to SEO success. If you are trying to make fewer HTTP requests on Shopify, then check out our recommendations.
Also Read: Tutorials & Examples: How to configure and set up a Reverse Proxy (Nginx & Apache)
For any website, one of the most significant facets is the page load time. A great number of visitors can depart from your website if it requires 3 seconds or more to load the page. Whenever a user visits a website, various technical operations are executed in the backend. However, the images and words are loading in front of your screen; in the background, the browser requests and receive files from the server. If the number of HTTP requests your site sends to the server is fewer, the site loading will be faster.
Firstly, let’s look at the meaning of HTTP requests and ways to decrease HTTP requests on your website.
What does it mean by the HTTP requests?
Whenever a user visits your website, their browser contacts your web server and also requests the files that contain the page content. Such files comprise CSS, HTML, JavaScript files, icons, images, and other files. The corresponding request is an HTTP request. The complete form of HTTP is the Hypertext Transfer Protocol. Essentially, the browser sends out a request for a file, and also the server transfers the file to that browser. Whenever the server gets an HTTP request from a user’s browser, your server reverts by sending the necessary files. Subsequently, the user’s browser renders the page.
Significance of keeping track of the HTTP requests:
Each time somebody visits your website, their browser has to create a specific HTTP request for every single file. There are lots of websites that use plenty of images, graphics, and other vibrant content. When you decrease the number of elements in your site’s pages, it is possible to reduce the number of HTTP requests. As a result, there will be a boost in the load time for your website.
One of the best ways to achieve this is to decrease the number of Shopify apps already installed.
A considerable number of apps available on the Shopify store automatically include few CSS/JavaScript files into your store. If your app is not in use, then the CSS or JavaScript files persist in executing in the background and decreasing the performance of your store. Therefore, it is recommended to look at your store, check the apps that are no more in use, and delete them. By doing this, your website will load quicker. As far as the unused apps stay installed, they will continue running their CSS or JavaScript files.
Method-2: Lazy image loading:
Another method to reduce HTTP requests is to perform lazy image loading. This method incorporates using a Javascript library for loading images only when they must be visible to the visitor of your site. Consequently, there will be an improvement in the page load time.
Lazy Image Loading is chiefly valuable when the theme you are using has lots of images that are not visible to your visitor until they navigate down. This means that there will be fewer HTTP Requests. Henceforth, you have to load all the images at the beginning.
Make sure to optimize the images and discard the file information which you think is useless. Additionally, make sure the size of the image files is not excessively big.
Method-3: Simplify Store code:
Occasionally, many stores depict lots of images that are loaded on the home page. Moreover, there are lots of new server calls towards the home page.
Firstly, examine server requests and find out which requests are needles for the current page.
To understand this, for instance, in one store a home page loads review associated with CSS and JS file. It is not essential on the home page related to JS and CSS files, but it is necessary for the product page. Hence, recognize and simplify the store code.
Tips to reduce the HTTP requests:
Use the HTTP Requests Checker Tool by GiftOfSpeed to inspect the number of HTTP requests your site sends.
Combine CSS and ascertain that they are all in-line
In this post, we explain how to add CAPTCHA in WordPress Login and Registration Forms.
Are you interested in adding CAPTCHA to your WordPress site’s login and registration forms? And are you interested in using CAPTCHAs to keep off bots and spammers from accessing your WordPress site? Well, the below article helps you to achieve this.
Generally, the WordPress login page and user registration page are major targets for spammers and hackers. The intention of these attackers is usually to obtain unauthorized access to your WordPress admin part to allocate malware. In some other cases, they may crash the whole network of websites hosted with a particular web hosting company to gather ransom.
In any such case, a breach can lead to pre-eminent damage to your website. But since the hackers use bots to quickly and successfully attacking your websites, it may feel that odds are loaded up against you.
Luckily, there is an easy-to-use tool that you can utilize to keep away spammers and bots from your WordPress site. The use of a Completely Automated Turing test to tell Computers and Humans Apart (CAPTCHA) is an easy way to enhance the security of your website.
The following guide familiarizes you with CAPTCHAs and the way they can assist in protecting your website against spam and hackers. The later section highlights the ways to add them to your website. Also, you will be introduced to a few of the finest WordPress CAPTCHA plugins.
One of the best ways to prevent such attacks is to use CAPTCHA that successfully blocks spambots and defends your site from getting hacked.
The below article will discuss how to include CAPTCHA within WordPress login and the registration form effortlessly. But before that, let us understand what this CAPTCHA is:
What is CAPTCHA?
In simple terms, a CAPTCHA is a computer program utilized to differentiate between human and automated bot users. The same is done by carrying out a test that can be easy for a human to pass. The same test is difficult and nearly impossible for the automatic scripts to get through.
The CAPTCHAS can adopt a wide range of forms, and one of the most widespread ones is distorted text which you need to decode. Some other test demands you to choose images that can fulfill some specifications from a collection of low-resolution photos.
In these cases, usually, humans can easily complete the challenge presented. But, even the contemporary bots are not able to decipher the distorted or pieces of images. Once they are incapable of getting through the test, they would be blocked from accessing your site.
The same is inevitable since bots are utilized in various situations that can negotiate the security and integrity of your website. One of the most widespread hacking strategies is brute force attacks. It utilizes bots to frequently type in credentials inside your login form until they attain access to your website.
One more kind of cyber attack is cross-site scripting (XSS). In that, hackers implement the malicious code within your site through a form like your login page or the comments section. The same can lead to malware saved on your site, misplaced information, and other ill outcomes.
The bots are also useful for spamming your comments part with low-quality links, which damage your Search Engine Optimization (SEO) and daunt legitimate users. In addition to being annoying, spam makes your website look less protected and badly monitored.
All those places on your site where users can enter information, i.e., any form in your site, are susceptible to attacks from bots. The inclusion of a CAPTCHA before submissions of form deters non-humans from attaining access to your website or inserting malicious code within it.
Throughout the inception of CAPTCHA, users were prompted to enter the text they observe in an image. The corresponding image showcased random letters, numbers, or words in an unclear style.
Subsequently, a newer technology entitled reCAPTCHA was implemented. It represented random words in the form of a challenge and utilized the input from the user to digitalize books.
The mentioned technology got hold of by Google in the year 2009. Since then, it helps to digitalize thousands of books as well as complete New York Times archives.
But, such new CAPTCHAs were still irritating and damaged the user experience on the websites.
Though CAPTCHAs offer a wide range of advantages and protections to your website, it comes with some limitations. For instance, they can negatively influence User Experience (UX). By making users sluggish, such simple tests come into the way of visitors and rapidly fulfill their targets on your site.
Additionally, users suffering from visual impairments or a few other challenges like dyslexia may find it difficult to complete their CAPTCHAs. Unintentionally keeping human users away from the site is beneficial to anyone. This holds even if it prevents bots in the procedure.
In 2014, Google launched its No CAPTCHA reCAPTCHA, a successor to the image tests and distorted word it has continued to use since 2007. This novel system demands users to choose a checkbox beside the words “I’m not a robot” to verify their legitimacy.
It displays a simple checkbox for human users to click on easily. Some other wary traffic will show slightly more difficult CAPTCHA, like recognizing objects in the shown images.
When you add a CAPTCHA to your WordPress website, you get the freedom to select which kind of test to use. But bear in mind that executing Google reCAPTCHA v2 or v3 must help make your website more enjoyable and easily accessible.
Now let’s go through how WordPress websites can enhance security through CAPTCHA.
Reasons to Use CAPTCHA for WordPress Login and Registration:
WordPress login and registration pages serve as a simple target for hackers and spammers and malicious force attacks.
This is because WordPress is the most well-known website builder (CMS) prevalent in the world. This makes it a frequent target for malicious attempts.
The simplest solution to defend your WordPress site from attacks is to use a WordPress firewall plugin such as Sucuri. The same will block bad traffic from landing on your website and stops unwarranted access.
One more solution is implementing a secondary layer of password protection on the WordPress login and registration pages. But the issue with this method is you need to share that second password with every user. This would not scale for huge multi-author blogs or membership sites.
CAPTCHA offers a simpler alternative to such solutions. It uses AI technologies from Google to identify genuine visitors and offer CAPTCHA challenges to doubtful users.
Default vs. Custom WordPress Login and Registration Form
The default WordPress login and registration form offer a fundamental collection of features.
The login page enables users to easily access your website’s backend as per their relevant user roles and permissions.
With the help of the default WordPress registration form, visitors can make an account on your website. After they are registered, they can log in to the backend of your website and carry out precise tasks permitted by their user function.
Plenty of website owners wish to tailor the default WordPress login and registration page using their personal styles, logos, etc. They use several plugins to make up their own custom login and registration page to substitute the default ones.
The following section covers how to add captcha whether you use the default pages or custom pages.
You will be made familiar with the ways to set up reCAPTCHA for default and custom login and registration pages present in WordPress.
Now let’s start on how to add reCAPTCHA in the default WordPress login and the registration form.
How to add reCAPTCHA to Default WordPress Login and Registration Form:
Firstly, you have to install and activate the Advanced noCAPTCHA & reCAPTCHA (v2 & V3) plugin.
After this plugin gets activated, follow the below path:
Settings > Advanced noCAPTCHA & Invisible CAPTCHA page available within our admin panel
Now WordPress will land you on the general settings page of the plugin.
From here on, you have to select a Google reCAPTCHA version and find out reCAPTCHA API keys to allow the service on your website.
It is recommended to use v2 since it is believed that v3 is not so stable, at least not yet!
To get those API keys, visit the reCAPTCHA website, and then click on the ‘Admin Console‘ button.
In the subsequent screen, Google will request to sign in to your account. After you have successfully logged in, you will observe the ‘Register a new site‘ page.
As a first step, enter the name of your website in the Label field. Now, choose a reCAPTCHA type. It is up to you to select reCAPTCHA v2 ‘I’m not a robot’ named checkbox.
Now, you have to mention your domain name within the Domains section. Ascertain that your domain name is devoid of ‘https://www.’
The Owners section displays your email address as well as allows you to add a new owner.
Once done, you have to check the box beside ‘Accept the reCAPTCHA Terms of Service.’ It is optional to check the ‘Send alerts to owners‘ box to get email alerts regarding doubtful traffic or captcha misconfiguration occurring on your site.
After this is done, click on the ‘Submit’ button.
Now, you will notice a success message and the site and secret keys that can be used on your website.
As a next step, open your WordPress dashboard and follow the below path:
This allows you to set up Google reCAPTCHA.
After you are landed on the plugin settings page, select the Google reCAPTCHA version. Because we have already registered our website for Google reCAPTCHA v2 ‘I’m not a robot,’ it is necessary to choose that option from the dropdown menu.
Now enter the site key and secret key given by Google reCAPTCHA before.
In the next step, you will find the ‘Enabled Forms‘ option. You need to check the box besides the forms wherein you wish to enable the Google reCAPTCHA. In this step, select the Login Form and Registration Form.
Once done, you have to scroll down the page to check other options. When done with selecting options, click on the ‘Save Changes’ button present at the bottom.
Now you have successfully included reCAPTCHA in the default WordPress login and registration form. If you want to preview it, you can open up your WordPress login URL inside your browser. For instance: www.website.com/wp-login.php.
If you wish to review the reCAPTCHA on the registration form, click on the Register link underneath the login form. Once done, the WordPress registration form would open, and also you can observe how reCAPTCHA functions.
Set-Up of reCAPTCHA in Custom WordPress Login and Registration Form:
The custom login and registration forms of WordPress provide new user-friendly membership possibilities to visitors of your website.
Firstly, you can enable users to either register or login into your website directly from the frontend. As a result, it enhances the user experience and allows you to retain the same design experience throughout the website.
Subsequently, it allows you to include your website logo and personalize the registration and login page according to your preference.
Making a custom WordPress login form and user registration form is quite simple using the intuitive WordPress form plugin named WPForms. This plug is the most user-friendly and being utilized by 2+ million websites.
For getting started, you need to install and activate the WPForms plugin over your WordPress site.
To create the custom WordPress user registration form, switch to at least the WPForms Pro plan.
Once activated, you have to open ‘Settings‘ from ‘WPForms.’ This will let you enter your WPForms license key. Actually, you will receive this key from your account area present on the WPForms website.
Once this is done, click on the reCAPTCHA option available at the upper part to organize reCAPTCHA for your customized WordPress forms. As the first step, select a reCAPTCHA type.
Because we have already selected v2 before, now we will select reCAPTCHA v3 in this step. However, the recommended option is still v2.
Now you will observe the secret key field and the site key field. For obtaining such keys, register your website on the Google reCAPTCHA website.
Now open the Google reCAPTCHA website and click on the Admin Console button present at the uppermost right corner.
Now Google will inquire you to sign in to the account. After that, you will notice the ‘Register a new site‘ page.
Now mention your website name and then choose the reCAPTCHA v3 option from the reCAPTCHA type option.
In the next step, mention your domain name but make sure it is without https://www.
Suppose you wish to add one more Gmail user in the form of the owner of the reCAPTCHA. After that, you could add the email address within the Owners section.
Now accept the ReCaptcha terms of service. It is also possible to check the box beside the ‘Send alerts to owners’ option to receive notification emails from Google regarding mistrustful traffic over your site.
After that is one, you need to click on the Submit button.
Now Google will display a success message accompanied by the site key and the secret key to supplement reCAPTCHA to your website.
By now, you possess the Google reCAPTCHA API keys. Follow the below path
WPForms > Settings ? reCAPTCHA
The reCAPTCHA page will open up in your WordPress dashboard.
In the settings page of the WPForms reCAPTCHA, mention the site key and secret key. Now save your settings.
After successfully adding the reCAPTCHA on WPForms, it is easy to enable the reCAPTCHA within the user registration form, your custom login form, or any forms created using WPForms.
Now let’s make a custom WordPress registration form.
Open ‘Addons’ page from ‘WPForms’. Now find out ‘User Registration Addon’ and then click on ‘Install Addon.’
WPForms will now download and set up the addon. After that, you will observe the User Registration Addon’s status to be ‘Active.’ This indicates that you are now ready to include a fresh user registration form.
Now follow the bellow path to start the WPForms Builder:
WPForms > Add New
From the WPForms setup page, you need to choose the ‘User Registration Form’ template.
Once done, WPForms automatically creates a custom user registration form and also opens the Form Setup page.
It is now easy to personalize your form with new fields or edit the available field options. In case you prefer the default form, then use it without creating any modifications.
Now click on the Settings option to organize your form settings as well as enable the Google reCAPTCHA.
Within the General Settings page, it is possible to modify your form name, include a form description, and also edit the Submit button text, etc. In the base, you will notice the checkboxes containing Enable Google v3 reCAPTCHA box.
Just check the box to enable the Google reCAPTCHA within your user registration form. When this is done, click on the Save button available in the upper right corner.
You can close the form builder by simply clicking on the ‘Close’ button beside the Save button.
Finally, you made a custom WordPress user registration form as well as included reCAPTCHA to it.
The next task you have to do is to include the custom user registration form on your website. It is possible to add forms to your pages, posts, or any widget-ready area. For instance, the below section describes how to make a new page and include its form.
Follow this path:
Pages > Add New
This opens up a new page from your WordPress dashboard, allowing you to create a new page. On the page’s screen, click on the ‘Add New Block’ icon, and choose the WPForms block.
Now you can observe the WPForms widget already added to your page edit screen. Choose the Custom User Registration Form which you created before. Once done, the widget automatically loads the form within the page editor.
Subsequently, you can add other vital content and post the page.
You can now open the page on your web browser to observe the custom user registration form along with Google reCAPTCHA implemented.
Because reCAPTCHA v3 is already selected, you will not notice a Google reCAPTCHA checkbox such as ‘I’m not a robot.’ The reason is the reCAPTCHA v3 functions in the background. However, you will still observe a tiny badge at the lowermost right corner.
The method of building a custom login form is nearly the same. However, the mere difference is that you have to select the User Login Form template available from the WPForms setup page.
Subsequently, the entire process is identical.
————————————–
Adding a CAPTCHA to Your Login Page:
Generally, your login page is a key target for Cross-Site Scripting (XSS) attacks and brute force.
For the addition of a CAPTCHA into it using the Google Captcha plugin, follow this path:
Google Captcha > Settings > General > Enable reCAPTCHA for inside WordPress
Now choose ‘Login Form‘ within ‘WordPress Default‘.
Now your login page stays protected.
Including a CAPTCHA on Your Password Reset Page:
When hackers’ attempts to log in to your website go futile, they might be landed on a page wherein users could reset their passwords. For the addition of a CAPTCHA to secure this page, follow this path within your WordPress dashboard:
Google Captcha > Settings > General > Enable reCAPTCHA form
Now choose the ‘Reset password form’ from the ‘WordPress Default’ list.
Securing Your WooCommerce Login Page using a CAPTCHA:
Your WooCommerce Login page is equally vulnerable to a malicious attack like your core WordPress page. For protecting it using Google Captcha, you will require the premium version of the plugin. Once you are ready, follow the below path within your WordPress dashboard:
Google Captcha > Settings > General > Enable reCAPTCHA
At this point, you can choose the ‘WooCommerce Login form’ from the ‘External Plugins’ list.
Including a CAPTCHA on Your Contact Form:
It is possible to protect your contact form using a CAPTCHA identical to the others already discussed above. But many different contact form plugins can integrate with Google CAPTCHA, like:
Contact Form 7
Ninja Forms
Jetpack Contact Form
It is necessary to activate any of the above tools on your site to add a CAPTCHA to your contact form. Now follow the below path:
Google Captcha > Settings > General > Enable reCAPTCHA
Now click on the checkbox for your chosen plugin:
Doing this will terminate the process. One more contact form plugin is available for use on your WordPress website; you may need to use a different CAPTCHA plugin that combines with it. Also, few form builder plugins include CAPTCHAs on their own, like WPForms.
Summary:
Keeping your site free from malicious bots is inevitable if you intend to protect your users, your content, your users, and the reputation of your brand. One of the simplest approaches to deter their activities is to add a CAPTCHA into the forms of your WordPress site.
The addition of CAPTCHA to your WordPress needs these 3 steps:
Setup and activate a WordPress CAPTCHA plugin.
Make your Google reCAPTCHA and include it on your site.
Reverse proxy positions ahead of a web server and get all the requests before reaching the origin server. This proxy functions identically to a forward proxy, apart from the case that is the webserver utilizing the broker instead of the client or user. Usually, reverse proxies are used to boost the performance, reliability, and security of the webserver.
To understand more, for instance, you can host a non-WordPress site on example.com domain on say Server A and let its blog running on the WordPress setup at example.com/blog URL that is hosted on say Server B. This is easy to achieve by adding a reverse proxy for that server hosting your top site. It is possible to configure the reverse proxy to pass on requests to the blog to a different server.
The present article discusses the fundamentals of reverse proxy servers, how they function, their key benefits, and how you can use them to quicken and secure your WordPress site.
To get knowledge on a reverse proxy server, firstly, you need to know its role and know about all its associated terms.
Whenever you browse the web in general by typing in a domain name or clicking a link, the website’s server gets directly connected to your browser or device. Subsequently, it begins the download process of its resources.
If you intend to anonymize your IP address directly from those websites you visit, there is an option to use a proxy server to send all your requests to it first. Next, it will promote your requests to the DNS resolver. Subsequently, it will download the resources of the website from its root server.
A reverse proxy is a server that sits in front of web servers and forwards client (e.g., a web browser) requests to those web servers. Reverse proxies are typically implemented to help increase security, performance, and reliability. To better understand how a reverse proxy works and the benefits it can provide, let us first define what a proxy server is.
Later, it will forward those resources towards your device, which is termed a forward proxy.
You are entirely concealed from the website because it assumes that your request comes from the forward proxy.
Info:
The way few hosting providers like Web hosting companies calculate site visits, they demand the users put a header to inform their actual IP address to the root server. Thus, the privacy advantages do not apply in some instances like these.
In addition to improving user privacy, using a forward proxy is primarily to avoid geographical content limitations. For example, you desire to watch a blocked video in that region, then a forward proxy and an IP address are helpful. On this IP address, you can watch the video.
Forward proxy functions are nearly identical to a Virtual Private Network (VPN). However, both are different technologies with specific use cases (however, they may occasionally overlap).
Reverse Proxy Server vs. Forward Proxy Server:
A reverse proxy server functions in the form of a front for the root servers to uphold anonymity and boost security. It is identical to how a user or client uses a forward proxy to attain the same result. It makes sure no client or user directly communicates with the root server.
Though the difference between forward and reverse proxy is slight, they work uniquely.
Both of them can work collectively because there is no overlap among their functioning. Generally, users or clients utilize a forward proxy, whereas the root servers use a reverse proxy.
Because a server admin can manage the way reverse proxy would function, you can utilize it to allow several valuable features.
All its advantages will be discussed later in this article.
Why Use a Reverse Proxy?
Several businesses, massive enterprises, use personalized websites that are custom-made to their unique requirements. Moreover, they are not operating on WordPress. Certain instances include websites focused on banks and insurance.
In another case, a business may host their website on an external service that disallows them to install external software. Typically, they are small to average-sized retailers who use an e-commerce platform like Shopify.
Because WordPress possesses powerful CMS features, several businesses, including big enterprises with personalized websites, may host their blogs through WordPress setup.
One effective way to solve this issue is to set up WordPress on the subdomain of the primary website and organize the navigation menus so that users can easily toggle between the primary website and the blog.
The subdomains act in the form of a unique domain to influence the SEO of your site. Though Google equally considers subdomains and subdirectories, it needs more effort to optimize any website for SEO rankings if the hosting is done on a subdomain than a subdirectory.
Google has again confirmed that it equally considers both subdirectories and subdomains. However, certain SEO experts conflict with it. Even if it does no influence the SEO of your site, a site that is hosted within a subdirectory is relatively simpler to maintain.
This is why you could use a reverse proxy to forward requests to the blog of the site hosted on a separate server. To understand clearly, for instance, a bank can securely host its primary website on its servers. However, they can even host their WordPress-driven blog distinctly on a managed WordPress host such as Web hosting companies.
Combining 2 various sites within a single domain name is an excellent benefit of using a reverse proxy. Moreover, it assists the brands to let their site stay ordered, look professional, and uphold credibility.
Now let’s learn how a reverse proxy can boost security, performance, and reliability.
Advantages of Using a Reverse Proxy:
Apart from the above use case, the reverse proxies too offer several other advantages. The below section discusses a few of their key benefits:
Load Balancing:
A single root server cannot manage all the traffic incoming for a website having millions of visitors daily. Especially in such cases, you can smartly allocate the traffic amongst a group of multiple servers. Typically, every server will host identical content to discard a single point of breakdown. Hence, the particular website turns more reliable.
Generally, a reverse proxy is found to be an excellent way to install this. This is because it can collect the incoming traffic before it goes into the root server. If the root server is overloaded or falls short completely, it can allow the distribution of the traffic to other servers. During this process, it makes sure the site’s functionality is unaffected.
Reverse proxies are also capable of forwarding incoming requests to multiple servers. In these cases, every server performs an explicit function for which they are optimized. Subsequently, the reverse proxy can amass responses from every server and submits them to the client.
Because we utilize the most famous reverse proxies chiefly for load balancing, they are too regarded as Load Balancers.
Global Server Load Balancing (GSLB):
GSLB is well-known as an advanced load balancing system for allocating website traffic among multiple servers strategically organized all over the globe. Usually, it is accomplished through the anycast routing technique. In this technique, the reverse proxy chooses the server node depending on the quickest travel time between the server and the client.
Apart from boosting the reliability and security of the website, GSLB also decreases latency and load times. Henceforth, it enhances the user experience. It is allowed to use GSLB with some other network optimization methods like Spoon Feeding. When you use it with such scenarios, the computational resources of the origin servers will be freed up.
You can manually set up GSLB on your server, but dedicated CDNs like Cloudflare and KeyCDN typically monitor it. Web hosting companies serve every website hosted via a Load Balancer (powered by Google Cloud Platform).
Enhanced Security:
Reverse proxies can hide the IP address as well as some other aspects of origin servers. So, the origin server of your website can better uphold its anonymity and thus significantly boosting its security.
As the reverse proxy would get all the traffic before it goes into the primary server, hackers or attackers will perceive it more challenging to target your site with security threats like DDoS attacks.
A strict firewall can strengthen the reverse proxy with more robust security to resist the general cyber-attacks. If a reverse proxy is not installed, it is hard to discard malware or begin takedowns.
Info:
Web hosting companies utilize reverse proxies within its backend architecture and provides free WordPress hack solutions to every website it hosts.
A reverse proxy, including HAProxy, can add basic HTTP access authentication into a web server that is not enabled. Also, you can use a reverse proxy to include centralized verification for different kinds of requests.
Powerful Caching:
A reverse proxy is also helpful in increasing the speed of the website. It accomplished this by caching static and dynamic content. As a result, there will be a reduction of the origin server load, which leads to a faster website.
Consider an example in which your origin server is based in the USA and suppose a user living in Europe visits your website. In this case, you can provide a cached version of your website from the convenience of a reverse proxy server located in Europe. Because the reverse proxy is situated nearer to the user than the origin server, the website takes time to load. Hence, performance is efficient.
Varnish and Nginx FastCGI are well-known examples of reverse proxies that are useful for caching web content. When you choose Kista as the host of your site, you can stay stress-free about caching. This is because Web hosting companies look after all the caching groundwork to reduce your effort.
Superior Compression:
Generally, server responses utilize a much amount of bandwidth. If the server responses are compressed before delivering them to the client, it can decrease the bandwidth needed. Hence, the server responses will speed up across the network.
A reverse proxy works perfectly to compress server responses because it is positioned amongst the client and the origin servers.
Optimized SSL Encryption:
For the origin server, encrypting and decrypting the SSL/TLS requests for every client can be highly taxing. This task can be handled by a reverse proxy to free up the resources of the origin server. The idea behind freeing up is to focus on other significant tasks like serving content.
Another benefit of delegating SSL/TSL encryption & decryption is to decrease latency for clients who are physically far from the origin server.
There is an option to choose a reverse proxy with dedicated SSL/TLS acceleration hardware to optimize this task even more. This kind of reverse proxy is termed an SSL/TLS termination proxy. Few servers like Varnish are not compatible with the SSL/TSL protocols. Hence, an SSL/TSL termination reverse proxy could assist in securing the traffic through them.
Better A/B Testing:
The majority of the A/B testing tools demand you to use the external JavaScript libraries for loading their functions. But, the process of loading third-party scripts can result in slowing down the page load times. Also, it can lead to a weird experience for users.
A reverse proxy can be helpful to make two distinct flows at the server level as an alternative. For instance, you can use split_clients or sticky route methods of Nginx to manage traffic redirection.
Go through the tutorials on freeCodeCamp and Nginx to know more about carrying out A/B testing through a reverse proxy.
Monitoring and Logging Traffic:
Whatever requests go across a reverse proxy is being captured. So, you can utilize them as a fundamental hub to supervise and record traffic. Irrespective of you using single or multiple web servers for hosting all components of your website, using a reverse proxy makes it simpler to supervise all the incoming & outgoing data from your website.
The Most Popular Reverse Proxies:
According to W3Techs, nearly 83% of the websites utilize no reverse proxy services, which they examine.
Out of the 17% of websites using a reverse proxy, you will observe that majority of them are CDNs. The reason is a majority of the reverse proxies, by default, conceal their existence for a safety measure. Therefore, you cannot trust website monitoring services such as W3Techs to discover which reverse proxies are the most famous ones.
Based on our research and knowledge, the most famous reverse proxies valid presently are
Nginx, Varnish, Apache Traffic Server, and HAProxy. They are discussed below:
Nginx:
Nginx is famously known as an open-source web server capable of working as a reverse proxy. In addition to working as a host for websites, it is one of the most extensively used reverse proxy and load balancing solutions. According to Netcraft, more than 479 million web servers were utilizing Nginx in December 2019. This makes it the front-runner in the webserver market share.
This proxy offers every reverse proxy benefit described above. Furthermore, it boosts web performance, reliability, security, and scalability. It is easy to configure Nginx through its configuration file.
The Nginx Plus, a commercial offering, is only helpful to gain access to the API-based configuration options and other functionalities appropriate for big enterprise websites.
Web hosting companies control all their websites via Nginx. It got rank in Top Tier web hosting status by Review Signal in every category it participated in. Few other leading companies that make use of Nginx are Netflix, MaxCDN, and Cloudflare.
It is easy to set up Nginx as a fundamental reverse proxy. Moreover, Nginx also offers you various directives to tailor your server’s reverse proxy according to your needs. The way to accomplish it is discussed in a later section. A Web hosting companies customer can learn how to use a reverse proxy for websites hosted via Web hosting companies in that section.
The Advantages of Using Nginx Reverse Proxy
Let’s delve into the reasons explaining why this tool is so popular:
It is simple to implement and provides the user with high-end security against Web server attacks such as DDoS and DoS
Nginx Reverse proxy helps create a balanced load among several back-end servers and provides caching for a slower back-end server
Nginx does not require setting up a new process for each web request from the client. Instead, the default configuration is to comprise one work process per CPU
It can act as a reverse proxy server for various protocols such as HTTP, HTTPS, TCP, UDP, SMTP, IMAP, and POP3
It can handle over 10000 connections with a low memory footprint. Nginx can operate multiple web servers via a single IP address and deliver each request to the correct server within a LAN
Nginx is one of the best web servers for improving the performance of static content. Additionally, it can also be helpful to serve cache content and perform SSL encryption to lower the load from the webserver
It can also be beneficial when optimizing content by compressing it to boost the loading time
Nginx can perform randomized experiments or A/B tests without placing JavaScript codes into pages.
Varnish:
Varnish is an open-source HTTP reverse proxy equipped with a cache engine. It is primarily created for high-traffic websites that serve dynamic content. Furthermore, you are free to use Varnish in the form of a load balancer, or a web app firewall (WAF), or an edge authentication and authorization server.
This proxy functions on all latest versions of Linux and FreeBSD, utilized primarily as a front for Apache or Nginx web servers. The efficient and flexible Varnish Configuration Language (VCL) allows you to define various features like managing HTTP requests, caching, and establishing connections to single or multiple web servers.
Due to this reason, several CDNs use Varnish in the form of their crucial foundation for sending content quickly.
Varnish supports Edge Side Includes (ESI), known as a language that assists you to reprocess sections of one web page in some other web pages. If your website uses plenty of recurring content on various pages, ESI can increase the speed of page load times of your site. It does this by caching recurrently used sections.
You can expand Varnish through its different modules (VMODs). Go through Varnish’s official tutorial to know how to set up Varnish in the form of a reverse proxy for WordPress.
Apache Traffic Server:
This is an open-source caching proxy server famous for its quick, scalable features. Formerly, it was a commercial product by Yahoo! However, they turned it to be open source and contributed it to the Apache Foundation for safeguarding.
Certain critical content networks and CDNs like Akamai, Yahoo, LinkedIn, and Apple utilize Apache Traffic Server to control their technology.
Also, you can use Apache HTTP Server (i.e., Apache HTTPd), known as an HTTP server daemon, for setting up a reverse proxy across your web server. Besides behaving as a virtual web server, it assists you in serving static and dynamic content to the users. The later section of the article discusses the setup process of Apache as a reverse proxy.
HAProxy:
HAProxy works as an open-source reverse proxy and also as a load balancer. It is created to incorporate the most prevalent web server architectures like cloud platforms and Linux distributions. Just like Nginx, HAProxy implements an event-driven I/O model. Furthermore, it supports splitting requests over numerous worker procedures.
For HTTP requests, HAProxy works efficiently even when subjected to heavy loads. Few of the substantial traffic websites on the Internet like Airbnb, Instagram, Reddit, Tumblr, Stack Overflow, GitHub, and Imgur use HAProxy to deliver their websites efficiently.
The process to implement HAProxy is beyond the reach of the article. However, you can go through their documentation to know how it works.
Note: Envoy and Traefik are two more open-source substitutes to HAProxy. Both of them are efficient reverse proxies and load balancers with several cutting-edge features.
Few other famous reverse proxies are GLBC, AWS Elastic Load Balancer, Google Cloud Load Balancer, and DigitalOcean Load Balancer. To know about an in-depth list of the premium reverse proxies and load balancers currently in use, check out Stackshare.io.
Reverse Proxy: Use Cases for WordPress Sites:
Chiefly, there are 3 use cases for implementing a reverse proxy for all WordPress sites.
For this example, only Nginx is used because it is the most famous reverse proxy for WordPress sites. However, the same fundamental principles will be valid to other reverse proxies.
Reverse proxies are usually difficult to install, organize, and support. So, Web hosting companies provide a $50 add-on subscription monthly for every reverse proxy that you need assistance with installation. Get further details from the support team of Web hosting companies.
1. Main and Proxied Sites Hosted on the Same Server:
If both the proxy and leading site are hosted on a similar server, the main one can execute a WordPress installation. In contrast, a typical WordPress installation controls the proxy site.
Since you possess access to the sites and their shared web server, it is easy to install the reverse proxy rules for the main website. Subsequently, you can configure the proxy site to process from the reverse proxy.
If both the sites are being hosted at Web hosting companies, you can contact Web hosting companies’ support team. Next, you can request them to install the reverse proxy. The process is as below:
Ensure that both the main and the proxy sites are hosted at Web hosting companies. But if not, then you can transfer both sites to Web hosting companies’ setup. You can do that either manually or after delivering a migration request.
Use a support ticket to submit a description of the domain configuration to the support team of Web hosting companies. It usually takes one business day to set up the reverse proxy.
Web hosting companies will install the appropriate reverse proxy rules on the leading site. Also, it will configure the proxy site to process the reverse proxy.
Below are the standard Nginx reverse proxy directives that Web hosting companies uses to load a subdirectory site across a reverse proxy:
In this code, substitute the /subfolder/ placeholder with the real subdirectory name. Moreover, the http://subfolder.domain.com subdomain must match the URL being used to direct the reverse proxy at the proxied site.
The caret and tilde symbols (^~) are present in the location directive. They inform Nginx that if it comes across the string defined, it must prevent the searching process for subsequent matches and finally use the commands mentioned here. Know in detail on reverse proxy directives of Nginx in its documentation.
After that, configure the proxied site for loading across the reverse proxy. Below are the standard steps that Web hosting companies follows to organize the proxied site:
From the location where the proxied site is loaded, you have to make a subdirectory. Every file of the proxied website is shifted to this subdirectory.
Revise the configuration files of the webserver to label the new subdirectory as the root directory for that proxied site. Also, you have to add a rewrite rule to discard the subdirectory from the request URL for every request coming in.
Revise every URL in the database of the proxied site to be equivalent to the live site URLs (e.g., example.com/blog).
Edit the wp-config.php file of the proxied site with $_SERVER[‘HTTP_HOST’] definition, directing to the URL of the main site.
If you use an SSL certificate, define rigid rules in the wp-config.php file to prevent redirection loops.
Note: A proxied site cannot make URLs that replica the similar subdirectory within which the proxied site processes. For example, a proxied site at example.com/blog cannot make a directory or page at example.com/blog/blog.
2. Only the Proxied Site Hosted on Your Server:
If there is access only to the proxied site and the corresponding web server, you have to contact the leading site’s server admin. They will help you to set up the reverse proxy rules.
For that, you should implement the same steps mentioned above. Apart from this case, you should configure the rules on two diverse servers.
For hosting your proxied site through Web hosting companies, you need to add a domain to the site that will direct to the reverse proxy. Typically, the subdomain fulfills this purpose (e.g., blog. example.com) to process the proxied site on a subdirectory link (e.g., example.com/blog).
Once your proxied site gets set up on Web hosting companies, feel free to contact the Web hosting companies support team for configuring the proxied site to load on a reverse proxy. During this time, the support team needs the actual IP of your for completion of the setup process to count visits properly. If you cannot provide a static IP because of the dynamic IP restrictions from several providers (like AWS CloudFront), your plan gets transferred to an equivalent bandwidth-based plan.
Finally, the process of the setup of the reverse proxy on your server is not in the scope of Web hosting companies’ support. This is because only the server admin can look after it.
3. Only the Main Site Hosted on Your Server:
If there is access only to the main site and equivalent web server, it is necessary to set up the reverse proxy. Next, construct its rules for loading the proxied site from an outside host. The installation and configuration of the proxied site for loading across the reverse proxy is the duty of the admin of the secondary server.
When your main site is being hosted at Web hosting companies, there will be access to the support team of Web hosting companies. You can create a support ticket to include the standard reverse proxy rules mentioned previously in the article. If needed, you can add some more customizations to those rules.
In the present circumstances, you are entirely accountable for the configuration of the proxied site to load it on the reverse proxy correctly.
How to Set Up Nginx as a Reverse Proxy:
If the situation is such that Web hosting companies do not host your website and the management of servers is your duty, then you should set up the reverse proxy on your own. Also, configure it to direct at the proxied site.
Based on the operating system of your web server, you can install Nginx another way. When using Linux distributions, various Nginx packages can be used depending on the version of your Linux distribution.
In the below example, the primary site is installed at example.com domain name. On the other hand, the proxied WordPress site is set up at subdomain, i.e., blog.domain.com. Both of them are controlled by Apache on a web server operating on Ubuntu 18.04. Moreover, in this example, Nginx is installed and configured in a reverse proxy on the main server.
Firstly, access your server’s terminal through SSH. Next, use the apt-get command for updating the packages list of your distribution and then install Nginx on the webserver you use. Follow the below commands:
sudo apt update
sudo apt install nginx
Now you have to configure Nginx to proxy requests for those domains that are hosted on Apache. For that, prepare a new virtual host file. The present example uses the nano editor to include the code. However, you can use any code editor you like.
A subdirectory link, i.e., example.com/blog, is defined in the above code, and it will be hand out by the Apache server. Ensure that you use the public IP address (or URL) of your proxied website in the proxy_pass directive. For this example, the proxied website is hosted over the blog.domain.com subdomain.
Note: Ensure that the proxied website is set up and all set to be served before you make any modifications.
Learn more about every reverse proxy directive used here in Nginx’s complete index of directives.
Now save the virtual host file. Next, activate the fresh virtual host by making a symlink for the files entitled example.com.conf in the /etc/Nginx/sites-available and the /etc/Nginx/sites-enabled directories.
After that, test Nginx for any configuration errors.
sudo nginx -t
If there are no errors, reload Nginx to enforce the changes.
sudo systemctl reload nginx
Nginx is now successfully set up to function as a reverse proxy. For confirmation, you can use the phpinfo() function. It helps you to check the PHP variables loaded whenever you visit your proxied site.
Within the SERVER_SOFTWARE and DOCUMENT_ROOT PHP variables, Apache hands out this domain across the backend. However, PHP variables like HTTP_X_REAL_IP and HTTP_X_FORWARDED_FOR validate that Nginx was used as a reverse proxy to direct the requests.
It is possible to enhance the speed of serving the WordPress site on Nginx with the help of the fastcgi_cache and ngx_cache_purge modules. The first module would cache your website, whereas the second module automatically cleans out the cache depending on specific events. The related events can be editing or publishing a WordPress post.
The Nginx Cache Controller WordPress plugin is useful to directly manage the proxy server cache of Nginx from your WordPress admin dashboard. But if you are currently using a WordPress Multisite installation, you have the freedom to use the Nginx Helper plugin.
How to Set up Apache as a Reverse Proxy:
First of all, confirm that you have two websites set up and operating at example.com and blog.domain.com. The first website doesn’t need to be a WordPress site. However, the second one must be a WordPress site because it is primarily used to load the blog of the root domain at the subdirectory link of example.com/blog.
Begin configuration of Apache by opening your server’s terminal through SSH and permitting proxy module of Apache.
sudo a2enmod proxy proxy_http ssl
Executing the above command will most probably restart Apache for reloading the freshly defined directives.
Now, you have to edit the virtual host file of your central server to make a reverse proxy. Below is the code to add:
<VirtualHost *>
DocumentRoot /var/www/app/public
SSLProxyEngine On ProxyRequests off
ProxyPass /blog http://blog.domain.com
ProxyPassReverse /blog http://blog.domain.com
</VirtualHost>
The ProxyPass directive creates a reverse proxy for the specified paths. On the other hand, the ProxyPassReverse command will interrupt the HTTP response headers delivered through this reverse proxy and rewrite them to go with the Apache server.
Once the file is saved, edit your wp-config.php file after adding the below code before the line asking you to prevent editing.
# ProxyPass Settings
# overrides the variables below to ensure that any
# request to /blog/* subdirectory is taken care of properly
Lastly, you have to update the database of your WordPress site to include the configuration values for /blog subdirectory link. For that, run the below SQL query:
UPDATE wp_options SET option_value = 'https://www.example.com/blog' WHERE option_name IN( 'siteurl', 'home' );
Now you can visit the https://www.example.com/blog URL and host your WordPress site at http://blog.domain.com subdomain load without altering its URL. You can carry on using WordPress as normal for browsing, writing, editing, and managing your site.
Limitations of a Reverse Proxy:
A reverse proxy causes a major security risk because it can read and modify all the traffic going through it. When you pass HTTPS traffic via the reverse proxy, it has to decrypt and encrypt the passing data. It implies that it should own the private keys of the SSL/TLS certificate. Hence, if any nasty party can negotiate your reverse proxy, it is allowed to log passwords and insert malware in your websites.
If you or your users can’t access your main server directly, using a reverse proxy leads to a single point of failure. To further understand, if you use a reverse proxy as a front to hand out multiple domains, its disconnection turns all the domains offline at once.
If you depend on a third-party reverse proxy like Cloudflare, keep in mind that you pass over sensitive info about your site to them. Though they are reliable, it is unpredictable what can be the outcome.
Bringing back the backups or letting staging sites go live on websites that load on a reverse proxy stops the proper loading of the proxied site.
The process of loading a WordPress Multisite installation on a reverse proxy can prove to be complex and challenging to maintain. That’s why Web hosting companies don’t allow the use of WordPress Multisite on a reverse proxy. But an individual WordPress subdirectory Multisite installation is helpful as an option to proxied sites.
Info:
Web hosting companies CDN possesses extremely low TTFB and famous for significantly improving your site’s performance. Each Web hosting companies account includes a free tier of Web hosting companies CDN. It is easy to set it up in a few seconds.
The majority of the advantages given by CDNs are identical to those offered by the reverse proxies. Now the question is – which one to choose among CDN and a reverse proxy?
You can settle with anyone as per your needs. If a reverse proxy is already installed, you will still notice an improvement in performance and speed from using a CDN. Both of them efficiently caches layer. Moreover, if there are any particular request handling requirements, you can easily configure it with a few custom headers directed by the reverse proxy or the CDN.
Summary:
The above article helps you to learn the complete setup process of a reverse proxy. Being highly flexible, WordPress is helpful as a blog or an e-commerce site, or a Learning Management System. Moreover, in a majority of cases, it is easy to customize WordPress to fulfill your requirements.
Occasionally you might need to use a distinct domain or a secondary server for hosting an extra site. It may be due to different technology stacks, especially for a large enterprise site, or setting up a WordPress blog for a previously set up non-WordPress website.
In both the above cases, a reverse proxy can prove helpful. So, you can gain the maximum benefit of WordPress without any compromise with the main website.
If you are planning to resolve WordPress not sending emails Issue read our step-by-step guide. We are also offering some tips to fix It with Most Used Contact Form Plugins.
A typical issue website owners may face is that WordPress does not send emails properly or sends them.
The majority of the managed WordPress hosting providers, counting Web hosting, don’t offer email hosting. But, this doesn’t imply that you cannot send emails from your WordPress setup. Usually, when you attempt to resolve the WordPress not sending emails problem, it is not a fault on the server. However, email is set up wrongly on the WordPress setup, or there is a compatibility issue.
The present post discusses how to recognize why WordPress cannot send emails to you or the users. It also shows how to resolve it. You may be running a standard WordPress website or a WooCommerce store. In both cases, the below post will help you to fix the emails not sending issue.
The post also discusses a few of the most famous contact form plugins and recognizes the exact reason behind the problem. Let’s get started:
Why Isn’t WordPress Sending Email?
There are specific reasons you may face problems with WordPress unable to send emails. They include:
Emails Are Sending but Going to Spam
Your Server Is not configured correctly
Your Contact Form Plugin is Sending ‘Spoof’ Emails
Now let’s go through how to recognize which of these may create the issue:
Emails Are Sending but Going to Spam:
Before performing any other tests, you need to ascertain that the emails from WordPress are not reaching spam.
If a user mentions to you that WordPress does not send emails, the reason may be the emails are going inside spam.
Inquire them to look at their spam folder for emails within the system. Few email clients may recognize emails from WordPress as spam since they are automated.
2. Your Server Isn’t Configured Correctly:
A typical reason why WordPress is not sending emails is your server is not configured for sending.
The web servers are not developed for sending emails. Your server may not be configured to utilize the PHP mail() function.
It is worth noting that you can effortlessly check if this is the cause of the problem and resolve it.
How to Test Whether the Server Is Sending Email?
The foremost thing you can carry out is to execute a test on your WordPress website through the free Check Email plugin.
It is an essential plugin created to test whether your WordPress installation and/or server could send emails or not.
After being installed, follow the below path in your WordPress dashboard.
Tools > Check Email
Now enter your email address to send a test to, and then click on ‘Send test email.’
Now you would notice a confirmation.
Verify your email client to know whether you have received the test email or not. The subject line would mention “Test email from https://yourdomain.com.”
Besides, make sure to look at your junk mail or spam folder. If you got an email, it suggests that WordPress can send emails on your web server.
If the emails are still not received, it would probably be a misconfiguration with your contact form plugin or an incompatibility issue. To get assistance, you can contact the plugin developer. Mention to them that you executed the above test and that the email automatically works on your WordPress setup. Alternatively, you can follow the following steps for using any one of the famous contact form plugins.
It is easy to know whether it is a compatibility issue or not if you are a Web hosting customer and possessing HHVM. Such users can momentarily switch to PHP 7 to examine the compatibility issue. It is pretty easy to switch to PHP 7 in your MyWeb hosting dashboard. Once the test is done, you can resume to HHVM.
When Web hosting customers or those customers with some other hosts face connection problems, they can try an alternative port. The reason can be that host blocking the port.
Web hosting utilizes the Google Cloud Platform. By default, this platform blocks outbound connections on port 25. As per Google, the outbound SMTP port remains block because this port is vulnerable to a considerable amount of misuse. For that case, you can try using an alternate port like 2525. The ports 587 and 465 are unlocked at Web hosting.
3. Your Contact Form Plugin is Sending ‘Spoof’ Emails:
If you have performed the above tests and your server is already configured to send emails, then the problem is with the plugin that sends emails from your WordPress website.
Most probably, it would be a contact form plugin.
The contact form plugins deliver emails that are occasionally recognized as spoof emails by the email clients. They are identical to the spam emails, and the email clients will ensign them as suspicious.
The contact form emails area may be occasionally visible as a spoof. The reason is they are delivered from a different address compared to the one added to the From: field inside the email you get.
Hence, if you have configured your contact form to fill the From field through the email address of the individual who fills out the form, however, the email originates from your WordPress site, then the problem is unique. The problem is your email client will be mistrustful of the email and may mark it as a spoof.
The problem may occur if emails are sent to and from identical email addresses. Hence, if the situation is that your forms plugin sends out emails from your admin email id and you too configured to deliver them to the particular address, certain email providers may not prefer it. This kind of issue is less probable than the ‘spoof’ emails problem.
For contact forms, usually, the receiver of the notification email will be you. The same suggests that you can modify the settings within your contact form plugin to solve the problem. Moreover, you can quickly test whether the emails are received or not.
Contact Form Plugins Affected:
A contact form plugin can be influenced due to the above issue. Below are specific plugins you may face the problem with:
Contact Form 7
Ninja Forms
Gravity Forms
Happy Form
Jetpack Contact Form
weForms
Formidable Forms
The below section discusses how to resolve the problem of emails not sending out for every contact form. First of all, let’s learn about how you fix the problem of WordPress not delivering emails for each of the reasons we recognized.
How to Prevent WordPress Emails from Going to Spam?
1. Whitelist the Email Address:
If email reaches spam, inquire your users to whitelist all your emails by including your email address into their list of contacts.
If the email is moved to the inbox in Gmail, it implies that emails from the particular address will not spam in the future. It is pretty safe to add the address to contacts.
2. Use a Safer Email Address:
It may be necessary to assess the email address from which your website is sending the email. As a default, it is vital to evaluate the admin email address. If contact@, info@, sales@, or anything similar, the email providers may consider it spam.
Make sure to try altering the email address and let it appear something more professional. Also, make sure any emails delivered to the particular address are switched to your standard address to ensure you don’t miss out on any replies. It is easy to do the same with the creation of an alias of your email address.
3. Set up Email Authentication:
Your domain name may not be authenticated correctly for your email. This can be a reason for WordPress emails reaching spam.
How to Set Up SMTP in WordPress to Send Email?
After executing the email test above, you may find that the emails are not being sent from your site. If this is the issue, then you have to use a third-party SMTP provider. Subsequently, connect it with your site to make sure it resumes sending the emails.
SMTP (Simple Mail Transfer Protocol) relocates emails over networks. Hence, if your server is not correctly configured to deliver emails, it makes it possible.
There are plenty of SMTP providers to opt from. The free ones are also included in the choice. So, it would help if you dedicated some time.
How to Configure Your Forms Plugin to Send Email Correctly?
The situation arises that your server is configured for sending emails, but there is still an issue with entries to forms not being sent. It may mean that you have to alter the settings for the condition.
Let’s learn about what to do for each of the famous forms of plugins to let such emails again.
For every of these form plugins, it is assumed that you have attempted to add SMTP to your site. If not, your server is already sending emails (and you already checked the spam folder), but still, the emails are unable to send.
Fix Contact Form 7 Not Sending Emails:
Contact Form 7 is the most famous free WordPress form plugins. It is one of the oldest plugins.
To fix the email not sending issue, modify the address from which your emails are sending out.
Within your WordPress admin, follow the below path:
Contact > Contact Forms
Choose the form you created and then open the ‘Mail’ tab.
Confirm that the ‘From’ field possesses the admin email address of your website instead of the email address input within the form. The same can be used in the ‘Reply to’ field only.
Ensure not to use the same email addresses for the ‘From’ and ‘To’ fields. Try to use a different email address compared to the one you already use for your site.
Now save your changes.
Examine the result after completing the form on your own.
Fix Gravity Forms Not Sending Emails:
One of the most famous and highly esteemed top-notch form plugins is the Gravity Forms. The possibilities are less to come across problems with emails not delivering from this plugin than the one with Contact Form 7. The plugin documentation shows in-depth guidance.
Try out the options in the documentation in sequence until the issue gets solved.
Fix Ninja Forms Not Sending Emails:
Ninja Forms supports both free and premium versions both. There are plenty of add-on plugins. The WordPress repository lets you freely download them.
If you face problems associated with emails with Ninja Forms, it is recommended to use the SendWP plugin.
The intention behind the design of SendWP is to let SMTP start functioning on your server. The same can be done using free plugins. If the problem is not related to your server not delivering email, SendWP cannot solve it.
If you want to stay away from paying $9/month for SendWP, implement the below email troubleshooting guide within their documentation.
Fix HappyForms Not Sending Emails:
HappyForms plugin comes in a free and premium version both. It includes a help guide, but it does not discuss the solution of emails not sending.
To modify the email address from which Happy Forms are being sent, you can change email settings for a form separately. The procedure is the same as with Contact Form 7.
Follow the below path:
HappyForms > All Forms
Now choose the form you wish to edit. You will see an interface opened up, and it appears like the Customizer.
Now open the ‘Email’ tab.
From there, you can modify the ‘To’ and ‘From’ addresses for notifications as well as confirmations. So, you can make sure spoof emails are not being sent.
After the changes are implemented, click the ‘Update’ button present at the top and review your form.
Fix weForms Not Sending Emails:
weForms plugin also supports free and premium versions. This plugin allows you to organize the plugin to use email through an assortment of email providers. The collection includes WordPress, SendGrid, etc.
There is a troubleshooting guide available to solve the email not sending out the issue. Ensure to follow the guide properly to recognize the cause of the problem and let your emails resume working again.
Fix Jetpack Contact Form Not Sending Emails:
If the Jetpack plugin runs, you may be using the basic contact form provided along with it. This is easy to do with adding a form block to a post or page in WordPress.
Jetpack comes with limited options for configuration, unlike the dedicated forms plugins. However, you can alter the address to which emails are sent.
Since Jetpack does not use a field from the form within the To or From field, the chances of problems associated with emails are fewer. If the problem occurs, the reason will be you are delivering emails to and from an identical address.
After the form is added, click on the editing icon over it. Next, you will see a dropdown menu. Use it to alter the address to which forms are being sent.
If you wish to alter the address from which forms are sent, you need to modify the admin email address for your site.
Fix Formidable Forms Not Sending Emails:
Formidable Forms plugin supports a free and premium version. If you are facing emails not sending contact forms in this plugin, then official documentation advises adding SMTP to your website.
Have you done it, and still things are not working? Well, it is perhaps because your emails got marked as ‘spoof’ emails. The reason is they are being sent out from an address that is not the exact sending address.
Within the WordPress admin, follow the below path:
Formidable > Forms
Now choose the form you wish to edit. Next, you click on the ‘Settings.’ tab available at the top. ‘Actions & Notifications’ tab is present at the side; click on it. From there, open the ‘Email notification’ meta box.
Now you can change the address from which the notification emails are sent and from. As a default, it uses the admin email address for both and not an email address used from the form.
To modify the address for which the emails are sent, you need to edit the ‘To’ field and manually enter the email address you wish to use.
The changes will be saved in the settings screen as you continue doing. Hence, make sure you confirm that you entered correctly.
If your emails are unable to send via WordPress, such typical problems can be the root causes.
Summary:
Occasionally WordPress cannot send emails, and you may struggle with what the cause is. This problem is one of the most typical WordPress errors. It can be since the emails are reaching spam, or your server is not configured for sending emails, or maybe the settings of your contact form demand changes.
The above guide assists you in evaluating the reason why your WordPress site cannot send emails and lets you fix it. Soon, you must see your emails working correctly.
If you are looking for the best Laravel tutorials for free, do read our recommendations.
For many years, Laravel has been the famous choice of PHP application development. Giant network, active community, excellent job market, flourishing startups — everything it possesses makes it valuable to accept new technology.
For learning Laravel, there is no need to worry. The following guide highlights the easy-to-understand Laravel tutorial. It perfectly matches your knowledge level and learning approach. So, let’s get started:
Why Learn Laravel?
There are several reasons why I may need to learn Laravel. The below section highlights the most important reasons. Also, the section will discuss a few tips on how to successfully learn the framework before diving deep into the Laravel tutorials. The tutorials include complete details, pros, cons, and use cases.
1. Rapid Development:
Laravel is extensively popular as an open-source PHP framework designed for web application development. It is based on the MVC (Model View Controller) architectural model. This framework boasts meaningful and clear-cut syntax that quickens the development. Also, it leads to a clean and justifiable codebase and scalable apps.
2. Wide Popularity:
The source code of Laravel is being hosted on GitHub, where it’s the most famous PHP archive, having 60,000+ stars and still counting. Moreover, several Laravel videos, tutorials, screencasts, and other online resources can assist you in gaining knowledge of the framework and stay advanced with recent developments.
3. Vast Ecosystem:
Due to its wide popularity, Laravel owns an enormous network of official and third-party packages, which can be supplemented with your application dev. Furthermore, the official packages contain server management tools & platforms, monitoring & testing tools, an administration panel, developer environments, and many more. The same is showcased on the homepage of Laravel under the ‘Ecosystem’ menu.
If you wish to add functionality that does not still exist, it is possible to develop your Laravel package.
4. Active Community:
There is a vast community around Laravel which can be found on Laravel.io, LaraChat, Laracasts Discuss, Reddit, Discord, and other places. Furthermore, Laravel possesses an official conference named Laracon that happens each year on 3 continents, namely Europe, America, and Australia.
5. Strong Job Market:
Laravel development is an exceedingly active skill that is high in demand. Its job prospects are outstanding. It possesses an official job board entitled Larajobs where the specific job titles are ‘Backend Laravel Developer,’ ‘Laravel Developer,’ ‘Full-Stack PHP Developer, ‘and ‘TALL Stack Developer.’
Apart from Larajobs, it is easy to find multiple Laravel jobs on some other job websites like Indeed, Monster, and LinkedIn. Furthermore, remote Laravel jobs are too available at We Work Remotely, RemoteOK, and other websites.
6. Potential Business Opportunities:
If you intend to not work for somebody else but instead set up your own business, then Laravel can prove to be an outstanding solution. Already, there are several flourishing businesses developed on Laravel. They are namely Mailcoach, OctoberCMS, Invoice Ninja, Monica CRM, and CodeCourse. Of course, there are many more.
Through Laravel as a foundation and implementing the most acceptable practices and efficient PHP hosting, your app will undoubtedly enhance production without any issues.
Possessing an active community and robust job market, Laravel is the popular solution for PHP application development.
How to Learn Laravel:
To begin learning Laravel development, it is essential to have some prior knowledge.
Prior Knowledge:
You have to use PHP, chiefly object-oriented PHP, safely. It is vital to know how to utilize the command line as well as the Composer package manager. The mentioned two topics are encompassed in the PHP tutorials designed for the beginner’s level.
Prior knowledge of HTML and RDBMS (relational database management systems) can prove beneficial for a smooth start.
Learning Resources:
Getting educated with a PHP framework like Laravel is unique from understanding a programming language like PHP. In the Laravel framework, you will do more practical projects and very few programming exercises right from the beginning. This is exactly how most Laravel tutorials are ordered.
Creating real-world apps also implies that you will often use Laravel as a portion of a stack. For example, several Laravel tutorials utilize it through a Vue frontend. This suggests that you would also have to learn Vue.js to complete the project.
It is difficult to find tutorials for beginners, and many of the tutorials are presented in video format. Moreover, there are hardly any books available on Laravel primarily because changes are implemented rapidly that meanwhile a book gets published, the corresponding framework is already two versions in advance.
Laravel Versions:
One vital thing when choosing a Laravel tutorial is focusing on the Laravel version it encompasses. You must be acquainted with the below Laravel versioning rules:
Starting from version 6, Laravel and its official packages pursue semantic versioning (major.minor.patch). For example, 8.* is the main release.
Before Laravel 6, the framework utilized the paradigm.major.minor rule, for example, 5.8.* is too a significant release.
The major release is done every 6 months (in February and August).
One LTS (long-term support) release is accomplished every 2 years.
For standard releases, bug fixes are offered for 6 months. The security releases are provided for 1 year.
For LTS releases, the bug fixes are offered for 2 years, and the security releases are provided for 3 years.
The Laravel’s successive major releases are 5.5.* (LTS), 5.6.*, 5.7.*, 5.8.*, 6.* (LTS), 7.*, 8.*
There is also support for minor releases and patches. However, they don’t include any significant changes.
Since there are 2 significant releases done every year, the tutorials can barely follow along. The majority of the Laravel tutorials you will find any time will be approx. 1-3 versions lagging compared to the actual release. It is not a big issue unless the framework undertakes a full overwrite. The last time it happened was when Laravel 4 got released in 2013.
Though it is advisable to use the newest tutorial available, there is no need to worry if you need to go back to 2 or 3 releases. This holds mainly if it’s a practical section that demonstrates how to develop the kind of application you wish to gain knowledge about.
You may find certain discrepancies between the various versions. However, they are typically recorded by either the author or some other learners within the discussion portion. Moreover, it is a decent idea to go through the release notes of every latest release to perceive what has been modified. The same will help you to know what to focus on more.
Learning Budget:
Learning Laravel is not at all costly, and you can even do it for free. The present guide contains both free well as paid Laravel tutorials. The paid versions are not too expensive. It is possible to subscribe to a premium tutorial website for an approximate 15-30 USD/month price.
Though you do not wish to spend money on Laravel learning, it proves helpful to browse through the paid section. This is because a few premium tutorial sites contain free trials, special free video courses, and some other free offerings.
6 Best Laravel Tutorials Sites for Free:
Now let us get familiar with the best Laravel tutorials:
1. Official Laravel Docs (Beginners, Intermediate, Advanced):
The official Laravel documentation is a straightforward explanation of the Laravel framework. The Laravel community is maintaining it, and you can find it on GitHub. It begins with an installation guide along with an overview of every Laravel concept. These concepts are security, database management, templating, etc. You can even find the documentation of official Laravel packages.
Pros:
Most advanced Laravel resource
Information is clear and straightforward to search
Docs for obsolete Laravel versions are also present
Contains code examples and top practice tips
The bug reports can be submitted on GitHub
Cons:
Uninteresting tone and design
When to Choose Laravel Docs?
The certified Laravel documentation is valuable irrespective of the knowledge level. It helps to check out the information of any concept related to Laravel. But it can be complex for beginners due to lots of information.
It is the most acceptable place to get familiar with the functionalities of the latest releases or for comparing various releases.
Laravel News is a comprehensive Laravel tutorial site incorporating multiple aspects. The corresponding blog features the recent Laravel news and a segment for Laravel tutorials encompassing topics ranging from beginner to professional level. It also features a bi-weekly Laravel podcast and a Laravel newsletter that is distributed every Sunday morning. Furthermore, Laravel News also represents famous Laravel packages with a short description and sample code.
Pros:
Regularly updated
Provides content in varied ways (podcast, blog, newsletter, etc.)
Finest practice pieces
Free tutorials are offered on creating practical Laravel apps/tools/tasks
Helpful screenshots and code fragments
Cons:
Few of the posts are sponsored posts (although it’s plainly stated)
Challenging to browse (successive portions of the same tutorial series are not connected)
When to Select Laravel News?
Laravel News is recognized as the most acceptable free source for any news related to Laravel. Their tutorials are of superior quality and encompass several fascinating aspects. However, if you are not interested in the same, it is better to subscribe to the newsletter to get the latest updates on the Laravel framework. Every edition also contains few Laravel job listings. Furthermore, the bi-weekly Laravel News Podcast is an outstanding resource for Laravel developers of any skill level.
Tuts Make is a well-known tutorial blog that encompasses various programming languages and technologies such as Laravel. Its tutorials are concise and easy to understand. They discuss the general Laravel tasks, use cases, and errors. Besides, they contain multiple code snippets that can be used in your projects.
TutsMake allocates a distinct category for Laravel interview questions & answers, with clear-cut explanations.
Pros:
Regularly updated
Tutorials for practice
Easy-to-skim content
Extensive but organized code examples
Job interview Q&A
Cons:
Tutorials are challenging to browse (no tags or other classifications)
Grammar errors all over
When to Select Tuts Make?
Tuts Make is not suitable for beginners. This is because you need to possess an intermediate knowledge of the Laravel framework to comprehend these tutorials. They are incredibly code-oriented without any discussion of the theory. Moreover, the tutorials are not interlinked. It is important to note that Tuts Make is a blog, not a detailed Laravel tutorial series. To obtain a Laravel job, make sure to look at its interview Q&A section.
LaraShout is famously known as a free tutorial website that fully emphasizes the Laravel framework. Apart from practical Laravel tutorials, it showcases guides on vital theoretical concepts like storage, middleware, queues and jobs, and many others. Few of the tutorials are clustered as series to impart a deep knowledge of every topic.
Presently, LaraShout contains 4 series, namely Design Patterns, Collections, E-Commerce Application Development, and Package Development.
LaraShout is chiefly suggested for intermediate as well as advanced learners. It even includes particular beginner-level tutorials. All 4 Laravel tutorial series are essential to check out. But, keep in mind that they don’t essentially encompass everything you will require. This is because LaraShout is more like a tech blog than an all-inclusive educational site.
5. Learn2torials (Beginners, Intermediate):
Learn2torials is essentially a one-person project presented by Sandip Patel. It features free tutorials discussing various frameworks and programming languages. Moreover, the Laravel tutorial section includes several essential aspects of this framework. It contains elements right from installation to caching.
The focus is more on theory rather than practice. However, as they contain several longer code examples, you can get great help to solve real-world problems.
Pros:
Well-written tutorials with considerate explanations
It uses an easy-to-follow Q&A format
Well-commented code examples
Multiple beginner-level tutorials
Cons:
Difficult to search website (absence of taxonomies)
Tutorials don’t pursue a logical sequence, from beginner to more advanced pieces
If you are a beginner or previously know any Laravel development, but your knowledge is inadequate on it, then Learn2torials proves to be the perfect Laravel resource. It even contains several overlaps along with the certified Laravel docs. Hence, you can use the two resources jointly to harden your understanding of the fundamental concepts.
Eloquent by Example is another great one-person project provided by Jeff Madsen. It is a free Laravel tutorial series exclusively about Eloquent ORM. There is an object-relational mapper. It is responsible for transmitting data between Laravel objects and the relational database that runs in the background. Examples of these databases are MySQL, SQLite, PostgreSQL, or SQL Server. You can choose any one of these databases according to your preference.
The tutorials are organized as successive lessons and interpreted like the chapters of a book with a discussion on Eloquent ORM.
Pros:
Very well written tutorials are very (almost like a novel)
A well-organized website with simple navigation
Plenty of code examples
‘Further reading’ sections along with resource recommendations
Cons:
No preliminary lesson for clarifying fundamental concepts like ORM
Absence of publication date on tutorials
When to Choose Eloquent by Example?
If you previously hold a bit of Laravel knowledge but willing to gain expertise on Eloquent ORM, then Eloquent by Example is the finest Laravel resource. It is unclear when it was recently updated, but the links direct to the Laravel 5.8 docs. Hence, it may include some obsolete information and may be devoid of new additions.
You will find it out to be the all-inclusive Eloquent guide there.
Best Laravel Tutorials: 6 Best Free Laravel Tutorial Videos, Screencasts, and Podcasts:
BitFumes is a learning website that features free and paid screencasts and video courses in web development. The corresponding accessible Laravel tutorial segment contains lots of quality video courses. These courses are intended for beginners. Also, you can find out some advanced classes too.
You will also find lots of free Laravel tutorials presented on the YouTube channel of BitFumes. It comprises a long course of length 6.5 hours—the same covers Laravel development right from the fundamentals to cutting-edge topics like Livewire.
Pros:
No need to sign up to see the free courses
Videos are organized in the form of lessons and chapters
Progress tracking feature included
Tutorials explaining the common tool pairings (Laravel with DigitalOcean, PHPUnit, VueJS, etc.)
Courses are correctly labeled (including the number of tutorials, level, length, and publication date)
Cons:
The ecosystem is hard to understand (free Laravel courses are available both on YouTube and the website, and it has a premium course)
When to Select BitFumes?
Its YouTube channel is helpful to browse through though you possess an advanced level. The free tutorials available on the BitFumes website encompass lots of topics suitable for beginner-level. These topics are difficult to find free of cost elsewhere. Moreover, it has a premium Laravel course that includes advanced topics like Stripe integration and test-driven development.
2. Laravel Business by Povilas Korop (Beginners, Intermediate, Advanced):
Laravel Business is a well-known YouTube channel comprising free video tutorials explaining how to use Laravel for business. Essentially, it is a one-person project developed by Povilas Korop. This person is the author of Laravel Daily.
On Povilas Korop’s channel, he posts multiple YouTube videos each week. These videos discuss topics like Eloquent, Blade, SaaS applications, PHPUnit, and many others. In addition to practical tutorials, Povilas also carries out comparisons and offers career & business recommendations. Within the ‘Community’ tab, he mentions the ‘Laravel tip of the day regularly.
Pros:
Updated almost each day
Provides a great
practice
Longer videos are collapsed into smaller segments
‘Related Links’ recommendations within the tutorial videos
Occasionally he reverts to his viewers in the video answers
Cons:
Videos are difficult to find
When to Select Laravel Business?
Even though Laravel Business is chiefly targeted at more advanced users, the tutorial can be an excellent Laravel resource. The business and career advice by Povilas is very much helpful.
If you are involved in Laravel development for some time and got bored with it, this channel can regain your motivation. This is because it describes several fascinating aspects, novel features, and clear use cases that do not present anywhere else.
Laraning’s name originates from combining the words ‘Laravel’ and ‘learning.’ It is completely focused on Laravel learning. This tutorial features free video courses, classified as ‘Features,’ ‘Series,’ and ‘Courses.’
‘Series’ are some individual joined video tutorials discussing Laravel packages and some other topics. On the other hand, the ‘Features’ are still in the development stage and presently contain just one video tutorial on the Blade templating engine. The third type, i.e., ‘Courses,’ is a lengthier video tutorial series intended for beginners.
Pros:
Well-organized courses
Easy to browse its website
Real-world examples
Full HD videos
Code content is present on GitHub
Cons:
Not fully developed
No publication date available on videos
When to Select Laraning?
Since the Laraning website is not entirely developed yet, there are some missing features. For example, the ‘Sign In’ button is still not functioning, and a few of the series contain just 2 video parts. But, those tutorials that are already posted are of high quality, and you must go through them. Notably, the Laravel from A to Z course is worth checking out if you are a beginner learner of this framework.
4. Laravel PHP Framework Tutorial by FreeCodeCamp (Beginners, Intermediate):
Laravel PHP Framework Tutorial is a video course by the FreeCodeCamp online learning platform. It is aimed at beginner learners. Though the back-end part of the curriculum by FreeCodeCamp focuses on Python, it also posts educational videos on a few other back-end languages. These videos are shared on its Youtube channel, and they are prepared by members of the corresponding open source community.
Victor Gonzalez develops it, and it explains creating an Instagram clone from the start. This is accomplished with the features like profile editing, follow/unfollow, resizing images, and a few others. The length of the video is approx. 4.5 hours. However, it is collapsed into tiny sections to make sure it becomes easy to follow.
Pros:
Real-world project
Detailed explanation
Audited by FreeCodeCamp
Demo code present on GitHub
Community members assist with questions posted in the comment section
Cons:
Depended on Laravel 5.8, so may include particular obsolete info (you can find solutions for these problems in the comment section)
When to Select Laravel PHP Framework Tutorial by FreeCodeCamp?
If you desire to get training on Laravel via developing the clone of a general, real-world application, this tutorial is one of the best ones, available free of cost. Victor’s clarifications are simple to understand. Besides, the FreeCodeCamp community is very supportive if you come across any issues.
Though it is intended for beginners, it is too helpful if you previously hold a bit of knowledge of Laravel but willing to learn how to compose an Instagram-like application.
5. Let’s Build with Laravel: A Linktree Clone (Beginners, Intermediate):
Let’s Build with Laravel: A Linktree Clone is recognized as a quickly working Laravel screencast. It instructs you to create a social media landing page builder application identical to the famous Linktree service.
The length of the video is 58 minutes. It does not describe fundamental concepts or demonstrates how to set up Laravel. Instead, it directly switches to hands-on training. It is a free Laravel tutorial created by Andrew Schmelyun. This person has uploaded many Laravel videos on his YouTube channel, which are so much helpful.
Pros:
Clear explanation with no fuzz or interruption
Allows building a functional Laravel app within an hour
Video is categorized into tiny sections
Source code is present on GitHub
Cons:
Audio quality is average
When to Select ‘Let’s Build with Laravel: A Linktree Clone’?
The video’s description available on Youtube mentions that it is intended for beginners. But if you are just beginning to use Laravel, you have to bear in mind that this video presumes prior knowledge of Laravel. The same includes installation or preliminary configuration.
This Laravel tutorial is perfect for developing your initial app through the framework. It is also helpful to enhance your app development skills.
6. The Laravel Podcast (Beginners, Intermediate, Advanced):
Matt Stauffer hosts the Laravel Podcast, which is a bi-weekly podcast. It features discussions related to Laravel and PHP. Every episode focuses on one topic like authentication, debugging, migrations, installing a local environment, and many others. Typically, the length of each episode is approx. 1.5 hours. Moreover, you can listen to these episodes either through the embedded podcast player or through Apple Podcasts.
Pros
Information-rich content
Updates regularly
Episodes are clearly described (includes notes, summary, link recommendations)
Transcripts are supported
High-quality audio
Cons
Episodes cannot be downloaded
When to Select the Laravel Podcast?
Even though a podcast is not a standard tutorial, it serves as a distinctive approach to acquaint yourself with the latest technology. It lets you listen to the opinions of industry experts and keep you updated with cutting-edge features. Hence, the Laravel Podcast is a highly recommended Laravel resource regardless of the skill level of developers.
8 Best Paid Laravel Tutorial Videos, Screencasts, and Books:
1. Laracasts (Beginners, Intermediate, Advanced):
Laracasts is a high-quality learning platform providing screencasts on web development. Though its key focus is the Laravel framework, there are also courses focused on other technologies. The majority of these courses can be used together with Laravel like PHP, CSS, JavaScript, Vue.js, SQL, and more.
It also showcases 5 Laracast Journeys, namely Laravel, PHP, JavaScript, Testing, and Tooling. A Journey is a compilation of screencasts that you require for gaining expertise in a particular skill.
Pros:
Screencasts are organized in 3 varied ways (series, topics, journeys)
Easy to browse its website
High-quality screencasts (audio and video)
It also includes screencasts on famous Laravel packages (Forge, Envoyer, Nova, etc.) and theory (principles, design, etc.)
Lively discussion forum (accessible with a free forum account)
Cons:
Does not have a free trial period
When to Select Laracasts?
Laracasts are high-quality video tutorials recommended at every level. Even though it’s a premium service, you can find some completely free series, for instance, an intermediate series on Envoyer and a beginner series on Forge. However, you can’t filter for free courses, so you’ll need to find them yourself.
Even if you don’t want to pay for the membership, it’s also worth signing up for a free forum account, especially if you need some community help with your code.
Laravel Daily is popularly known as the paid Laravel tutorial site by Povilas Korop (the creator of this Laravel Business YouTube channel). Povilas possesses 10 paid and accessible Laravel video tutorial series. They encompass fascinating topics like developing an invoice creation app with Laravel and creating a CRUD SPA through Vue and Laravel. Also, the topic revolves around learning Eloquent, developing a REST API through Laravel, and a lot more.
You can register or pay through the safe Teachable platform
You can submit your questions to Povilas through email
Cons:
Absence of publishing date on the courses (though you can assume it from the commit history of the associated GitHub repo)
When to Select Laravel Daily?
Laravel Daily is suggested for Laravel developers irrespective of level. Some Laravel developers may be previously a subscriber to the channel of Laravel Business and prefer Povilas’ teaching approach. For them, his paid video courses on Laravel Daily could be the subsequent logical step in your Laravel learning track.
It is too an outstanding alternative if you are willing to learn skills that are trendy in the job market. For example, you can learn API or SaaS development using Laravel.
CodeCourse is a high-quality screencast platform aimed at web development tutorials. Most of the screencasts are organized as ‘Paths,’ and they are accessible in 4 categories. They are namely Vue.js, Flutter, Laravel, and design patterns.
The Clean Laravel course track comprises 9 video courses. It instructs you on the proper method to write quality Laravel code without errors. Moreover, CodeCourse also supports a shorter Laravel path entitled ‘Filtering with Laravel.’ In addition to the tracks, it also showcases single courses wherein you can learn how to develop varied types of apps through Laravel. These apps can be an e-commerce platform, a code snippet website, and a Twitter clone.
Pros:
Addition of new content regularly
Plenty of information on courses and paths
Superior quality screencasts (both audio and video)
Emphasizes practice skills
Shows short screencasts named ‘Snippets’ for free
Intro videos are provided for free
Cons:
The website is not adequately structured (it is unclear that they have varied kinds of content, ‘Snippets’ are difficult to find, single courses are only accessible from the ‘Library’ menu, etc.)
No free trial
When to Select CodeCourse?
To make the most out of the Laravel screencasts by CodeCourse, you should be acquainted with the fundamentals of Laravel development. But, if you possess an intermediary knowledge of the framework, it is easy to learn many new aspects.
Though it is a premium service, it is not too costly. Hence, if you can find a path or course that interests you, it is a decent investment considering your effort and time.
4. Building APIs and SPAs with Laravel, Vue.js, and Capacitor (Advanced):
A complete guide to developing APIs & Single-Page Applications using Vue.js, Laravel, and Capacitor. It is an ebook from Dan Pastori and Jay Rogers. The same is available on ServerSideUp. You will be familiar with the way to create web & mobile applications from an identical codebase. Here all your apps connect with a unified API.
The book discusses the procedure of creating a helpful app named Roast. It is a coffee house finder app. It is not simply a demo, but an existing app is allowing you to sign up, include your favorite cafe, search for coffee houses over a map, and more. The Roast app is easy to install on an Android or iOS device.
Pros:
Written by industry specialists
Well-organized content (table of content is present on the sales page)
Two free chapters (but you have to sign up for the ServerSideUp newsletter to receive them)
Optimized Sketch and Figma icon templates for Capacitor
Accessible in 3 unique formats (PDF, MOBI, and EPUB)
Provides access to a private online community for getting help (applicable only if you purchase the more costly package)
Lifetime access as well as updates
Specific free, advanced-level Laravel tutorials on the ServerSideUp website
Cons:
Extra video tutorials (promoted as a portion of the more costly package) are yet under development.
When to Choose ‘Building APIs and SPAs with Laravel, Vue.js, and Capacitor’?
If you are an experienced Laravel developer, then this ebook can enhance your skill and knowledge. It effectively guides you on the way to support 3 codebases (iOS, Android, and web) while developing a complex application.
It too pairs Laravel with the latest tools like the Nuxt.js frontend framework and the Capacitor cross-platform runtime. Furthermore, it encompasses Laravel 8. Hence, currently, it is the newest Laravel book accessible on the market.
5. LinkedIn Learning (Beginners, Intermediate):
LinkedIn Learning, formerly known as Lynda.com, is a high-quality e-learning platform. It provides a comprehensive learning track in Laravel development.
It comprises of 5 individual courses. They are Laravel basics, testing, security, deployment, RESTful API building, Vue basics, and using Laravel and Vue.js collectively as a full-stack environment. If you complete this learning track, you will get enough knowledge to kick start your career as a full-stack Laravel developer.
Pros:
Instructors hold great industry expertise (namely Justin Yost, Michael Sullivan, Ray Villalobos)
Superior quality, professional videos reviewed by LinkedIn
Well-organized, easy to browse content
Transcripts are present
You can receive a Linkedin badge of achievement
1-month free trial
Mobile apps accessible on Android and iOS devices
Cons:
The courses include Laravel 5 and 6, so they may consist of obsolete info at certain places.
When to Select LinkedIn Learning?
If you intend to function as a full-stack Laravel developer and there is an extensive portfolio, then the Laravel path from LinkedIn Learning may be beneficial to get a job. This is because you can showcase the achievement badge on your LinkedIn profile. It can also prove an excellent pick if you wish to make a more prolonged course on the full-stack Laravel development, wherein all the essential content is already amassed for you.
Udemy is a worldwide e-learning market wherein autonomous creators are selling out their video courses. These courses are not just focused on web development but also cover several other subjects.
The Laravel topic presently contains 280 courses for all knowledge levels. The interface of Udemy offers you many varied filters like duration, level, price, and many more. They will assist you in finding out the finest Laravel tutorial. Apart from English, it provides courses in many other languages.
Pros:
Easy-to-browse user interface
Plenty of information on courses
A broad assortment of Laravel courses
Subtitles in various languages (based on the course)
Offers certificate of completion
Supports 30-day money-back guarantee
Mobile apps are accessible on Android and iOS devices.
Cons:
Quality of audio and video differs because indie authors post the courses
When to Select Udemy?
Because Udemy provides nearly 300 Laravel tutorial video series, it is necessary to dedicate effort and time to find the needful thing. It is valuable to pay attention to the ‘new,’ ‘best seller,’ and ‘hot & new’ labels, though you could not sort out for such characteristics.
Remember to go through the student reviews and look at the previews. This is because Udemy is not a unified platform with a consistent quality assurance procedure. In case you face any issues, you can regain your money through the 30 days money-back guarantee.
Skillshare is a great e-learning market identical to Udemy. But it utilizes a unique pricing model. There is no need to make payment for separate courses. However, you need to pay a monthly fee, and subsequently, you can use every Skillshare course.
Presently, Skillshare registers 22 Laravel video courses developed by sovereign teachers. But, few PHP courses are also registered in the form of a ‘Laravel course.’
The majority of the Laravel courses from Skillshare emphasize hands-on skills like creating a to-do app, a mailing list filter, a personal budget website, a task scheduler admin panel, etc.
Pros:
Well-organized courses
The interface is easy to browse
Includes note-taking feature
Videos come with English captions
Mobile apps accessible for Android and iOS
Supports 7-day free trial (mandatory to use credit card details)
Cons:
Need to sign up to look at pricing plans
Video quality differs over the courses
Absence of publishing date on courses (but you can filter for courses that are created this year)
When to Select Skillshare?
Though Laravel development is not the prime focal point of Skillshare, finding out some high-quality courses is possible. If you already possess a Skillshare membership, it is advisable to go through the Laravel tutorial videos.
On the other hand, if you are a novice to Skillshare but fascinated by some other topics they support, it can be a decent idea to register a membership. The topics vary from music to photography.
8. Eduonix (Beginners, Intermediate):
Eduonix is a popular online learning marketplace comprising of independent instructors, identical to Skillshare and Udemy. It makes use of a similar pricing model like Udemy. Hence, you need to pay for every course separately. There is also an option supported for lifetime membership to every Eduonix course and some bunch discounts.
Presently, it provides 16 Laravel video courses, most of which instruct you through a practical project. The type of project may be making a hotel app with translation in 4 languages, a contact manager app with a Vue frontend, a single-page forum application, and others.
Pros:
In-depth details on course content (containing when it was recently updated)
Eduonix can prove to be a decent choice if you are more fascinated by practical app-building than theory. Though it does not provide lots of courses on Laravel development, it is advisable to focus on it. This is mainly because few creators sell their courses on Udemy and Eduonix with a varied price tag. (Eduonix is cheaper).
Summary:
The present guide on free and paid tutorials assists you in gaining expertise on this famous framework. Fixing a learning goal to know where you are reaching up can benefit you to find out the finest Laravel tutorial. If you hold previous experience with independent online learning, you may know what kinds of materials to choose from. For example, materials can be text-based tutorials, screencasts, videos, blogs, podcasts, or longer books.
You don’t essentially need to begin with only one Laravel tutorial. However, you can choose a combined approach. For instance, you can start with a video course when listening to a podcast, signing up for a newsletter, and going through a blog simultaneously.
If you are uncertain about what skills you require, it is a decent idea to go through job sites like LaraJobs. This will help you know what skills are in high demand in the market.
It is also convenient to use a project planning app like Trello or any alternatives to follow your progress, fix deadlines & reminders, and continue motivating yourself by tracking your learning graph.
When you opt for a paid version of the Laravel tutorial, it is typically better, to begin with, the monthly subscription rather than paying in advance for a year. By doing this, you can immediately know whether your expectations meet or not. It is recommended to do this if the monthly fee is lesser than that of the annual subscription.
Lastly, begin to create a functional Laravel app at the soonest in the learning procedure. Perceiving that you are capable of completing a real-world project assists you in following your learning and achieve your goals.
If you are looking for the best WordPressSecurity Plugins, check our recommendations.
The following article familiarizes you with some of the best WordPress security plugins. Before starting, let’s take an example. Suppose you purchase a new house and this latest investment needs a hefty down-payment which you perhaps not used for spending. You may be afraid of the inspection fees before buying. Besides, mortgage and insurance payments also need to be considered. All of these add up to a significant expense.
Related: Best Free WordPress Security Plugins
It is said that buying real estate is one of the finest investments you could make. However, this investment is expensive. You would want to protect it as much as you can for such a hefty investment, isn’t it?
Therefore, you purchase insurance and consider installing an alarm system or any kind of security camera. Several experts recommend at least including a security system sign over your door. By doing this, it will frighten those who do not wish to take a risk. This security is intended to secure the initial investment and the prospective for that investment in the future.
And you should think a similar way for your WordPress website.
The upfront investment is required when starting a blog or a small business, or an e-commerce website. This investment needs to be made for the products and services such as plugins, themes, hosting, and website development. The same does not contain any assistance you should hire like salespeople or customer service reps.
This preliminary investment is adequate to protect your website from the beginning. But significantly, you guarantee that you don’t overlook to secure the potential money you will make in the future.
As a default, WordPress core has specific security measures. However, it is negligible compared to what a trustworthy security plugin accomplishes for you. For instance, the best WordPress security plugins offer the following:
Active security monitoring
Malware scanning
File scanning
Blacklist monitoring
Post-hack actions
Security hardening
Brute force attack protection
Firewalls
Notifications whenever a security threat is identified
and much more
Your Foremost Priority Must Be Secure Hosting:
The security of your website is equally good as the foundation and the backend it is running on. Before going through security plugins, it is significant to select a WordPress host that has organized security measures. For example, HostingXP is one of the best WordPress hosts with security measures in place.
Many of these protections are implemented at the server level. Moreover, they can be so effective without severely influencing the performance of your website. You need not spend time going through many security settings within plugins in which you may not understand their working mechanism.
Below are certain security features that HostingXP provides on every WordPress managed hosting plan:
HostingXP identifies DDoS attacks, checks for uptime, and automatically prohibits IPs that have over 6 failed login attempts within a minute.
Only encrypted SSH and SFTP connections (no FTP) are maintained while directly accessing your WordPress websites.
Hardware firewalls, together with added active and passive security measures, are implemented to avoid access to your data.
The open_basedir restrictions also prevent the execution of PHP inside standard directories, which are susceptible to malicious scripts.
HostingXP utilizes Linux containers (LXC) and the Google Cloud Platform (GCP) that offers absolute isolation not just for each account but also for each specific WordPress site. This is a more secure approach than the one provided by some other competitors. GCP too implements data encryption at rest.
HostingXP only executes the PHP versions like 7.2, 7.3, and 7.4. The unsupported PHP versions are risky because they no longer include security updates and are susceptible to unpatched security risks.
Nothing is entirely hack-proof, and so HostingXP offers free hack fixes for every client.
Note that plenty of security plugins lead to performance problems because of their uninterrupted and scanning features. Therefore, HostingXP prohibits some security plugins. Furthermore, HostingXP also uses load balancers through the Google Cloud Platform. This implies that IP blocking functionalities of few security plugins will not work as planned in some instances.
If you are a HostingXP client, it is advisable to use a solution like Sucuri or Cloudflare, together with HostingXP. By doing this, you will get additional protection or assistance to reduce bot and/or proxy traffic.
But every host does not offer so much high security as HostingXP. This is where WordPress security plugins prove to be advantageous.
Best WordPress Security Plugins in 2019:
Take a look at the list of the best WordPress security plugins. The later section highlights a detailed analysis of each of them.
Sucuri Security – Auditing, Malware Scanner and Security Hardening
iThemes Security
Wordfence Security
WP fail2ban
All In One WP Security & Firewall
Jetpack
SecuPress
BulletProof Security
VaultPress
Google Authenticator – Two Factor Authentication
Security Ninja
Defender
Astra Web Security
Shield Security
Hide my WP
WebARX
Most useful security plugins come at a high price. However, some plugins are available free of cost with limited functionality.
It is vital to understand the functionality of each plugin, in addition to the price. It is about finding out the most acceptable way to stay away from the bad guys, and for that, you may need to spend a little money.
Now let’s get into details of each WordPress security plugins:
1. Sucuri Security – Auditing, Malware Scanner, and Security Hardening:
The Sucuri Security plugin provides free as well as paid versions. Though, most of the websites must be acceptable along with the free plugin. For example, the website firewall demands payment for a Sucuri plan. However, all webmasters don’t feel as if they require that level of security.
Looking at the free features, this plugin supports security activity auditing to monitor how efficiently the plugin is securing your website. Moreover, it includes blacklist monitoring, file integrity monitoring, security hardening, and security notifications. On the other hand, the premium plans bring in customer service channels and more recurrent scans. To understand this, for example, you want a scan to be finished after every 12 hours. To benefit from this, you will need to pay $17/month.
Features That Make Sucuri Security a Great Choice:
It provides numerous variations of SSL certificates. No need to pay for them, but it’s present in the packages.
The customer service is accessible through email and chat.
You get immediate notifications whenever something is incorrect with your website.
Advanced DDoS protection is offered in some plans.
When you don’t wish to pay any money, you can still get to use helpful tools for malware scanning, file integrity monitoring, blacklist monitoring, and security hardening.
The iThemes Security plugin (formerly recognized as Better WP Security) presents an extraordinary approach to secure your website. It comes with more than 30 offerings to avoid cases like hacks and unnecessary intruders. This plugin focuses more on identifying plugin risks, out-of-date software, and weak passwords.
Though certain fundamental security features are implemented in the free version, upgrading to the iThemes Security Pro is recommended for $80 per year. The exact offers ticketed support, plugin updates for one year, and excellent support for two websites. If you prefer o secure multiple sites, there is an option to upgrade to a costlier plan.
Discussing the main features in the pro version, this plugin offers strong password enforcement, database backups, keeping away the wrong users, and two-factor authentication. All these are just some of the ways to secure your website using this plugin. You can set off 30 security measures that make the iThemes Security Pro more beneficial.
Features That Make iThemes Security a Great Choice:
This plugin provides file change detection that is vital because most web admins do not perceive when a file is being messed.
Include an additional protection layer into your login with the use of the Google reCAPTCHA integration.
The plugin makes a comparison of your WordPress core files with the existing version of WordPress. This lets you know if anything malicious is included in such files.
Update your WordPress salts and keys to supplement an additional layer of difficulty to your authentication keys.
It allows setting an “Away Mode” that helps when you are not creating continuous updates to your site and is willing to lock your WordPress dashboard from every user fully.
Other features like brute force protection, 404 detections, and powerful password enforcement.
Wordfence Security is one of the highly famous WordPress security plugins. It combines minimalism with efficient protection tools like robust login security features and security incident recovery tools. A vital benefit of this plugin is that you understand the traffic trends in general and hack efforts.
Wordfence presents unique free solutions with everything ranging from firewall blocks to security against brute force attacks. But, a premium version comes at a price of approx. $99/year for a single site. Moreover, the plugin creators too make it more cost-effective for developers. As a result, they provide significant discounts whenever you sign up for numerous site keys. For example, if you purchase more than 15 licenses, you will receive a 25% discount or $74.25 for each license. On the whole, Wordfence is helpful if you want to develop multiple websites and wish to protect all of them.
Features That Make WordFence Security a Great Choice:
Its free version is efficient enough for smaller websites.
Developers can save a lot of money whenever they sign up for several site keys.
It comes with a complete firewall suite along with the tools for manual blocking, country blocking, real-time threat defense, brute force protection, and a web application firewall.
The scan section of the plugin combats malware, spam, and real-time threats. It also scans each of your files for malware instead of just WordPress files.
The plugin supervises live traffic after observing logins and logouts, Google crawl activity, bots, and human visitors.
You get access to some exceptional tools, such as the option to sign in through your cell phone quickly. Also, there is support for password auditing.
The comment spam filter discards the requirement to install a separate plugin.
It supervises your plugins and helps you know whether they are discarded from the WordPress plugin repository or not. It also lets you know if they are no longer updated and have been deserted.
WP fail2ban comes with an important feature, i.e., protection against brute force attacks. This plugin implements a unique approach that may seem more effective than what you obtain from a few of the security suite plugins discussed above. WP fail2ban notes down every login attempt, irrespective of their nature or effectiveness, on the syslog through LOG_AUTH. There is an option to execute a hard or soft ban. It is different from the conventional approach of just selecting one.
There is little to know in regards to configuration for this plugin. You just need to install it, and it works automatically. Furthermore, the brute force security plugin is entirely free, so there is no need to concern about spending money. It is found that this plugin is really unique because the users time and again mention that it works smoothly.
Features That Make WP fail2ban a Great Choice:
Select between hard or soft blocks.
Incorporate with CloudFlare and proxy servers.
Log comments to avoid spam or malicious comments.
The plugin too records information about pingbacks, spam, and used inventory.
The option to make a shortcode immediately blocks users before even possessing a chance to get to the login procedure.
Being one of the most excellent feature-rich free security plugins, the All In One WP Security & Firewall offers a simple interface. It is also famous for providing excellent customer support with no premium plans. Essentially, this plugin incorporates meters and graphs. Hence, it is renowned as a visual security plugin. With the graphs and meters, the beginners can understand the metrics like security strength and steps required to be taken to increase the strength of your site.
The features are categorized into 3 categories, namely Basic, Intermediate, and Advanced. , you can still benefit from this plugin if you are an advanced developer. This plugin function’s significant way is by securing your user accounts, obstructing vigorous attempts on your login, and improving user registration security. Besides, the database and file security is too included in the plugin.
Features That Make All In One WP Security & Firewall a Great Choice:
This security plugin contains a blacklist tool wherein you can fix several criteria to block a user.
It allows backup of .htaccess and .wp-config files. Also, a tool is available to restore them if something goes wrong.
The plugin depicts a graph to state how influential your website is. The graph assigns points to some definite regions of your website. It is one of the most delicate features for the regular user to envisage the process happening with the security of a website.
The majority of the people who utilize WordPress are acquainted with Jetpack. This is chiefly because the plugin includes plenty of features. Also, since the people from WordPress.com create the plugin, this plugin is packed with modules to improve the strength of your social media, website speed and enhance spam protection. In this plugin, there is a myriad of features that are so much helpful.
Specific security tools are packed with Jetpack, making it an exciting plugin for those who wish to save money and benefit from reliability. For example, the Protect module is free, and it obstructs the occurrence of mistrustful activity. The Jetpack’s essential security feature also supports brute force attack protection and whitelisting.
In terms of security, the Jetpack’s paid versions are more efficient. For example, the $99/year plan contains malware scanning, planned website backups, and restoration if something goes incorrect. Besides, the $299/year plan provides on-demand malware scans and real-time backups for outstanding protection.
Features That Make Jetpack a Great Choice:
Its free plan offers enough security for a small website. Later, you can upgrade to the premium plans at affordable prices and receive full support.
The premium plans make the plugin similar to a suite, with advantages like security scanning, spam protection, and backups.
Plugin updates are fully organized through Jetpack.
You also receive downtime monitoring.
Jetpack plugin discards the requirement to use other plugins. For example, it comes with social media features, email marketing, site customization, and site optimization.
SecuPress is a new security plugin (formally launched as freemium in 2016). However, it is undoubtedly one that is proliferating. It is being developed by Julio Potier, who is known as one of the original co-founders of WP Media. Both a free version and a premium one are available for this plugin that contains plenty of extra features.
If you are looking for a security plugin that contains an excellent user interface that is simple to use, then SecuPress is a perfect choice. Its free version comes with a firewall, anti-brute force login, and blocked IPs. Also, it contains protection of your security keys and can blocks visits from the bad bots. In other security plugins, you usually need to pay to block the visit from the bad bots.
To benefit from more features, you can go for its premium versions that begin at $59/year per site. This version contains extra features like two-factor authentication, alerts and notifications, PHP malware scans, GeoIP blocking, and PDF reports.
Features That Make SecuPress a Great Choice:
The UI in this plugin is perhaps one of the finest. The same makes it simple to use, especially for beginners.
Its premium version comes with a myriad of features. You can check 35 security points within 5 minutes, obtain a report, and then set up your WordPress site.
It comes with the capability to alter your WordPress login URL so that bots could not find it.
Assists you identify themes and plugins that are risky or that have been interfered with to incorporate malicious code.
The BulletProof Security plugin comes with free as well as premium versions. Its paid option charges a one-time payment priced at $69.95. Moreover, this option is dynamically developed, updated and perhaps includes additional features that most other security plugins on the market do not. They also offer a money-back guarantee for 30 days. You will get features like email alerting, quarantines, auto-restore, anti-spam, and many more.
It is better first to try the free plugin because it provides the below tools:
Database backups and restoring
Login security and monitoring
Anti-spam and anti-hacking tools
MScan Malware Scanner
A security log
Maintenance mode
Hidden plugin folders
A full setup wizard
Though this plugin is not highly user-friendly, it accomplishes the task for the advanced developers willing to benefit from the exceptional settings and features. These features include the online Base64 decoder and the anti-exploit guard. Also, it possesses a setup wizard auto-fix feature for making it more straightforward.
Features That Make BulletProof Security a Great Choice:
The plugin boasts a few of the most exceptional advanced security tools in the market. These tools have features like BPS Pro ARQ Intrusion Detection and Prevention System (ARQ IDPS) encrypting solutions. Additionally, they support cURL scans, scheduled crons, folder locking, and more.
Its free version is loaded with good features for the standard website.
The database backups are available in its free version.
You can conceal distinct plugin folders.
Its maintenance mode is not found in other security plugins.
VaultPress functions identically to plugins like Sucuri Scanner and iThemes Security Pro. You will be charged some fees to obtain specific protection. The plan begins just at $39/year, which makes it a cost-effective first-class security plugin. Its corresponding website mentions that this plan is suitable for bloggers and small businesses. However, you also get the option to upgrade it to a more feature-rich plan for $99/year or $299/year.
The daily, as well as real-time backups, are the vital components of the operation. The elegant calendar view lets you know when you will prefer to accomplish your backups. Also, you can complete site restores through an instant mouse click. It is important to note that the restore files are logged within the dashboard. Many of them are saved so that you could choose the preferred one. One of the best things about VaultPress in terms of backups is that they are escalating. The same boosts the performance.
The key security tools supervise suspicious activity going on your website. There are tabs available for looking at your history and observing which threats have been worked upon or neglected. Also, you can look at the statistics and organize your whole security detail from the clean dashboard.
Features That Make VaultPress a Great Choice:
The pricing is more affordable than the majority of the other premium WordPress security plugins.
Its dashboard boasts a clean interface, and it is easy to understand for every user.
Through a calendar, it allows you to create real-time or manual backups.
The stats tab shows the information on the most famous visiting periods on your website. Besides, it shows what threats have taken place during such times.
You can approach the experts from the VaultPress team to assist you with tasks such as site backups and restoration.
10. Google Authenticator – Two Factor Authentication:
Most of the plugins equipped with distinct security features don’t prove so valuable for installation. This is because you can opt for a plugin like iThemes Security Pro and obtain that feature and tons of other features. But, two-factor authentication is a unique feature because it appears that the majority of the security suites don’t contain it. This, it is better to strengthen your login security using a plugin in the present discussion.
The Google Authenticator plugin includes a second layer of security within your login module. This is quite essential because most of the hacking attempts take place with the login. Apart from your regular password, the particular plugin either delivers a push notification into your phone or a few other forms of validation like a QR code or inquiring about a security question.
With this approach, your login turns less vulnerable because the second layer is probably the only one you identify or save on your personal devices.
The particular WordPress security plugin does not need any payment. Its interface is also quite simple to understand. Apart from selecting the type of authentication, the other exciting features help you identify which type of user role you must pass through the authentication. Henceforth, you can enable admins to get easy access, but you may ask that authors or other users pass through the two-factor procedure.
The only issue is that the two-factor authentication makes it tricky to log in to your backend through a mobile device.
Features That Make Google Authenticator a Great Choice:
It almost discards the susceptibility, i.e., your login area.
You get the freedom to select which two-factor authentication system is the simplest for you.
You can choose which user types have to pass through the authentication procedure.
The plugin possesses a shortcode for use with the custom login pages.
11. Security Ninja:
Security Ninja is prevalent for 7 years. Began as one of the foremost security plugins traded on CodeCanyon, later in 2016, it shifted to a freemium model. The add-ons were removed instead of just 2 versions, i.e., free and premium. The main module that is available free of cost carries out more than 50 security tests. These tests vary from inspecting files and MySQL permissions to diverse PHP settings.
This plugin even performs a brute force check of every user password to remove accounts with weak passwords like “1234” or “password.” The same assists in training users about security. It also contains an auto-fixer module; however, for those users who wish to comprehend the process, an in-depth clarification of all tests, including code to fix the security problem on your own.
If you dislike the plugins cluttering your website, Security Ninja provides a wonderful alternative to the typical “just click here to fix it” method. Many other modules inside the paid version begin at $29/year per site.
Features That Make Security Ninja a Great Choice:
The security tester module that is present in its free version accomplishes 50+ security tests on your site.
For non-tech-savvy individuals, the auto fixer module can solve any issues identified.
Scan WordPress core to guarantee the integrity of the core files after weighing them against a secure and recent copy from wordpress.org.
Scan plugins as well as themes to find out malicious code and malware.
Present a large list of recognized bad IPs and then block them automatically.
Record all events that are going on your WordPress site. They range from users logging in to settings being modified.
Defender is basically a layered WordPress security plugin with a simple interface. Its free and pro version begins with a list of the most effective techniques for immediately upgrading your WordPress security.
It allows you to perform free scans that monitor WordPress for malicious code. The Defender scan tool puts side by side your WordPress install with the directory. Also, it compares report changes. Subsequently, it allows you to restore the original file with a click. Besides, they offer a pro version that contains cloud backups with a remote storage space of 10 GB. The pro version also has audit logs for supervising changes, automatic security scans, and blacklist monitoring. This plugin’s experts will assist you in resolving a hacked site.
Features That Make Defender a Great Choice:
WordPress core file scanning and repair
Google 2-Step Verification
IP Blacklist manager and logging
Login Screen Masking
Timed Lockout brute force attack safeguard for login protection
Astra Web Security is a valuable security suite for a WordPress site. There is no need to concern about malware, XSS, SQLi, brute force, comments spam, and over 100 threats using this tool. This implies that you can stay away from the other security plugins and allow Astra to monitor the rest. The user-friendly dashboard does not include a lot of buttons. Its user interface is clean and easy to use.
Many popular brands like Gillette, Ford, African Union, and Oman Airways use the Astra security plugin. The pricing begins from $9/month, and they provide a flat 20% off when the plan is billed yearly. It seems that Astra can be a decent investment if you intend to spend money on the security of your website.
Features That Make Astra Web Security a Great Choice:
Astra security solution is set up in the form of a WordPress plugin. No need to modify DNS settings.
They provide instant malware cleanup, a reliable firewall that prevents attacks like XSS, SQLi, Bad Bots, Code Injection, SEO spam, Brute force, and other over 100 cyber attacks.
Comprehensive security audit containing the business error logic for a WordPress website.
User-friendly dashboard records all attacks and presents you with an alternative to whitelist IP range or a URL, block country, constant blacklist, reputation supervising, hourly admin login notifications, etc.
It presents a bug bounty management or free community security platform in which you provide hackers a secure method to state any susceptibility that they detect on your website. Astra’s engineers authenticate each reported issue.
The key function of Shield Security is to undertake your rising load of site security. Generally, we are always short on time. Therefore, it is essential to use more ingenious defenses and a security plugin that owns the ability to revert to threats devoid of bugging you with emails. Convenient for beginners and advanced, Shield begins scanning and shielding your site as soon as you activate it. Every option is fully documented. Thus, you can go in deep into your site security whenever you like.
The core of Shield Security is always free. Those businesses and professionals, who require intense protection and practical 24-hour support, can go for the Shield Pro at a nominal price of $12/site. The Shield Security’s mission is ‘no website left behind.’ The objective is to make Pro-Grade security reachable for all sites. The Pro version offers more scans (which operate more frequently), user password policies, traffic monitoring, more extensive audit trails, excellent support for WooCommerce, and functionalities that turn security policies smooth for the users.
Features That Make Shield Security a Great Choice:
Only a security plugin that limits access to its own settings to some users.
More competent protection is implemented with features that function efficiently in the background. They don’t bug you with notifications.
The only security plugin that provides 3 kinds of two-factor authentication free of cost. Also, it offers the option to choose which users may use it.
Pro upgrades for all users for $12/site – voluminous pricing without the voluminous purchase.
Pro provides 6 times efficient scans to identify problems in all portions of your sites.
15. Hide My WP:
Hide My WP is a well-known security plugin for WordPress that conceals the truth you use WordPress as your CMS to spammers, attackers, and even the theme detectors like BuiltWith or Wappalyzer.
It comes packed with the solid art intrusion detector (IDS) to restrict real-time security attacks such as XSS, SQL injection, etc. The premium version comes for $24. Note: Some features of this plugin may not function at HostingXP.
Features That Make Hide My WP a Great Choice:
Conceals the name of the plugins, theme, modifies permalinks, conceals wp-admin, login URL, and much more.
Restricts direct access to PHP files, clears out WP class names, and disqualifies directory listing.
Informs about any possible bad behavior with complete details of an attacker like IP address, username, date, etc.
It contains a “trust network2 which automatically restricts traffic from the bad source IP addresses.
The pre-made settings are easy to use with the one-click operation.
Compatible with multi-site, premium themes Nginx, Apache, IIS, and other security plugins.
WebARX is extensively known as a premium website security platform that supports all PHP applications. Mostly, it is well-known for its innovative endpoint firewall allowing you to fully control the traffic within your websites through its cloud-based dashboard. WebARX possesses a managed web application firewall that shields your site against bot attacks, plugin vulnerabilities, and fake traffic.
The plugin enables you to prepare your personal firewall rules, strengthen your WordPress installation, prepare backups, check uptime & security issues, export reports, obtain alerts, and so on. It is pretty simple to set up.
Features That Make WebARX a Great Choice:
Advanced Website Firewall fully customizable from the WebARX portal).
Virtual patching automatically obtains rules to reinforce plugin and theme susceptibilities.
WordPress installation coagulation: recaptcha, 2FA, automatically include security headers, restrict brute-force attacks, add cookies, modify wp-admin, etc.
Uptime monitoring: Obtains slack and email alerts whenever a website goes down.
Custom PDF security reports (personalize them using your logo to deliver to clients).
Unified security for unlimited websites.
Which WordPress Security Plugin is Best for You?
Well, we have gone through the details of the top WordPress security plugins. Now it is essential to look at the recommendations. The same makes it simpler for you to choose one or two plugins without testing each one. Keep in mind that security plugins might not be required based on what is already offered by your WordPress host.
These recommendations work in several situations where you may choose a security plugin compared to another.
For the best value – SecuPress, Sucuri Security, iThemes Security, Jetpack, or Shield Security.
For a free WordPress security plugin – Sucuri Security (free version) All In One WP Security & Firewall, or Wordfence Security.
For a security plugin for beginners – Defender, All In One WP Security & Firewall, or Security Ninja.
When you need a more innovative brute force protection plugin – Astra or WP fail2ban.
For obtaining two-factor authentication – Google Authenticator – Two Factor Authentication.
For elegant interface – SecuPress or VaultPress.
In addition to installing a plugin, you can take additional steps to enhance the security of your website. For instance, Lockr’s offsite key management solution shields websites against critical site susceptibilities. It also assists in protecting your data. Easy integration is accessible for WordPress.
The above section highlights only the recommended plugins depending on the user experience.
If you are trying to change your WordPress Homepage layout using free tools and plugins, check out our step-by-step approach.
The tone of your website depends on its homepage. If your homepage does not showcase the appropriate content or does not appear how you imagined it, you may need to make some modifications. But this can be a daunting task if you do not hold enough experience in building websites.
The good news to note is that WordPress offers you lots of possibilities for modifying your homepage. This task is not at all problematic. Specific ways are available to implement this so that your homepage conveys your message appropriately.
The following guide discusses the WordPress homepage. It also discusses the reason to change it. The later section highlights several ways to adjust and personalize your homepage. Take a look below:
What Is WordPress Homepage (And Reason to Change Your WordPress Homepage Layout)?
Your homepage is like the welcome mat of your website. Any visitor will first observe this page whenever they type in your website’s URL. Hence, it is vital to lay a powerful first impression.
The homepage must serve the visitors with a basic idea of the idea of your website and what service it can provide them. Generally, slack’s homepage performs an outstanding job of showcasing the product and obtaining the people’s attention.
As default, with several WordPress themes, your homepage showcases your recent blog posts.
However, there is a change if you wish to feature something different. This holds true if you do not have a blog or not the focus of your website.
You may wish to modify your homepage all through the years. If you intend to showcase an event or holiday sale, you can update the page to broadcast that promotion. Alternatively, it suggests that there are ample reasons to modify your WordPress homepage.
Since your homepage fixes the tone for your whole website, as a site owner, you must know how to modify it. Continue reading this detailed guide:
How to Set a Static Homepage:
If you do not wish to represent your blog posts on your website’s front page, you can set a static homepage. This kind of page showcases content that does not change often. On a WordPress site, there can be a homepage and a separate blog page.
For the creation of your homepage, log in to your admin dashboard. So, follow the below path:
Pages > Add New
Give a name to your WordPress homepage, and then click on the ‘Publish’ button. Now repeat these steps another time to make your blog page.
By now, your pages are ready, so you can inform WordPress for what purpose they are to be used.
Follow the below path:
Settings > Reading page
Now in the ‘Your Homepage Displays‘ options, choose ‘A static page.’ After that, from the dropdown menus, select your homepage and posts page.
When you are carrying out such steps, you might need to place your website in maintenance mode. Doing this shows visitors a message you set instead of a general error page or a nonfunctioning website. If you already receive some amount of traffic to your website, it is essential to consider this before modifying your homepage.
For the setup of this feature, you can use the WP Maintenance Mode plugin.
This plugin allows you to convey a custom message to the visitors of your site. Also, it enables you to make a custom message which helps the visitors to know that your site will resume working quickly.
3 Methods to Change Your WordPress Homepage:
Your homepage is already set up, so it is now time to design it and include some content.
Look at the 3 various tools to accomplish this task:
1. With the use of the Theme Customizer to Edit Your Homepage:
Several WordPress themes will offer you a fundamental homepage design along with a few options for modifying it. It is easy to access such options through the Theme Customizer.
Beginning from your admin area, you need to click on the Appearance > Customize to open the tool. It is found that the corresponding customizer presents you with a live preview when you are editing your homepage. Henceforth, you can observe how your modifications influence the look of your website.
But such modifications will not take effect unless you click on the ‘Publish’ button. Hence, you can give it a try.
Based on your theme, there may be varied options for the modifications you can implement. You can navigate through the menu tabs, or you can also click on any area through a blue pencil icon for making edits:
If your theme contains numerous templates for different pages of your website, you can start by exploring each template.
Specific themes provide you options for the position to include your sidebar. Alternatively, you can entirely discard that element to see a full-width page:
There may be some parts of the homepage that you would not use. You can discard them using the theme customizer.
This is easy to implement by searching for the element within the menu, and then you need to click on the eye icon beside the name of the section:
It is possible to bring back any parts you have removed previously by again clicking on the same icon. Also, you can drag the items inside the column if you want to modify their order.
2. Editing Your WordPress Homepage Using the Block Editor:
Though you made some modifications with the theme customizer, you may want some more changes via the Block Editor. The Block Editor provides you more options for modifying the layout and design of your homepage.
Firstly, look for your homepage in the admin dashboard. You need to click on ‘Pages’ and then choose whatever page you set as homepage. Using the Block Editor, you can add various kinds of content to your homepage. It is possible to start with some text that introduces visitors to your website and the purpose.
For getting started, click on the page, and begin typing. You will see that a suitable paragraph block will be automatically prepared.
You can even choose the block on your own after clicking on the plus symbol. This can be done from the top left corner of the screen or whenever it shows up inside the editor window. Next, you can choose or find out the paragraph block.
After there is text in the place, it is possible to use the block settings menu to customize it. Within ‘Text settings,’ you can modify your text’s size by choosing a preset or custom size. Also, you can incorporate a drop cap for a few additional style points.
For the inclusion of some color into your paragraph, use the ‘Color settings.’ You will be presented with a collection of predefined colors to let you choose easily. Alternatively, you can use a custom brand color.
You will probably wish to incorporate some images within your homepage.
For that, click on the plus symbol and choose the ‘Image’ block.
It is possible to use the resultant block for uploading an image. You can choose the photo from your existing Media Library or include one through a URL. A toolbar is present above the block. You can use it to change the alignment of the image or move it vertically across the page.
If you want to include a caption, there is a space available beneath the image to incorporate.
Now you can continue to add the required number of blocks. For accessing more blocks, click on the plus symbol. Now either navigate or search the resultant menu.
To see all the blocks for which you have access, click on ‘Browse all.’
To understand this, for instance, if you want to incorporate a combination of text and media, use the distinct paragraph and image blocks. Instead, you may try a Media & Text block.
This block allows you to display media as well as written content in the particle block, in various configurations:
For removing a block, click the 3 vertical dots within the toolbar over it and select ‘RemoveBlock’. Using these tools, it is easy to design any homepage you want.
3. Modifying Your WordPress Homepage Using the Classic Editor:
If you want to work with the Classic Editor, still, you can make an eye-catching homepage. For that, begin from the dashboard of WordPress admin.
Now click on ‘Pages’ and choose the page which you assign as homepage.
For the addition of text, start typing. By default, the text will be a paragraph. However, you can use the dropdown menu to make a heading or title.
The corresponding dropdown menu allows you to modify the text from a paragraph into various headings.
The toolbar besides this drop-down area allows you to perform more changes in your text. You can italicize or bold it, modify the alignment, and make numbered or bulleted lists. Also, you can include a blockquote on your page if you want.
In this toolbar, you can include links in your copy. A button is available to add a ‘read more’ tag. This feature can be beneficial if you add articles on your website but do not plan to show the full texts on the homepage.
The final button in the sequence will open another set of tools. So, you will get more options for changing the style of your text. For example, you can vary the size or add colors.
Additionally, you can add some media or images to your page through the Classic Editor. For that, click on the ‘Add Media button, and you will see a new window opened. To add new files to your media library, you can select the ‘Select Files’ button.
There is the flexibility to upload files from your device to include them in your Media Library.
From this window, it is possible to access the files uploaded previously by clicking on the ‘Media Library’ tab. Now choose the file you want to add, and then click on the ‘Insert into page button.
Now the image will show up on your page. The options for the file are easy to access by just clicking on them. For the image, you can alter the alignment, make editing, or remove it.
After insertion of the image, you can vary the alignment.
To observe how your homepage looks, click on the ‘Preview’ button. After you liked the page’s appearance, click on the ‘Publish’ button to save all the changes. Now, these changes will be reflected on your website.
Optional: Check Out the Twenty Twenty-One Theme:
If you prefer using the block editor, you can look at the Twenty-One theme, known as the latest default theme in WordPress 5.6.
The Twenty Twenty-One theme offers great flexibility and function well on various types of websites. It contains simple fonts and a low-key, pastel color pattern. Also, it makes exclusive use of the designs that are pre-defined block layouts that can be further edited to meet your needs.
Such dedicated layouts and the minimalism of Twenty Twenty-One make the theme a perfect choice for creating a highly customized homepage. No need to use any third-party page builder.
Steps to Build a Menu for Your Homepage:
When you are working on the homepage, you need to consider the navigation menu. This menu probably shows up on many of the pages of your website. Moreover, it can be beneficial for visitors who landed on your homepage for the first time.
From the admin dashboard, follow the below path:
Appearance > Menus
If there are no menus yet, you will be asked to make one. Alternatively, you can choose the ‘Create Menu’ button. Keep in mind that your menu needs a name to differentiate it from other menus you may create.
The subsequent step is to include pages in the menu. Either you can add them separately, or checkmark ‘Auto add pages’ boxes for automatic addition of all top-level pages.
If you like to choose the pages manually, choose the ‘View All’ tab in the left column. Now check to mark the boxes you want to include and then click on the ‘Add to Menu’ button:
It is easy to automatically add the top-level pages or choose the pages on your own.
After adding your pages to the menu, you can set the sequence in which they will show up. This is easy to accomplish by just dragging and dropping the menu items in the place.
Suppose you prefer to include some items inside others to make a dropdown type menu possible. This allows you to have more links in your navigation. When you do it, the appearance will be clutter-free.
You need to drag the child page below and somewhat to the right part of the parent page.
Lastly, based on your theme, there may be a few options on the position of the menu to be shown on your page.
Famous options highlight the footer, the top part of the page, and sidebars (right or left). If the default menu options are not sufficient for you, you can use some other plugins to expand your menu features.
Summary:
An elegant homepage can let visitors accurately understand the actual purpose of your website. Once you set the WordPress homepage correctly, it can be an efficient tool for your blogs, e-commerce sites, etc.
In specific scenarios, you need to modify your homepage to reveal your brand message, a new service you want to offer, or a new theme. Fortunately, WordPress provides various ways to alter and edit your WordPress homepage. This can be done in 3 ways:
In this article, we explain how to configure WordPress on AWS free Tier. If you want to try out WordPress on Amazon’s robust infrastructure then this article is for you.
Cloud computing is trendy since it is cost-efficient, secure, and a reliable approach to host any online project. The AWS (Amazon Web Services) offers an efficient cloud infrastructure. In simple terms, AWS is a secure and flexible on-demand cloud computing platform. It is extensively helpful to manage your online projects.
You can use it on multiple computers for tasks ranging from setting up a server to hosting a WordPress site. Though AWS is considered for more significant projects, it can be used for your job if you want to benefit from scalability and efficiency. The below section shows the practicality of this platform for WordPress:
The usefulness of AWS for WordPress:
Enhanced user experience
Flexible and scalable
Complete Ownership
Cost-effective platform
Ease of migrating WordPress site
Boost in website performance
Now let’s look at the detailed steps on how to install WordPress on AWS free tier:
Method-1: Configure WordPress on AWS free Tier:
Step-1: Signing Up for an AWS free tier account:
The AWS Free Tier offers you a 12 -month free, practical experience, including the majority of the services provided by the AWS platform. You can sign up for an AWS account at 750 hours/month, including Linux and Windows t2.micro instances for a year. To stay within the free tier, you will only use the EC2 Micro instances.
Step-2: Setup of Amazon EC2 Instance:
To set up Amazon EC2 Instance, follow the below steps:
Login to your AWS account and launch the AWS Management Console
In this console, find the EC2 under ‘Compute’ and then double-click on it to launch the EC2 dashboard. Now, click on ‘Launch Instance’ to set up and configure your EC2 instance.
Step-3: Installation of WordPress on your EC2 Instance
The AWS Marketplace consists of plenty of Amazon Machine Images (AMI), which can be used to set up a good number of commonly used software instantly. Usually, the AMIs are pre-configured with the ideal settings for operating on AWS. This step will use one of these AMISs for the installation of WordPress. Follow the below steps;
From the left menu, click on ‘AWS Marketplace.’
Now search for ‘WordPress’ and then for ‘WordPress powered by BitNami’
Press the blue ‘Select’ button
Step-4: Validate the pricing:
In this step, you need to confirm the pricing for your instance. Don’t worry, as it is free of cost for the software, irrespective of the size of the instance you use.
Note: This step uses a free-tier eligible t2.micro instance.
Follow the following steps:
Navigate down and choose ‘Continue.’
In the ‘Type’ column, click on ‘t2.micro.’
Now click ‘Next: Configure Instance Details. Please wait for a few seconds to load it.
In the subsequent screens, click on ‘Next: Add Storage’ and finally click on ‘Next: Tag Instance.’
Step-5: Setting name, for instance, and reviewing it:
To set a name for your instance, enter ‘Name’ in the ‘Key’ box and ‘WordPress’ in the ‘Value’ box.
Click on ‘Review and Launch’ to proceed further.
Confirm the instance last time before moving on. Now click on ‘Launch.’ By doing this, it will launch your Amazon EC2 instance that operates on WordPress.
Step-6: Configuration of Key-Pair for SSH:
Key pairs denote how you can connect them to your EC2 instances through a terminal program with the help of Secure Shell (SSH). Keep in mind that you must have a key pair to log into your terminal. Follow the below steps for the configuration:
Choose ‘Proceed without a key pair’ and tick a mark on the box to validate that you know you require this key for accessing your EC2 instance.
Now click on ‘Launch Instances’ to launch your instance. Wait a few minutes to begin the instance.
Step-7: Test your WordPress Instance:
It is essential to check whether your WordPress Instance is running or no. These are the steps to follow:
From the bottom right part, click on ‘View Instances.’
Now select the WordPress instance. (Make sure the ‘Instance State’ shows as running. But if the ‘Instance State’ shows up as launching, AWS is yet busy creating your WordPress instance.
Step-8: Test your site:
After your instance gets running, follow the below steps to test the WordPress website:
Search for the ‘Public IP’ for your instance at the bottom of the page.
Now copy that IP in a new tab inside your web browser. (When you do this, you must notice the well-known ‘Hello World’ WordPress home screen.)
The installation of WordPress on your AWS free tier EC2 instance now completes.
Step-9: Configuration of the newly set up WordPress website:
Source: https://aws.amazon.com/getting-started/hands-on/build-wordpress-website/
Once your WordPress website begins running, you have to log into the admin page to customize the settings. However, before that, you should have your admin password. Follow the below steps:
Open your EC2 dashboard and choose your WordPress instance.
Click on the ‘Actions’ button.
From the drop-down menu, choose Instance Setting > Get System Log.
Browse through the ‘System Log’ popup to find out the password for your WordPress admin.
(You can easily find the password enclosed by hash marks.)
Copy the password to some external file or note it down.
Open your WordPress website.
Now add /admin to the URL’s end.
Click on enter, and it will show up login page of your WordPress site.
Whenever you want to log in, you can enter the default username and password you copied above. Now you can control, customize, and configure your WordPress website. It is recommended to change your username and password.
Method-2: Using AWS through managed WordPress hosting:
The first method discussed above may feel technical and complex. The cloud computing infrastructure presented by the AWS platform is a pay-as-you-go solution. So, the traffic spikes will significantly raise your hosting expense. However, it is easy to manage your service through a managed WordPress hosting provider.
It is better to use WP Engine since it executes a portion of its hosting platform on the AWS infrastructure. Moreover, you need not worry about server management, traffic spikes, or WordPress maintenance.
You can try out another alternative -Pagely, which is a top-notch managed WordPress hosting provider. It also operates its platform on AWS and provides an ideal WordPress environment to scale up your business.
If you are looking for a checklist and best practices to set up W3 Total Cache Plugin for WordPress sites, check out our guide below.
Related: How to Setup Cloudflare Cache for WordPress
W3 Total Cache has over a million active installations and is one of the recommended plugins to have. It offers complete control over various optimizations at a granular level, unlike most cache plugins. It helps advanced users and developers to make various optimization combinations to get the desired results.
W3 Total Cache is the greatest comprehensive plugin that does exactly what it says- Improves the performance of a site using multiple-stage caching.
Popular websites that use W3TC are:
WpBeginner
SitePoint
Why W3TC is a best Caching plugin?
The implementation of flexibility, cutting-edge feature, and broad range of support makes it the best plugin.
Overview:
Pros:
Cutting-edge features and flexibility are amazing—5/5 for performance.
Found compatible with Cloudflare, Varnish, and more.
Cons:
Lots of settings may confuse beginners, but the same make the plugin extremely flexible.
Before proceeding with following steps, make sure to disable every other caching plugin. Moreover, it is recommended to prevent the use of numerous caching plugins at WordPress.
Installation & Setup process:
First of all, login to WordPress Dashboard example.com/wp-admin/
Now follow the below path: Plugins > Add new > Search for W3 Total Cache
Now install and Activate
Go to Settings > General
Click on Hide button to discard following header message.
CDN: Choose Generic Mirror (Addition of cdn.exmaple.com in the forthcoming steps)
Reverse Proxy: This should be enabled if you use Varnish. (Additionally, make sure to enter application path wordpress-xyz-abc.cloudwaysapps.com:8080 in case you are a Cloudways user. Your App path is mentioned at Applications > Domain management.)
In the Miscellaneous tab, you need to uncheck Enable Google Page Speed dashboard widget.
Save Settings and Purge Caches. At this step, the general Settings completes.
Now open the Page Cache menu of the W3 Total Cache plugin.
Don’t change “Cache URIs with query string variables.”
Don’t change “Cache 404 (not found) pages.”
Check “Don’t cache pages for logged in users”
Check “Don’t cache pages for following user roles.”
Tip: You might choose user role – Administrator, Editor, and Author” for those you don’t wish to clutter with cache
Aliases: Let it stay blank.
Cache Preload: Keep it unchecked.
Purge Policy: Should check Front Page, Post Page, Blog Feed
Finally, save settings so that you never need to visit the Page Cache option of W3TC again.
Please navigate to the Browser Cache menu and configure it correctly. (Typically, browser cache is regulated by an HTTP header names “cache-control” that guides the browser the proper way to manage e particular file. It decides whether to cache or not.)
Firstly, you will notice the General Settings that specifies global browser cache policy. You might override depending on the file type. The same is the exceptional and flexible feature of this plugin. This feature is not found in any other well-known cache plugin.
It is important to understand what these menus mean. First one is Last Modified, I advise enable it, assists Googlebot to do not forcefully crawl non-modified static resources.
Set Expires header which is commonly utilized by proxy, to save file, web page in the cache memory for a specific time period. Make sure to keep it disable.
Now you have to set the cache-control header which is utilized by browser. Now you have to keep it disable. Since keeping globally is not a decent idea.
In this step, you have to set the entity tag (ETag) and keep that option enable. It assist browser to validate cached file either to be used or not.
Now you need to set the W3 Total Cache header. In order to keep the thing white level you have to disable this feature. Either the header is disabled or enabled; it does not matter.
Enable HTTP (gzip) compression: You may enable this feature.
Avoid objects getting cached after settings change. Make sure not to enable it. Otherwise, it may add to your bandwidth consumption by avoiding appropriate browser cache. Particularly, this feature must be used only when you encounter some issue in which you are unable to override browser cache for the static files.
Discard query strings from static resources: Please don’t enable this. When you enable this feature, it will just enhance grade by discarding query strings like ver=?2.3 outside the static files. Doing this will not enhance actual load time.
Don’t set cookies for static files: Enable.
Do not process 404 errors for static objects with WordPress: Famous feature from W3TC plugin that decreases server load for the 404. You may observe that how a single 404 error occasionally leads to a long time for loading. The particular option decrease the impact by serving simple 404 page instead of attractive for static files like jpg, txt, etc. It would be best if you did not worry as this is not for standard pages. It is recommended to enable this feature.
The rewrite URL structure of objects: Let it stay uncheck.
Apply HTTP Strict Transport Security policy: It is a great setting for caching “force HTTPS request”. If you are novice to WordPress, make sure not to enable this; it may lead to problems when you occasionally miss SSL. The browser will prevent the loading process in HTTPS or HTTP, except you keep valid certificate.
Now, navigate down and find CSS & JS. The particular setting is applicable only for CSS and JS. Look at the screenshot below.
For HTML, the Browser cache settings must have slight modification. It is clear that our HTML (a document in browser language) is basically a dynamic version of content. It is always better to not cache anything for HTML. Also, the same is not a recommended approach. In case you keep expire 3600seconds then it means that again W3TC will continue refreshing pages. It is better to prevent browser caching for HTML.
For Media elements, the settings must be identical to JS and CSS. Go through the below screenshot.
Now one important setting is CDN If you have enabled the “Generic Mirror” or CDN option in the most recent General Settings page in previous steps, you now have to configure it. (Warning: Please don’t alter any of these options otherwise you may face problem.)
Navigate down a bit at the CDN page, and you will observe “General” settings. Go through the below screenshot.
General: Don’t check Add canonical header: Google doesn’t support it.
Configuration: Navigate down, and mention your CDN path
Advanced: Navigate down and enable the Set cookie domain.
Now CDN configuration is complete, so click on Save Settings and Purge Caches.
Open the Extensions menu of W3TC. Make sure to disable everything apart from Yoast SEO. As a result, it will direct the correct CDN path for images within the Yoast XML Sitemap.
To Conclude:
All these steps included the needful tasks you need to follow.

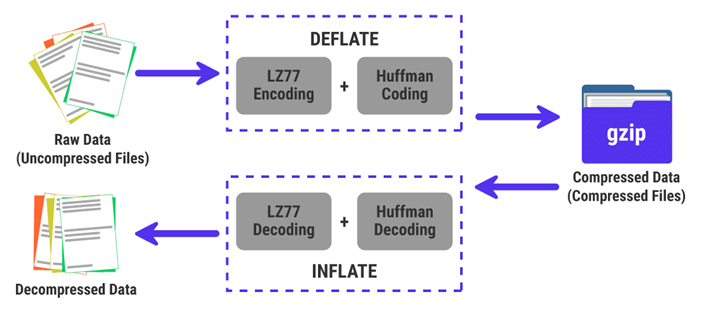
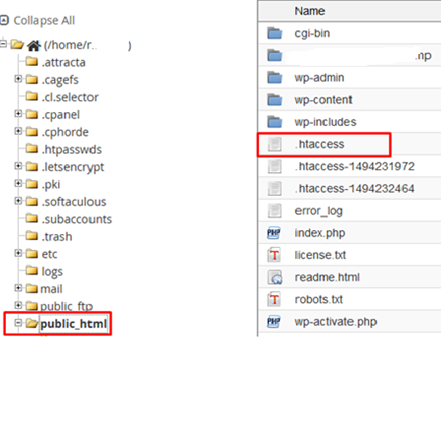

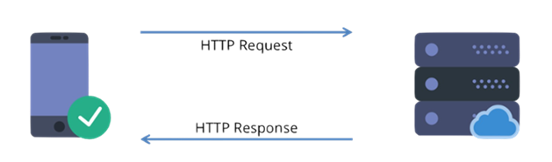 Whenever a user visits your website, their browser contacts your web server and also requests the files that contain the page content. Such files comprise CSS, HTML, JavaScript files, icons, images, and other files. The corresponding request is an HTTP request. The complete form of HTTP is the Hypertext Transfer Protocol. Essentially, the browser sends out a request for a file, and also the server transfers the file to that browser. Whenever the server gets an HTTP request from a user’s browser, your server reverts by sending the necessary files. Subsequently, the user’s browser renders the page.
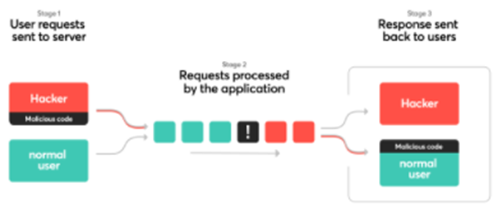
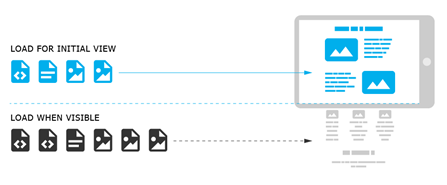

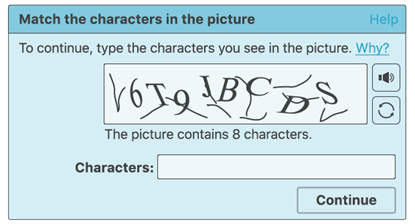 In simple terms, a CAPTCHA is a computer program utilized to differentiate between human and automated bot users. The same is done by carrying out a test that can be easy for a human to pass. The same test is difficult and nearly impossible for the automatic scripts to get through.
The CAPTCHAS can adopt a wide range of forms, and one of the most widespread ones is distorted text which you need to decode. Some other test demands you to choose images that can fulfill some specifications from a collection of low-resolution photos.
In these cases, usually, humans can easily complete the challenge presented. But, even the contemporary bots are not able to decipher the distorted or pieces of images. Once they are incapable of getting through the test, they would be blocked from accessing your site.
The same is inevitable since bots are utilized in various situations that can negotiate the security and integrity of your website. One of the most widespread hacking strategies is brute force attacks. It utilizes bots to frequently type in credentials inside your login form until they attain access to your website.
One more kind of cyber attack is cross-site scripting (XSS). In that, hackers implement the malicious code within your site through a form like your login page or the comments section. The same can lead to malware saved on your site, misplaced information, and other ill outcomes.
The bots are also useful for spamming your comments part with low-quality links, which damage your Search Engine Optimization (SEO) and daunt legitimate users. In addition to being annoying, spam makes your website look less protected and badly monitored.
All those places on your site where users can enter information, i.e., any form in your site, are susceptible to attacks from bots. The inclusion of a CAPTCHA before submissions of form deters non-humans from attaining access to your website or inserting malicious code within it.
Throughout the inception of CAPTCHA, users were prompted to enter the text they observe in an image. The corresponding image showcased random letters, numbers, or words in an unclear style.
Subsequently, a newer technology entitled reCAPTCHA was implemented. It represented random words in the form of a challenge and utilized the input from the user to digitalize books.
The mentioned technology got hold of by Google in the year 2009. Since then, it helps to digitalize thousands of books as well as complete New York Times archives.
But, such new CAPTCHAs were still irritating and damaged the user experience on the websites.
Though CAPTCHAs offer a wide range of advantages and protections to your website, it comes with some limitations. For instance, they can negatively influence User Experience (UX). By making users sluggish, such simple tests come into the way of visitors and rapidly fulfill their targets on your site.
Additionally, users suffering from visual impairments or a few other challenges like dyslexia may find it difficult to complete their CAPTCHAs. Unintentionally keeping human users away from the site is beneficial to anyone. This holds even if it prevents bots in the procedure.
In 2014, Google launched its No CAPTCHA reCAPTCHA, a successor to the image tests and distorted word it has continued to use since 2007. This novel system demands users to choose a checkbox beside the words “I’m not a robot” to verify their legitimacy.
It displays a simple checkbox for human users to click on easily. Some other wary traffic will show slightly more difficult CAPTCHA, like recognizing objects in the shown images.
When you add a CAPTCHA to your WordPress website, you get the freedom to select which kind of test to use. But bear in mind that executing Google reCAPTCHA v2 or v3 must help make your website more enjoyable and easily accessible.
Now let’s go through how WordPress websites can enhance security through CAPTCHA.
In simple terms, a CAPTCHA is a computer program utilized to differentiate between human and automated bot users. The same is done by carrying out a test that can be easy for a human to pass. The same test is difficult and nearly impossible for the automatic scripts to get through.
The CAPTCHAS can adopt a wide range of forms, and one of the most widespread ones is distorted text which you need to decode. Some other test demands you to choose images that can fulfill some specifications from a collection of low-resolution photos.
In these cases, usually, humans can easily complete the challenge presented. But, even the contemporary bots are not able to decipher the distorted or pieces of images. Once they are incapable of getting through the test, they would be blocked from accessing your site.
The same is inevitable since bots are utilized in various situations that can negotiate the security and integrity of your website. One of the most widespread hacking strategies is brute force attacks. It utilizes bots to frequently type in credentials inside your login form until they attain access to your website.
One more kind of cyber attack is cross-site scripting (XSS). In that, hackers implement the malicious code within your site through a form like your login page or the comments section. The same can lead to malware saved on your site, misplaced information, and other ill outcomes.
The bots are also useful for spamming your comments part with low-quality links, which damage your Search Engine Optimization (SEO) and daunt legitimate users. In addition to being annoying, spam makes your website look less protected and badly monitored.
All those places on your site where users can enter information, i.e., any form in your site, are susceptible to attacks from bots. The inclusion of a CAPTCHA before submissions of form deters non-humans from attaining access to your website or inserting malicious code within it.
Throughout the inception of CAPTCHA, users were prompted to enter the text they observe in an image. The corresponding image showcased random letters, numbers, or words in an unclear style.
Subsequently, a newer technology entitled reCAPTCHA was implemented. It represented random words in the form of a challenge and utilized the input from the user to digitalize books.
The mentioned technology got hold of by Google in the year 2009. Since then, it helps to digitalize thousands of books as well as complete New York Times archives.
But, such new CAPTCHAs were still irritating and damaged the user experience on the websites.
Though CAPTCHAs offer a wide range of advantages and protections to your website, it comes with some limitations. For instance, they can negatively influence User Experience (UX). By making users sluggish, such simple tests come into the way of visitors and rapidly fulfill their targets on your site.
Additionally, users suffering from visual impairments or a few other challenges like dyslexia may find it difficult to complete their CAPTCHAs. Unintentionally keeping human users away from the site is beneficial to anyone. This holds even if it prevents bots in the procedure.
In 2014, Google launched its No CAPTCHA reCAPTCHA, a successor to the image tests and distorted word it has continued to use since 2007. This novel system demands users to choose a checkbox beside the words “I’m not a robot” to verify their legitimacy.
It displays a simple checkbox for human users to click on easily. Some other wary traffic will show slightly more difficult CAPTCHA, like recognizing objects in the shown images.
When you add a CAPTCHA to your WordPress website, you get the freedom to select which kind of test to use. But bear in mind that executing Google reCAPTCHA v2 or v3 must help make your website more enjoyable and easily accessible.
Now let’s go through how WordPress websites can enhance security through CAPTCHA.
 Firstly, you have to install and activate the Advanced noCAPTCHA & reCAPTCHA (v2 & V3) plugin.
After this plugin gets activated, follow the below path:
Settings > Advanced noCAPTCHA & Invisible CAPTCHA page available within our admin panel
Now WordPress will land you on the general settings page of the plugin.
From here on, you have to select a Google reCAPTCHA version and find out reCAPTCHA API keys to allow the service on your website.
It is recommended to use v2 since it is believed that v3 is not so stable, at least not yet!
To get those API keys, visit the reCAPTCHA website, and then click on the ‘Admin Console‘ button.
In the subsequent screen, Google will request to sign in to your account. After you have successfully logged in, you will observe the ‘Register a new site‘ page.
As a first step, enter the name of your website in the Label field. Now, choose a reCAPTCHA type. It is up to you to select reCAPTCHA v2 ‘I’m not a robot’ named checkbox.
Now, you have to mention your domain name within the Domains section. Ascertain that your domain name is devoid of ‘https://www.’
The Owners section displays your email address as well as allows you to add a new owner.
Once done, you have to check the box beside ‘Accept the reCAPTCHA Terms of Service.’ It is optional to check the ‘Send alerts to owners‘ box to get email alerts regarding doubtful traffic or captcha misconfiguration occurring on your site.
After this is done, click on the ‘Submit’ button.
Now, you will notice a success message and the site and secret keys that can be used on your website.
As a next step, open your WordPress dashboard and follow the below path:
Firstly, you have to install and activate the Advanced noCAPTCHA & reCAPTCHA (v2 & V3) plugin.
After this plugin gets activated, follow the below path:
Settings > Advanced noCAPTCHA & Invisible CAPTCHA page available within our admin panel
Now WordPress will land you on the general settings page of the plugin.
From here on, you have to select a Google reCAPTCHA version and find out reCAPTCHA API keys to allow the service on your website.
It is recommended to use v2 since it is believed that v3 is not so stable, at least not yet!
To get those API keys, visit the reCAPTCHA website, and then click on the ‘Admin Console‘ button.
In the subsequent screen, Google will request to sign in to your account. After you have successfully logged in, you will observe the ‘Register a new site‘ page.
As a first step, enter the name of your website in the Label field. Now, choose a reCAPTCHA type. It is up to you to select reCAPTCHA v2 ‘I’m not a robot’ named checkbox.
Now, you have to mention your domain name within the Domains section. Ascertain that your domain name is devoid of ‘https://www.’
The Owners section displays your email address as well as allows you to add a new owner.
Once done, you have to check the box beside ‘Accept the reCAPTCHA Terms of Service.’ It is optional to check the ‘Send alerts to owners‘ box to get email alerts regarding doubtful traffic or captcha misconfiguration occurring on your site.
After this is done, click on the ‘Submit’ button.
Now, you will notice a success message and the site and secret keys that can be used on your website.
As a next step, open your WordPress dashboard and follow the below path:
")

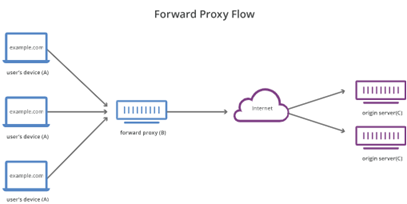 A reverse proxy server functions in the form of a front for the root servers to uphold anonymity and boost security. It is identical to how a user or client uses a forward proxy to attain the same result. It makes sure no client or user directly communicates with the root server.
Though the difference between forward and reverse proxy is slight, they work uniquely.
Both of them can work collectively because there is no overlap among their functioning. Generally, users or clients utilize a forward proxy, whereas the root servers use a reverse proxy.
Because a server admin can manage the way reverse proxy would function, you can utilize it to allow several valuable features.
All its advantages will be discussed later in this article.
A reverse proxy server functions in the form of a front for the root servers to uphold anonymity and boost security. It is identical to how a user or client uses a forward proxy to attain the same result. It makes sure no client or user directly communicates with the root server.
Though the difference between forward and reverse proxy is slight, they work uniquely.
Both of them can work collectively because there is no overlap among their functioning. Generally, users or clients utilize a forward proxy, whereas the root servers use a reverse proxy.
Because a server admin can manage the way reverse proxy would function, you can utilize it to allow several valuable features.
All its advantages will be discussed later in this article.
 Apart from the above use case, the reverse proxies too offer several other advantages. The below section discusses a few of their key benefits:
 Nginx is famously known as an open-source web server capable of working as a reverse proxy. In addition to working as a host for websites, it is one of the most extensively used reverse proxy and load balancing solutions. According to Netcraft, more than 479 million web servers were utilizing Nginx in December 2019. This makes it the front-runner in the webserver market share.
This proxy offers every reverse proxy benefit described above. Furthermore, it boosts web performance, reliability, security, and scalability. It is easy to configure Nginx through its configuration file.
The Nginx Plus, a commercial offering, is only helpful to gain access to the API-based configuration options and other functionalities appropriate for big enterprise websites.
Web hosting companies control all their websites via Nginx. It got rank in Top Tier web hosting status by Review Signal in every category it participated in. Few other leading companies that make use of Nginx are Netflix, MaxCDN, and Cloudflare.
It is easy to set up Nginx as a fundamental reverse proxy. Moreover, Nginx also offers you various directives to tailor your server’s reverse proxy according to your needs. The way to accomplish it is discussed in a later section. A Web hosting companies customer can learn how to use a reverse proxy for websites hosted via Web hosting companies in that section.
Nginx is famously known as an open-source web server capable of working as a reverse proxy. In addition to working as a host for websites, it is one of the most extensively used reverse proxy and load balancing solutions. According to Netcraft, more than 479 million web servers were utilizing Nginx in December 2019. This makes it the front-runner in the webserver market share.
This proxy offers every reverse proxy benefit described above. Furthermore, it boosts web performance, reliability, security, and scalability. It is easy to configure Nginx through its configuration file.
The Nginx Plus, a commercial offering, is only helpful to gain access to the API-based configuration options and other functionalities appropriate for big enterprise websites.
Web hosting companies control all their websites via Nginx. It got rank in Top Tier web hosting status by Review Signal in every category it participated in. Few other leading companies that make use of Nginx are Netflix, MaxCDN, and Cloudflare.
It is easy to set up Nginx as a fundamental reverse proxy. Moreover, Nginx also offers you various directives to tailor your server’s reverse proxy according to your needs. The way to accomplish it is discussed in a later section. A Web hosting companies customer can learn how to use a reverse proxy for websites hosted via Web hosting companies in that section.
 Varnish is an open-source HTTP reverse proxy equipped with a cache engine. It is primarily created for high-traffic websites that serve dynamic content. Furthermore, you are free to use Varnish in the form of a load balancer, or a web app firewall (WAF), or an edge authentication and authorization server.
This proxy functions on all latest versions of Linux and FreeBSD, utilized primarily as a front for Apache or Nginx web servers. The efficient and flexible Varnish Configuration Language (VCL) allows you to define various features like managing HTTP requests, caching, and establishing connections to single or multiple web servers.
Due to this reason, several CDNs use Varnish in the form of their crucial foundation for sending content quickly.
Varnish is an open-source HTTP reverse proxy equipped with a cache engine. It is primarily created for high-traffic websites that serve dynamic content. Furthermore, you are free to use Varnish in the form of a load balancer, or a web app firewall (WAF), or an edge authentication and authorization server.
This proxy functions on all latest versions of Linux and FreeBSD, utilized primarily as a front for Apache or Nginx web servers. The efficient and flexible Varnish Configuration Language (VCL) allows you to define various features like managing HTTP requests, caching, and establishing connections to single or multiple web servers.
Due to this reason, several CDNs use Varnish in the form of their crucial foundation for sending content quickly.
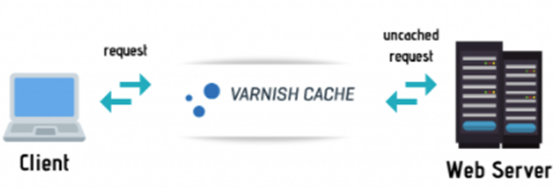 Varnish supports Edge Side Includes (ESI), known as a language that assists you to reprocess sections of one web page in some other web pages. If your website uses plenty of recurring content on various pages, ESI can increase the speed of page load times of your site. It does this by caching recurrently used sections.
You can expand Varnish through its different modules (VMODs). Go through Varnish’s official tutorial to know how to set up Varnish in the form of a reverse proxy for WordPress.
Varnish supports Edge Side Includes (ESI), known as a language that assists you to reprocess sections of one web page in some other web pages. If your website uses plenty of recurring content on various pages, ESI can increase the speed of page load times of your site. It does this by caching recurrently used sections.
You can expand Varnish through its different modules (VMODs). Go through Varnish’s official tutorial to know how to set up Varnish in the form of a reverse proxy for WordPress.
")
 Before performing any other tests, you need to ascertain that the emails from WordPress are not reaching spam.
If a user mentions to you that
Before performing any other tests, you need to ascertain that the emails from WordPress are not reaching spam.
If a user mentions to you that 
 There are several reasons why I may need to learn Laravel. The below section highlights the most important reasons. Also, the section will discuss a few tips on how to successfully learn the framework before diving deep into the Laravel tutorials. The tutorials include complete details, pros, cons, and use cases.

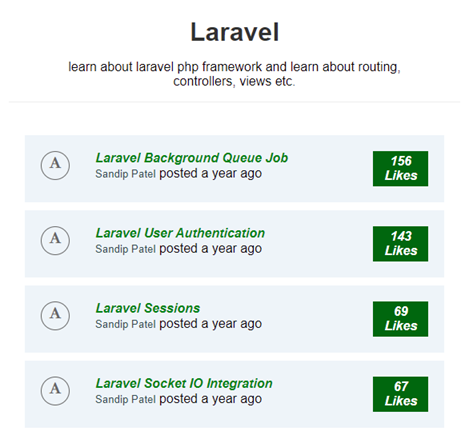


 Laracasts are high-quality video tutorials recommended at every level. Even though it’s a premium service, you can find some completely free series, for instance, an intermediate series on Envoyer and a beginner series on Forge. However, you can’t filter for free courses, so you’ll need to find them yourself.
Even if you don’t want to pay for the membership, it’s also worth signing up for a free forum account, especially if you need some community help with your code.
Laracasts are high-quality video tutorials recommended at every level. Even though it’s a premium service, you can find some completely free series, for instance, an intermediate series on Envoyer and a beginner series on Forge. However, you can’t filter for free courses, so you’ll need to find them yourself.
Even if you don’t want to pay for the membership, it’s also worth signing up for a free forum account, especially if you need some community help with your code.
 Laravel Daily is popularly known as the paid Laravel tutorial site by Povilas Korop (the creator of this Laravel Business YouTube channel). Povilas possesses 10 paid and accessible Laravel video tutorial series. They encompass fascinating topics like developing an invoice creation app with Laravel and creating a CRUD SPA through Vue and Laravel. Also, the topic revolves around learning Eloquent, developing a REST API through Laravel, and a lot more.
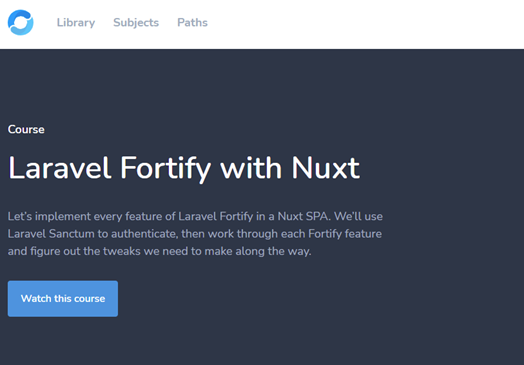
 A complete guide to developing APIs & Single-Page Applications using Vue.js, Laravel, and Capacitor. It is an ebook from Dan Pastori and Jay Rogers. The same is available on ServerSideUp. You will be familiar with the way to create web & mobile applications from an identical codebase. Here all your apps connect with a unified API.
The book discusses the procedure of creating a helpful app named Roast. It is a coffee house finder app. It is not simply a demo, but an existing app is allowing you to sign up, include your favorite cafe, search for coffee houses over a map, and more. The Roast app is easy to install on an Android or iOS device.
A complete guide to developing APIs & Single-Page Applications using Vue.js, Laravel, and Capacitor. It is an ebook from Dan Pastori and Jay Rogers. The same is available on ServerSideUp. You will be familiar with the way to create web & mobile applications from an identical codebase. Here all your apps connect with a unified API.
The book discusses the procedure of creating a helpful app named Roast. It is a coffee house finder app. It is not simply a demo, but an existing app is allowing you to sign up, include your favorite cafe, search for coffee houses over a map, and more. The Roast app is easy to install on an Android or iOS device.


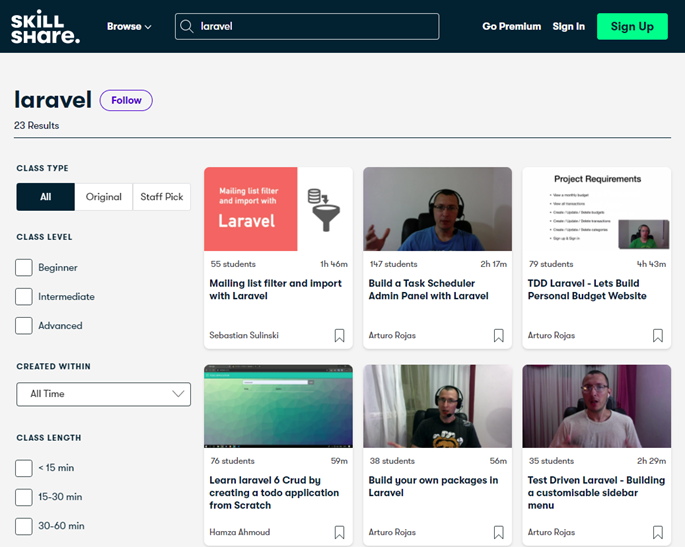
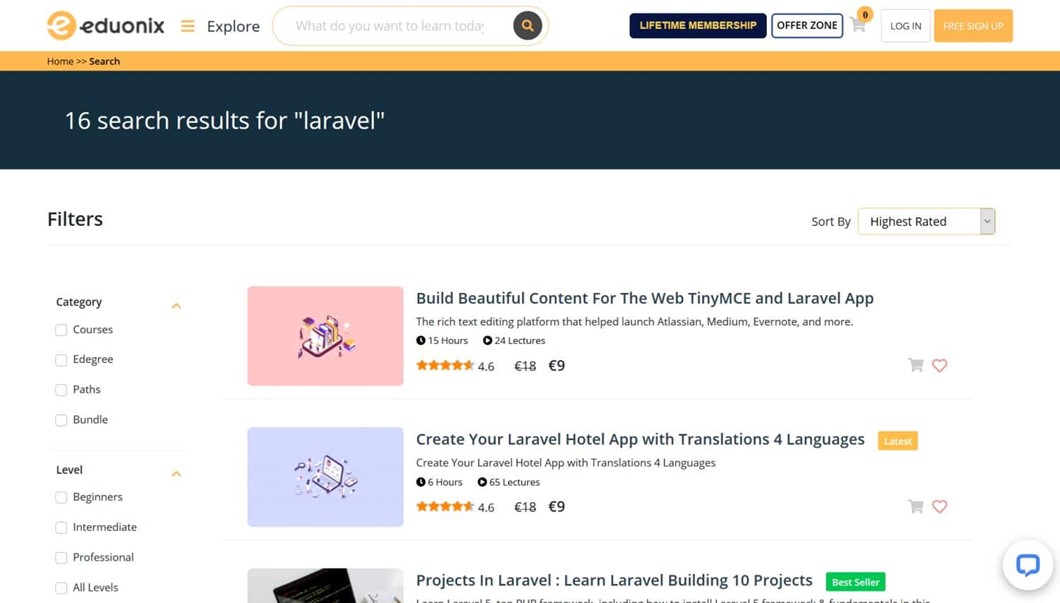

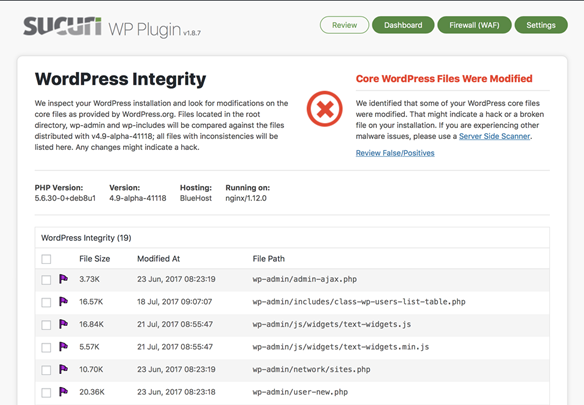
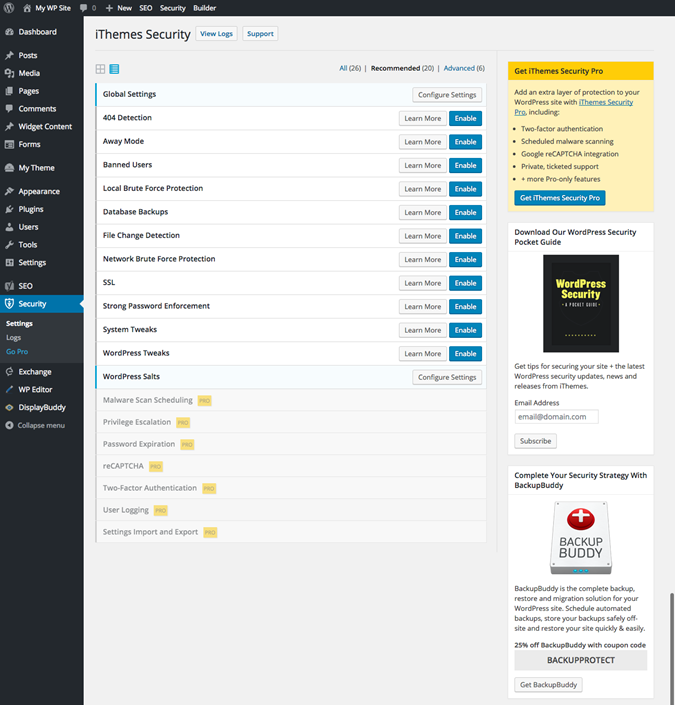
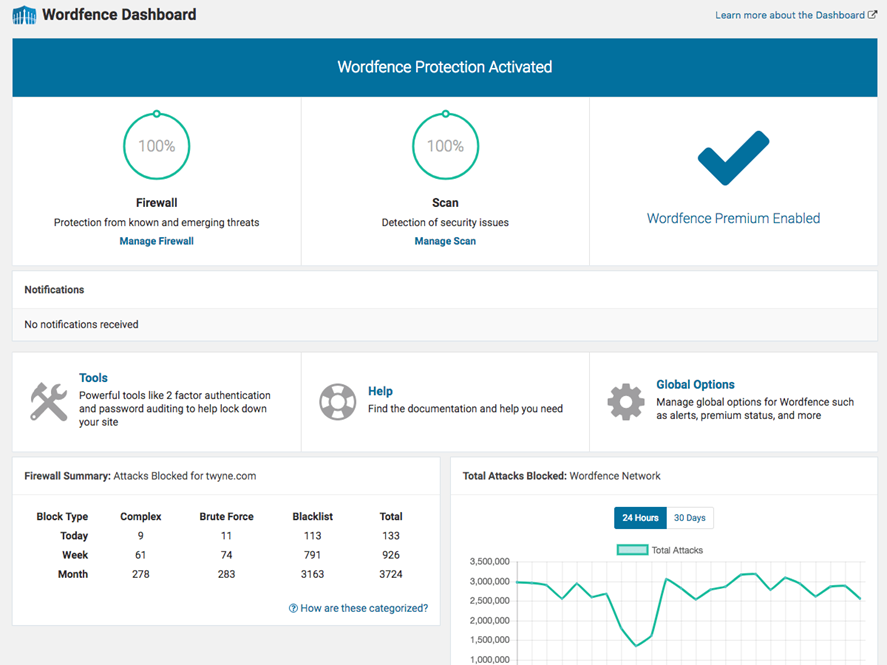


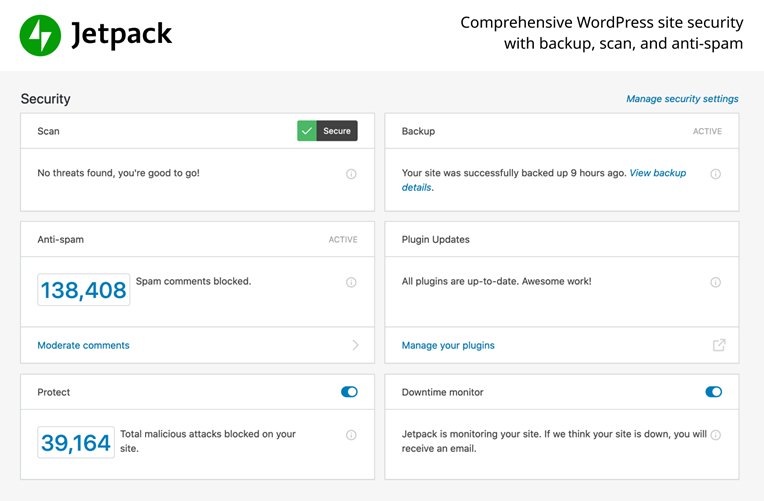
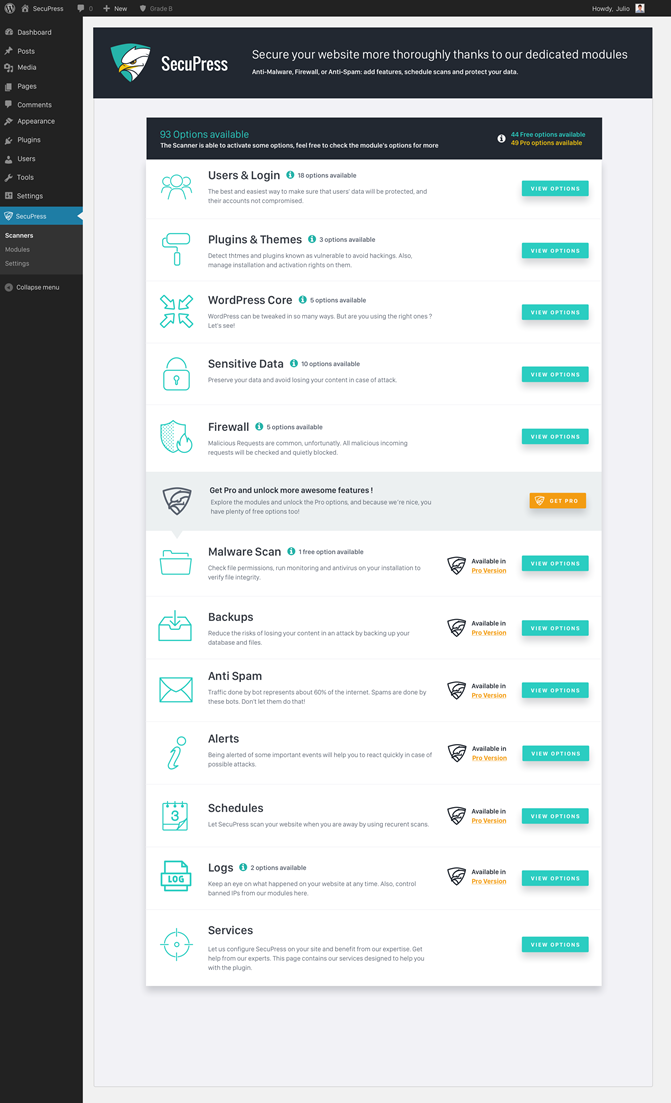
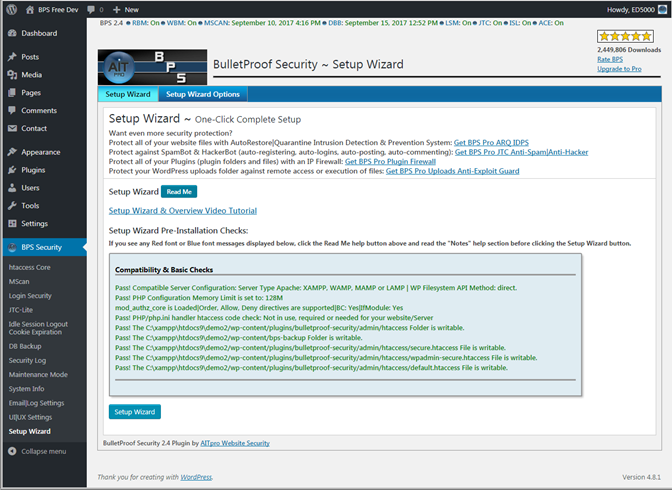
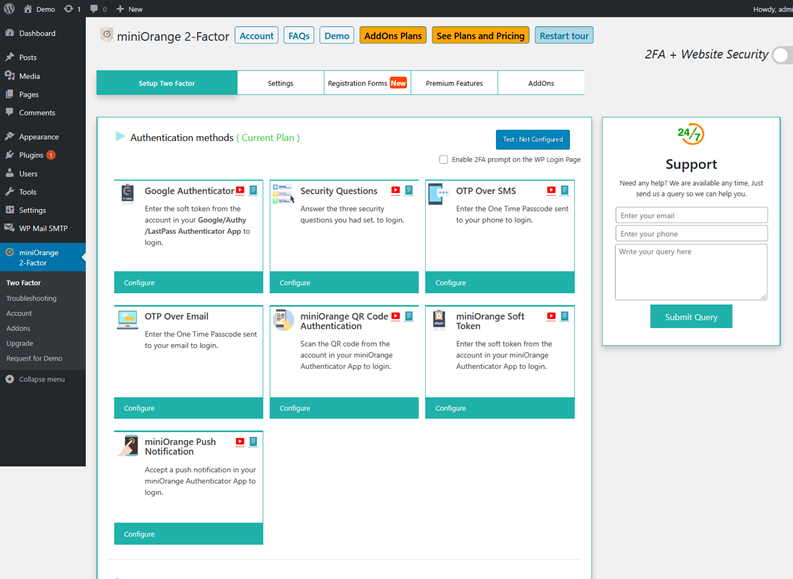
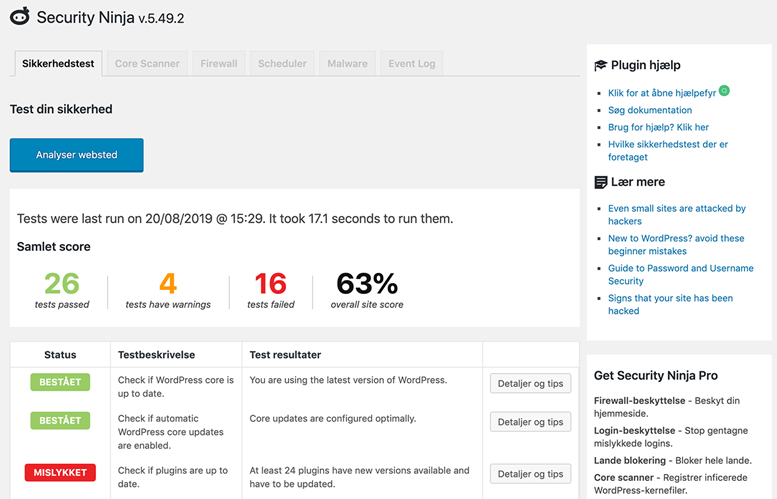 Security Ninja is prevalent for 7 years. Began as one of the foremost security plugins traded on CodeCanyon, later in 2016, it shifted to a freemium model. The add-ons were removed instead of just 2 versions, i.e., free and premium. The main module that is available free of cost carries out more than 50 security tests. These tests vary from inspecting files and MySQL permissions to diverse PHP settings.
This plugin even performs a brute force check of every user password to remove accounts with weak passwords like “1234” or “password.” The same assists in training users about security. It also contains an auto-fixer module; however, for those users who wish to comprehend the process, an in-depth clarification of all tests, including code to fix the security problem on your own.
If you dislike the plugins cluttering your website, Security Ninja provides a wonderful alternative to the typical “just click here to fix it” method. Many other modules inside the paid version begin at $29/year per site.
Security Ninja is prevalent for 7 years. Began as one of the foremost security plugins traded on CodeCanyon, later in 2016, it shifted to a freemium model. The add-ons were removed instead of just 2 versions, i.e., free and premium. The main module that is available free of cost carries out more than 50 security tests. These tests vary from inspecting files and MySQL permissions to diverse PHP settings.
This plugin even performs a brute force check of every user password to remove accounts with weak passwords like “1234” or “password.” The same assists in training users about security. It also contains an auto-fixer module; however, for those users who wish to comprehend the process, an in-depth clarification of all tests, including code to fix the security problem on your own.
If you dislike the plugins cluttering your website, Security Ninja provides a wonderful alternative to the typical “just click here to fix it” method. Many other modules inside the paid version begin at $29/year per site.
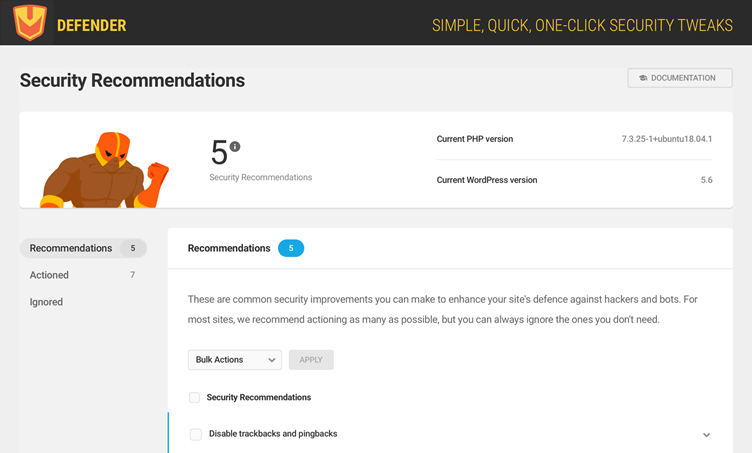
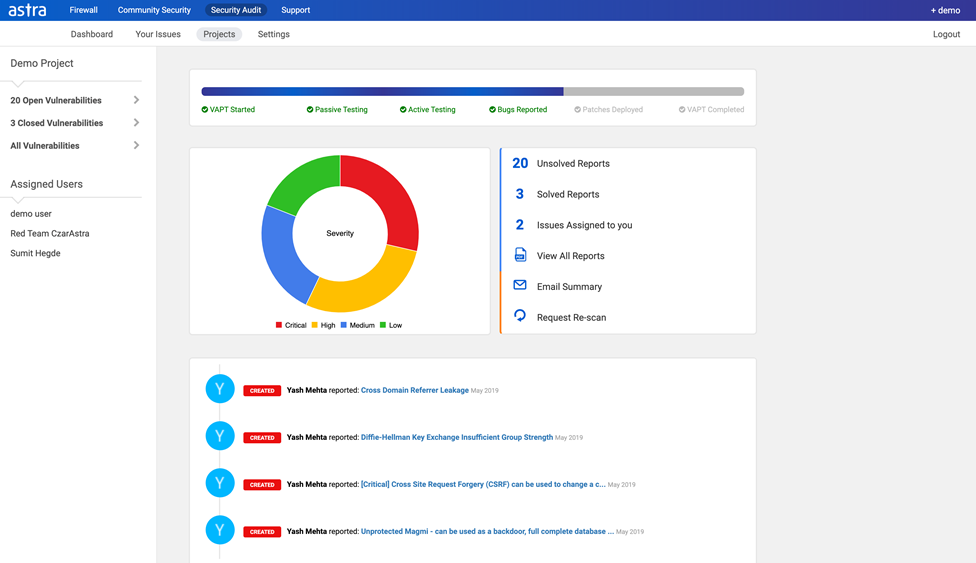

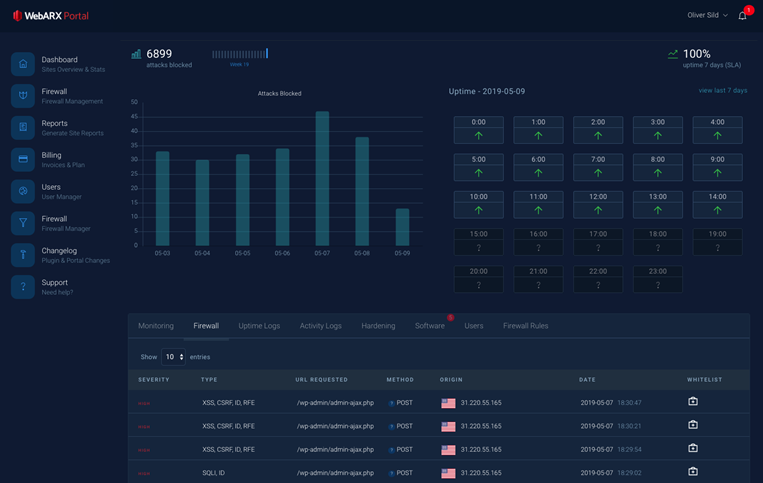

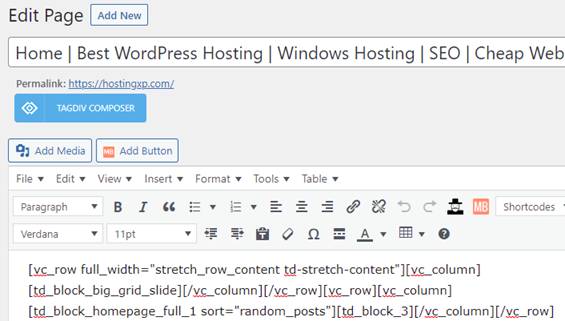 Your homepage is like the welcome mat of your website. Any visitor will first observe this page whenever they type in your website’s URL. Hence, it is vital to lay a powerful first impression.
The homepage must serve the visitors with a basic idea of the idea of your website and what service it can provide them. Generally, slack’s homepage performs an outstanding job of showcasing the product and obtaining the people’s attention.
As default, with several WordPress themes, your homepage showcases your recent blog posts.
However, there is a change if you wish to feature something different. This holds true if you do not have a blog or not the focus of your website.
You may wish to modify your homepage all through the years. If you intend to showcase an event or holiday sale, you can update the page to broadcast that promotion. Alternatively, it suggests that there are ample reasons to modify your WordPress homepage.
Since your homepage fixes the tone for your whole website, as a site owner, you must know how to modify it. Continue reading this detailed guide:
Your homepage is like the welcome mat of your website. Any visitor will first observe this page whenever they type in your website’s URL. Hence, it is vital to lay a powerful first impression.
The homepage must serve the visitors with a basic idea of the idea of your website and what service it can provide them. Generally, slack’s homepage performs an outstanding job of showcasing the product and obtaining the people’s attention.
As default, with several WordPress themes, your homepage showcases your recent blog posts.
However, there is a change if you wish to feature something different. This holds true if you do not have a blog or not the focus of your website.
You may wish to modify your homepage all through the years. If you intend to showcase an event or holiday sale, you can update the page to broadcast that promotion. Alternatively, it suggests that there are ample reasons to modify your WordPress homepage.
Since your homepage fixes the tone for your whole website, as a site owner, you must know how to modify it. Continue reading this detailed guide:
 Follow the below path:
Settings > Reading page
Follow the below path:
Settings > Reading page
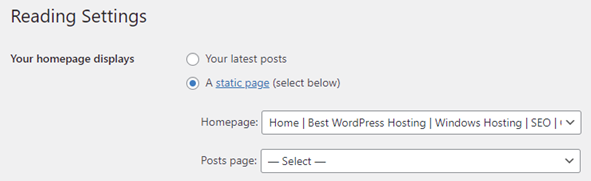 Now in the ‘Your Homepage Displays‘ options, choose ‘A static page.’ After that, from the dropdown menus, select your homepage and posts page.
When you are carrying out such steps, you might need to place your website in maintenance mode. Doing this shows visitors a message you set instead of a general error page or a nonfunctioning website. If you already receive some amount of traffic to your website, it is essential to consider this before modifying your homepage.
For the setup of this feature, you can use the WP Maintenance Mode plugin.
Now in the ‘Your Homepage Displays‘ options, choose ‘A static page.’ After that, from the dropdown menus, select your homepage and posts page.
When you are carrying out such steps, you might need to place your website in maintenance mode. Doing this shows visitors a message you set instead of a general error page or a nonfunctioning website. If you already receive some amount of traffic to your website, it is essential to consider this before modifying your homepage.
For the setup of this feature, you can use the WP Maintenance Mode plugin.
 This plugin allows you to convey a custom message to the visitors of your site. Also, it enables you to make a custom message which helps the visitors to know that your site will resume working quickly.
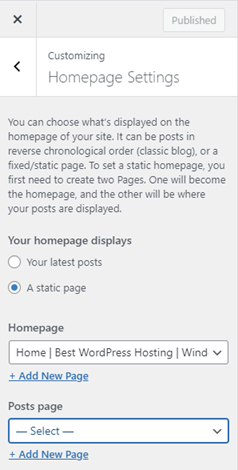 But such modifications will not take effect unless you click on the ‘Publish’ button. Hence, you can give it a try.
Based on your theme, there may be varied options for the modifications you can implement. You can navigate through the menu tabs, or you can also click on any area through a blue pencil icon for making edits:
If your theme contains numerous templates for different pages of your website, you can start by exploring each template.
Specific themes provide you options for the position to include your sidebar. Alternatively, you can entirely discard that element to see a full-width page:
There may be some parts of the homepage that you would not use. You can discard them using the theme customizer.
This is easy to implement by searching for the element within the menu, and then you need to click on the eye icon beside the name of the section:
It is possible to bring back any parts you have removed previously by again clicking on the same icon. Also, you can drag the items inside the column if you want to modify their order.
But such modifications will not take effect unless you click on the ‘Publish’ button. Hence, you can give it a try.
Based on your theme, there may be varied options for the modifications you can implement. You can navigate through the menu tabs, or you can also click on any area through a blue pencil icon for making edits:
If your theme contains numerous templates for different pages of your website, you can start by exploring each template.
Specific themes provide you options for the position to include your sidebar. Alternatively, you can entirely discard that element to see a full-width page:
There may be some parts of the homepage that you would not use. You can discard them using the theme customizer.
This is easy to implement by searching for the element within the menu, and then you need to click on the eye icon beside the name of the section:
It is possible to bring back any parts you have removed previously by again clicking on the same icon. Also, you can drag the items inside the column if you want to modify their order.
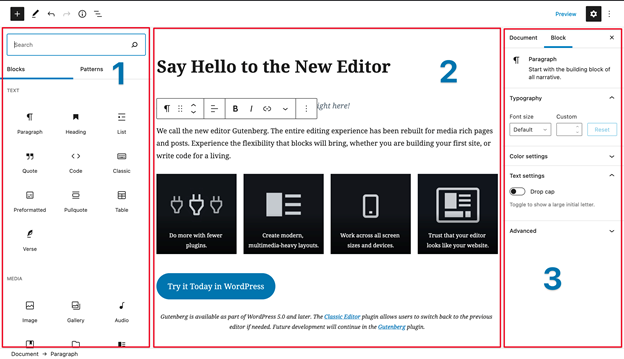 Though you made some modifications with the theme customizer, you may want some more changes via the Block Editor. The Block Editor provides you more options for modifying the layout and design of your homepage.
Firstly, look for your homepage in the admin dashboard. You need to click on ‘Pages’ and then choose whatever page you set as homepage. Using the Block Editor, you can add various kinds of content to your homepage. It is possible to start with some text that introduces visitors to your website and the purpose.
For getting started, click on the page, and begin typing. You will see that a suitable paragraph block will be automatically prepared.
You can even choose the block on your own after clicking on the plus symbol. This can be done from the top left corner of the screen or whenever it shows up inside the editor window. Next, you can choose or find out the paragraph block.
After there is text in the place, it is possible to use the block settings menu to customize it. Within ‘Text settings,’ you can modify your text’s size by choosing a preset or custom size. Also, you can incorporate a drop cap for a few additional style points.
For the inclusion of some color into your paragraph, use the ‘Color settings.’ You will be presented with a collection of predefined colors to let you choose easily. Alternatively, you can use a custom brand color.
You will probably wish to incorporate some images within your homepage.
For that, click on the plus symbol and choose the ‘Image’ block.
It is possible to use the resultant block for uploading an image. You can choose the photo from your existing Media Library or include one through a URL. A toolbar is present above the block. You can use it to change the alignment of the image or move it vertically across the page.
If you want to include a caption, there is a space available beneath the image to incorporate.
Now you can continue to add the required number of blocks. For accessing more blocks, click on the plus symbol. Now either navigate or search the resultant menu.
To see all the blocks for which you have access, click on ‘Browse all.’
To understand this, for instance, if you want to incorporate a combination of text and media, use the distinct paragraph and image blocks. Instead, you may try a Media & Text block.
This block allows you to display media as well as written content in the particle block, in various configurations:
For removing a block, click the 3 vertical dots within the toolbar over it and select ‘Remove
Block’. Using these tools, it is easy to design any homepage you want.
Though you made some modifications with the theme customizer, you may want some more changes via the Block Editor. The Block Editor provides you more options for modifying the layout and design of your homepage.
Firstly, look for your homepage in the admin dashboard. You need to click on ‘Pages’ and then choose whatever page you set as homepage. Using the Block Editor, you can add various kinds of content to your homepage. It is possible to start with some text that introduces visitors to your website and the purpose.
For getting started, click on the page, and begin typing. You will see that a suitable paragraph block will be automatically prepared.
You can even choose the block on your own after clicking on the plus symbol. This can be done from the top left corner of the screen or whenever it shows up inside the editor window. Next, you can choose or find out the paragraph block.
After there is text in the place, it is possible to use the block settings menu to customize it. Within ‘Text settings,’ you can modify your text’s size by choosing a preset or custom size. Also, you can incorporate a drop cap for a few additional style points.
For the inclusion of some color into your paragraph, use the ‘Color settings.’ You will be presented with a collection of predefined colors to let you choose easily. Alternatively, you can use a custom brand color.
You will probably wish to incorporate some images within your homepage.
For that, click on the plus symbol and choose the ‘Image’ block.
It is possible to use the resultant block for uploading an image. You can choose the photo from your existing Media Library or include one through a URL. A toolbar is present above the block. You can use it to change the alignment of the image or move it vertically across the page.
If you want to include a caption, there is a space available beneath the image to incorporate.
Now you can continue to add the required number of blocks. For accessing more blocks, click on the plus symbol. Now either navigate or search the resultant menu.
To see all the blocks for which you have access, click on ‘Browse all.’
To understand this, for instance, if you want to incorporate a combination of text and media, use the distinct paragraph and image blocks. Instead, you may try a Media & Text block.
This block allows you to display media as well as written content in the particle block, in various configurations:
For removing a block, click the 3 vertical dots within the toolbar over it and select ‘Remove
Block’. Using these tools, it is easy to design any homepage you want.
 If you prefer using the block editor, you can look at the Twenty-One theme, known as the latest default theme in WordPress 5.6.
The Twenty Twenty-One theme offers great flexibility and function well on various types of websites. It contains simple fonts and a low-key, pastel color pattern. Also, it makes exclusive use of the designs that are pre-defined block layouts that can be further edited to meet your needs.
Such dedicated layouts and the minimalism of Twenty Twenty-One make the theme a perfect choice for creating a highly customized homepage. No need to use any third-party page builder.
If you prefer using the block editor, you can look at the Twenty-One theme, known as the latest default theme in WordPress 5.6.
The Twenty Twenty-One theme offers great flexibility and function well on various types of websites. It contains simple fonts and a low-key, pastel color pattern. Also, it makes exclusive use of the designs that are pre-defined block layouts that can be further edited to meet your needs.
Such dedicated layouts and the minimalism of Twenty Twenty-One make the theme a perfect choice for creating a highly customized homepage. No need to use any third-party page builder.
 If there are no menus yet, you will be asked to make one. Alternatively, you can choose the ‘Create Menu’ button. Keep in mind that your menu needs a name to differentiate it from other menus you may create.
The subsequent step is to include pages in the menu. Either you can add them separately, or checkmark ‘Auto add pages’ boxes for automatic addition of all top-level pages.
If you like to choose the pages manually, choose the ‘View All’ tab in the left column. Now check to mark the boxes you want to include and then click on the ‘Add to Menu’ button:
It is easy to automatically add the top-level pages or choose the pages on your own.
After adding your pages to the menu, you can set the sequence in which they will show up. This is easy to accomplish by just dragging and dropping the menu items in the place.
Suppose you prefer to include some items inside others to make a dropdown type menu possible. This allows you to have more links in your navigation. When you do it, the appearance will be clutter-free.
You need to drag the child page below and somewhat to the right part of the parent page.
Lastly, based on your theme, there may be a few options on the position of the menu to be shown on your page.
Famous options highlight the footer, the top part of the page, and sidebars (right or left). If the default menu options are not sufficient for you, you can use some other plugins to expand your menu features.
If there are no menus yet, you will be asked to make one. Alternatively, you can choose the ‘Create Menu’ button. Keep in mind that your menu needs a name to differentiate it from other menus you may create.
The subsequent step is to include pages in the menu. Either you can add them separately, or checkmark ‘Auto add pages’ boxes for automatic addition of all top-level pages.
If you like to choose the pages manually, choose the ‘View All’ tab in the left column. Now check to mark the boxes you want to include and then click on the ‘Add to Menu’ button:
It is easy to automatically add the top-level pages or choose the pages on your own.
After adding your pages to the menu, you can set the sequence in which they will show up. This is easy to accomplish by just dragging and dropping the menu items in the place.
Suppose you prefer to include some items inside others to make a dropdown type menu possible. This allows you to have more links in your navigation. When you do it, the appearance will be clutter-free.
You need to drag the child page below and somewhat to the right part of the parent page.
Lastly, based on your theme, there may be a few options on the position of the menu to be shown on your page.
Famous options highlight the footer, the top part of the page, and sidebars (right or left). If the default menu options are not sufficient for you, you can use some other plugins to expand your menu features.


 The AWS Free Tier offers you a 12 -month free, practical experience, including the majority of the services provided by the AWS platform. You can sign up for an AWS account at 750 hours/month, including Linux and Windows t2.micro instances for a year. To stay within the free tier, you will only use the EC2 Micro instances.
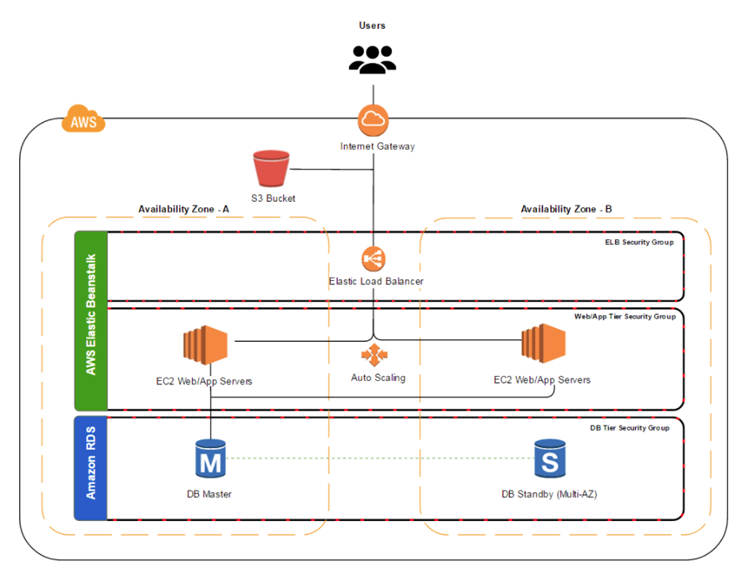

 The implementation of flexibility, cutting-edge feature, and broad range of support makes it the best plugin.