
In this article, we are going to discuss how to use the WordPress HTTP API in detail.
The WordPress HTTP API comprises various functions helping you to simplify the task of HTTP calls. You will not get deceived with cURL or file_get_contents; all you need to use is a single integrated interface. It works efficiently for interconnecting with third-party APIs, chiefly REST-full APIs such as Facebook, Twitter, MailChimp, etc. Let’s first get an overview of HTTP:
Also Read: How to Setup Cloudflare Cache for WordPress
The Fundamentals Of HTTP:
 You might have seen HTTP when you come across any web address. HTTP is basically a network protocol used to deliver every data and file over the Interwebs.
When it comes to HTTP, there are 2 parts involved i.e. HTTP request and HTTP response. Both these aspects are identical in structure. They both have the following 4 parts:
-
An initial line
-
Zero or multiple header lines
-
A blank line
-
A body content (optional)
 The Initial Line:
Requests make use of the initial line for sending three segments of information. They are namely the path, the method name, and the HTTP version. To understand clearly, for instance, while watching the main blog page of HostingXP, you may see the following as the initial line of the request:
GET /blog/ HTTP/1.1
Just like requests, responses also offer 3 segments of information. However, they are different, namely – the HTTP version, a description of the response, and the response code. While you create a request to the main blog page of HostingXP, it sends out an HTTP response using this initial line:
HTTP/1.0 200 OK
Headers:
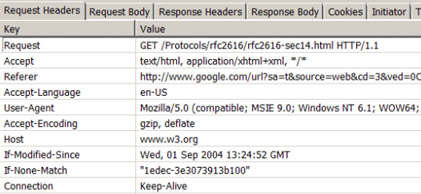
Headers include different pieces of information associated with the response or the request. HTTP 1.1 describes 46 headers; however, just one is needed to make requests, i.e., the ‘Host’ reader. Please go through the screenshot taken from the Chrome developer tools. It depicts a few of the headers sent accompanied by request sent to the main blog of HostingXP:

Body:
Mostly, the body includes data concerning the requested resource. For example, when a GET request is sent to the main HostingXP blog, you will get the HTML needed to deliver the page (the resource) in the body content.
Additional Information:
The above sections are enough to get an overview of HTTP. Typically, we will focus on the body, headers, and the method name. To learn more, it is better to go through James Marshall’s explanation of HTTP (http://www.jmarshall.com/easy/http/). This guide clearly explains all necessary aspects of HTTP.
About Restful APIs:
Restful APIs (REST methodology) targets to offer an easy and classic approach for interrelating with an application. (learn in-depth about the fundamentals of the WordPress REST API from this link –https://HostingXP.com/wordpress-rest-api-basics/). Frequently, it is used in combination with HTTP for creating an extremely logical structure of interactions. It is based on HTTP verbs and paths.
HTTP Verbs are identical to the method names seen earlier. The typical ones are GET, POST, DELETE and PUT. As per my view, PUT is the only uncertain method; you can consider it as an update command. While you use these verbs collectively with paths, it is possible to make an effective system:
- GET /post/1/ will be useful to access the post through the ID of 1.
- DELETE /post/1/ will be useful to delete that post.
For updating the post, use the command PUT /post/1/ by mentioning the applicable information in the headers and request body.
Simply adding an HTTP version to the existing codes results in the initial line of an HTTP contract. This is the reason why this system is extremely efficient.
Use of the WordPress HTTP API:
Equipped with all fundamental knowledge, now we can look into how the WordPress HTTP API functions. The 4 methods useful to create requests and interrupt the responses are:
-
wp_remote_get()
-
wp_remote_post()
-
wp_remote_head()
-
wp_remote_request()
Of these 4, the first 2 functions are easy to understand. They utilize the GET and POST methods correspondingly in the request. In the execution of the third function, there is the use of the HEAD method. It is useful to access only the headers of a response. When the case is such that we only require some metadata for a resource, this HEAD method can save a considerable overhead. The fourth one is a generic function. It lets you state which way you will prefer to utilize inside the parameters of the functions.
Other than these, there are 5 extra functions we can take help for retrieving exact parts of the response. They work as shortcuts to browse the bunch of data we get; they are namely:
-
wp_remote_retrieve_body()
-
wp_remote_retrieve_header()
-
wp_remote_retrieve_headers()
-
wp_remote_retrieve_response_code()
-
wp_remote_retrieve_response_message()
Our First HTTP Request:
Now let’s perform a quick test, i.e., accessing the header detail from the HostingXP blog. It is up to you where to do it inside a theme or plugin. However, make sure you are within a test environment to necessary text over a live site.
$response = wp_remote_head( 'https://HostingXP.com/blog/' );
var_dump( $response )
From the response we receive below, the body section is vacant. This is because we use the HEAD method here, and all the headers are displayed. To take hold of just the headers with no other array members, the wp_remote_retrieve_headers(,) function can be used.
array (size=5)
'headers' =>
array (size=13)
'server' => string 'nginx' (length=5)
'date' => string 'Wed, 22 Jul 2015 14:22:07 GMT' (length=29)
'content-type' => string 'text/html; charset=UTF-8' (length=24)
'connection' => string 'close' (length=5)
'vary' => string 'Accept-Encoding' (length=15)
'x-pingback' => string 'https://HostingXP.com/xmlrpc.php' (length=29)
'x-powered-by' => string 'HHVM/3.8.0' (length=10)
'link' => string '; rel="https://github.com/WP-API/WP-API"' (length=68)
'x-frame-options' => string 'DENY' (length=4)
'x-content-type-options' => string 'nosniff' (length=7)
'strict-transport-security' => string 'max-age=31536000' (length=16)
'x-HostingXP-cache' => string 'HIT' (length=3)
'content-encoding' => string 'gzip' (length=4)
'body' => string '' (length=0)
'response' =>
array (size=2)
'code' => int 200
'message' => string 'OK' (length=2)
'cookies' =>
array (size=0)
empty
'filename' => null
Understanding APIs:
The most significant obstruction I perceive for any developer is the total amount of new stuff which they need to include exactly. In the absence of the new stuff, the API call cannot function. It is essential to know what HTTP is, the way to make requests, and how to properly validate. Without knowing these aspects, every call will be unsuccessful. Now let’s go through an example through the Twitter API because they hold excellent documentation.
In the example, we will look at the Application-only Authentication since it is a simple flow. You will go through a few steps below which are the same as what Twitter recommends. Before starting, make an application on Twitter.
You must be able to append the code below anywhere in a plugin or theme. Keep in mind to use a test site.
Step-1: Encoding Consumer Key And Secret:
After you create an application, you must have a secret key and a consumer key at hand. For ease of understanding, let’s create constants that contain this information.
define( 'TWITTER_CONSUMER_KEY', '12disnir382jeqwdasd23wdasi' );
define( 'TWITTER_CONSUMER_SECRET', '23wdajskduhtrq2c32cuq9r8uhuf' )
The 3 steps for making an encoded version of the constants are included in the docs:
-
URL encode the consumer key as well as the consumer secret
-
Concatenate them using a colon
-
Base64 encode the entire string
In PHP, it is quite simple to do, as below:
$key = urlencode( TWITTER_CONSUMER_KEY );
$secret = urlencode( TWITTER_CONSUMER_SECRET );
$concatenated = $key . ':' . $secret;
$encoded = base64_encode( $concatenated );
Step-2: Receiving a Bearer Token:
In place of using your password, you can send your encoded string to Twitter. Consequently, you will get a temporary pass that is legitimate for a predefined time (TTL). For that, we will make an HTTP request, and Twitter says the following points:
-
The request should be an HTTP POST request.
-
The request should contain an Authorization header along with the value of Basic.
-
The request should contain a Content-Type header along with the value of application/x-www-form-urlencoded;charset=UTF-8.
-
The request’s body should be grant_type=client_credentials.
Let’s begin with the basics. Since we will require a POST request, we will use wp_remote_post(). This function accepts 2 parameters. The first one is URL whereas the second contains optional arguments. The first parameter is https://api.twitter.com/oauth2/token. The second parameter will be used to manage every other requirement.
$args = array(
'headers' => array(
'Authorization' => 'Basic ' . $encoded,
'Content-Type' => 'application/x-www-form-urlencoded;charset=UTF-8'
),
'body' => 'grant_type=client_credentials'
);
$response = wp_remote_post( 'https://api.twitter.com/oauth2/token', $args );
Headers should be added as an array and the header type as the key, the value of the array member. Keep in mind the body must be a string. When it works successfully, you will observe a response same as following:
array (size=5)
'headers' =>
array (size=23)
'cache-control' => string 'no-cache, no-store, must-revalidate, pre-check=0, post-check=0' (length=62)
'content-disposition' => string 'attachment; filename=json.json' (length=30)
'content-encoding' => string 'deflate' (length=7)
'content-length' => string '142' (length=3)
'content-type' => string 'application/json;charset=utf-8' (length=30)
'date' => string 'Wed, 22 Jul 2015 14:47:37 GMT' (length=29)
'expires' => string 'Tue, 31 Mar 1981 05:00:00 GMT' (length=29)
'last-modified' => string 'Wed, 22 Jul 2015 14:47:37 GMT' (length=29)
'ml' => string 'A' (length=1)
'pragma' => string 'no-cache' (length=8)
'server' => string 'tsa_b' (length=5)
'set-cookie' => string 'guest_id=v1%3A14375720938219946; Domain=.twitter.com; Path=/; Expires=Fri, 21-Jul-2017 14:47:37 UTC' (length=100)
'status' => string '200 OK' (length=6)
'strict-transport-security' => string 'max-age=631138519' (length=17)
'x-connection-hash' => string 'd8b10926f99dwef93rd7edbe5a71a97a' (length=32)
'x-content-type-options' => string 'nosniff' (length=7)
'x-frame-options' => string 'SAMEORIGIN' (length=10)
'x-response-time' => string '34' (length=2)
'x-transaction' => string 'ef0ebwefweece62ef' (length=16)
'x-tsa-request-body-time' => string '0' (length=1)
'x-twitter-response-tags' => string 'BouncerCompliant' (length=16)
'x-ua-compatible' => string 'IE=edge,chrome=1' (length=16)
'x-xss-protection' => string '1; mode=block' (length=13)
'body' => string '{"token_type":"bearer","access_token":"AAAAAAAAAAAAAAAAAAAAAFoafQAAAAAAqg%2BxmuH83hjsod6crH5bKTUX9Arc%3D5dWpp0XCTDjyiXxMC7LDLg8JbzPdGlCsJi2R1qjY1FMksTAFyG"}' (length=155)
'response' =>
array (size=2)
'code' => int 200
'message' => string 'OK' (length=2)
'cookies' =>
array (size=1)
0 =>
object(WP_Http_Cookie)[303]
public 'name' => string 'guest_id' (length=8)
public 'value' => string 'v1:143757645770219946' (length=21)
public 'expires' => int 1500648457
public 'path' => string '/' (length=1)
public 'domain' => string '.twitter.com' (length=12)
'filename' => null
The key underline of these is the access token that is present in the response’s body. Let’s retrieve that now we use our practical WordPress functions. For ease of understanding, we will continue on from our earlier example. We can use the below code to capture the access token:
$body = wp_remote_retrieve_body( $response );
$body = json_decode( $body, true );
$access_token = $body['access_token'];
Step-3: Using Bearer Token:
The eventual step is to utilize this bearer token in every other API call. It is necessary to append it in form of the ‘Authorization’ header with the value as Bearer [bearer_token]. Now let’s make a simple API call that will access the latest tweets via the user_timeline path.
$url = 'https://api.twitter.com/1.1/statuses/user_timeline.json?screen_name=danielpataki&count=3';
$args = array(
'headers' => array(
'Authorization' => 'Bearer ' . $access_token,
),
);
$response = wp_remote_get( $url, $args );
$tweets = json_decode( wp_remote_retrieve_body($response), true
After this, the $tweets variable will hold an array of tweets. It is possible to use different properties of this array to show the tweet. Also, you can use these properties to control the data.
Conclusion:
Connection to external services is easy through WordPress HTTP API. Lots of new APIs are created using the same REST principles. When you learn each of these principles, you can quickly discover the others.
Whenever the documentation requests you to use the body section, make sure to use the body. When these requests call for headers, you remember to add as many as required. Subsequently, look at the response, transform it to an array, capture the data you want, and use it.
