
The smaller file sizes result in quick loading time on a WordPress site. It is possible to decrease the size of your webpage with the help of Gzip compression. The same helps reduce the size of JavaScripts, HTML files, XML files, and CSS stylesheets.
Additionally, Google warns for sites that are devoid of compression enabled. When the Gzip Compression is allowed in your WordPress with a plugin, there will be a data reduction in the range of 60%-80% of your website. The present article discusses how to enable Gzip compression into your WordPress website by editing the .htaccess file:
The working mechanism of Gzip Compression:
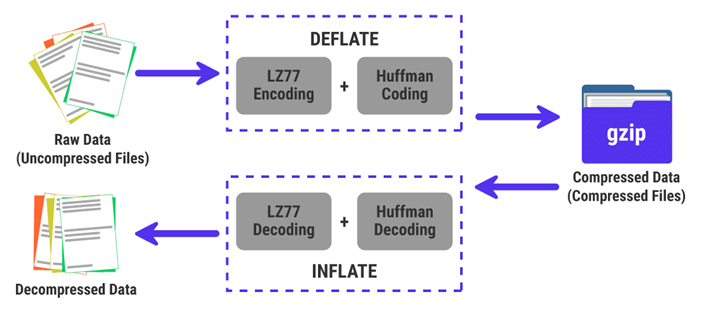
The Gzip compression utilizes an algorithm that manages repetitive strings in one place only as an alternative to saving those strings repeatedly. Moreover, it controls such strings and their location values when compressing and recovering data from compressed files.
Generally, Gzip compression works well with stylesheets as well as web pages. This is because every such resource file contains several repeated strings. Due to its compression mechanism, Gzip can decrease the file size by 80 to 90%.
Steps to enable Gzip compression a WordPress website through .htaccess file
- Step-1: Firstly, login into your cPanel
using your username and password. - Step-2: Now click on File Manager in the Files section.
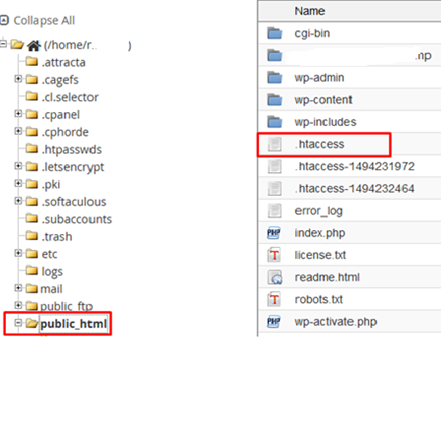
- Step-3: Find out the .htaccess file present in the public_html directory. Alternatively, you can use the Filezilla client application to find out the .htaccess file.
- Step-4: Now right-click the .htaccess
file and then click on ‘Edit.’ This will show the Edit menu as it popped up. Now click on the ‘Edit.’
Button. - Step-5: Include the below line of codes at the bottom of your .htaccess
document:
# BEGIN GZIP COMPRESSION

<IfModulemod_gzip.c>

mod_gzip_onYes

mod_gzip_dechunkYes

mod_gzip_item_includefile.(html?|txt|css|js|php|pl)$

mod_gzip_item_includehandler^cgi-script$

mod_gzip_item_includemime^text/.*

mod_gzip_item_includemime^application/x-javascript.*

mod_gzip_item_excludemime^image/.*

mod_gzip_item_excluderspheader^Content-Encoding:.*gzip.*

</IfModule>

# END GZIP COMPRESSION
If your website is hosted on an Nginx server, include the below lines of codes:
gzipon;

gzip_comp_level2;

gzip_http_version1.0;

gzip_proxied any;

gzip_min_length1100;

gzip_buffers168k;

gzip_types text/plain text/html text/css application/x-javascript text/xml
application/xml application/xml+rss text/javascript;

gzip_disable"MSIE [1-6].(?!.*SV1)";

gzip_varyon;
- Step-6: To save all your changes, click on ‘Save Changes.’
- Step-7: Use the W3 Total Cache plugin:
There are WordPress plugins accessible to let you enable the Gzip compression to your website. The W3 Total Cache is one of the widely used and famous caching plugins on WordPress. With the help of this plugin, it is easy to enable Gzip compression.
Go to the settings page to enable Gzip compression through the W3 Total Cache. Next, enable the HTTP compression option and finally click on ‘Save Changes.’
