In this article, we are going to discuss how to use the WordPress HTTP API in detail.
The WordPress HTTP API comprises various functions helping you to simplify the task of HTTP calls. You will not get deceived with cURL or file_get_contents; all you need to use is a single integrated interface. It works efficiently for interconnecting with third-party APIs, chiefly REST-full APIs such as Facebook, Twitter, MailChimp, etc. Let’s first get an overview of HTTP:
Also Read: How to Setup Cloudflare Cache for WordPress
The Fundamentals Of HTTP:

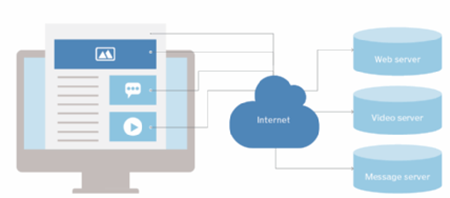
You might have seen HTTP when you come across any web address. HTTP is basically a network protocol used to deliver every data and file over the Interwebs.
When it comes to HTTP, there are 2 parts involved i.e. HTTP request and HTTP response. Both these aspects are identical in structure. They both have the following 4 parts:
 The Initial Line:
Requests make use of the initial line for sending three segments of information. They are namely the path, the method name, and the HTTP version. To understand clearly, for instance, while watching the main blog page of HostingXP, you may see the following as the initial line of the request:
GET /blog/ HTTP/1.1
Just like requests, responses also offer 3 segments of information. However, they are different, namely – the HTTP version, a description of the response, and the response code. While you create a request to the main blog page of HostingXP, it sends out an HTTP response using this initial line:
HTTP/1.0 200 OK
Headers:
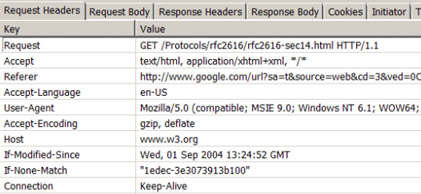
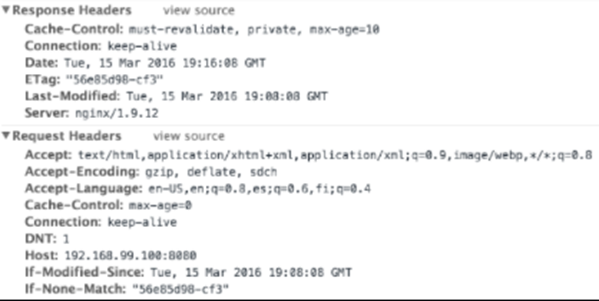
Headers include different pieces of information associated with the response or the request. HTTP 1.1 describes 46 headers; however, just one is needed to make requests, i.e., the ‘Host’ reader. Please go through the screenshot taken from the Chrome developer tools. It depicts a few of the headers sent accompanied by request sent to the main blog of HostingXP:

Body:
Mostly, the body includes data concerning the requested resource. For example, when a GET request is sent to the main HostingXP blog, you will get the HTML needed to deliver the page (the resource) in the body content.
Additional Information:
The above sections are enough to get an overview of HTTP. Typically, we will focus on the body, headers, and the method name. To learn more, it is better to go through James Marshall’s explanation of HTTP (
http://www.jmarshall.com/easy/http/). This guide clearly explains all necessary aspects of HTTP.
About Restful APIs:
Restful APIs (REST methodology) targets to offer an easy and classic approach for interrelating with an application. (learn in-depth about the fundamentals of the WordPress REST API from this link –
https://HostingXP.com/wordpress-rest-api-basics/). Frequently, it is used in combination with HTTP for creating an extremely logical structure of interactions. It is based on HTTP verbs and paths.
HTTP Verbs are identical to the method names seen earlier. The typical ones are GET, POST, DELETE and PUT. As per my view, PUT is the only uncertain method; you can consider it as an update command. While you use these verbs collectively with paths, it is possible to make an effective system:
- GET /post/1/ will be useful to access the post through the ID of 1.
- DELETE /post/1/ will be useful to delete that post.
For updating the post, use the command PUT /post/1/ by mentioning the applicable information in the headers and request body.
Simply adding an HTTP version to the existing codes results in the initial line of an HTTP contract. This is the reason why this system is extremely efficient.
Use of the WordPress HTTP API:
Equipped with all fundamental knowledge, now we can look into how the WordPress HTTP API functions. The 4 methods useful to create requests and interrupt the responses are:
-
wp_remote_get()
-
wp_remote_post()
-
wp_remote_head()
-
wp_remote_request()
Of these 4, the first 2 functions are easy to understand. They utilize the GET and POST methods correspondingly in the request. In the execution of the third function, there is the use of the HEAD method. It is useful to access only the headers of a response. When the case is such that we only require some metadata for a resource, this HEAD method can save a considerable overhead. The fourth one is a generic function. It lets you state which way you will prefer to utilize inside the parameters of the functions.
Other than these, there are 5 extra functions we can take help for retrieving exact parts of the response. They work as shortcuts to browse the bunch of data we get; they are namely:
-
wp_remote_retrieve_body()
-
wp_remote_retrieve_header()
-
wp_remote_retrieve_headers()
-
wp_remote_retrieve_response_code()
-
wp_remote_retrieve_response_message()
Our First HTTP Request:
Now let’s perform a quick test, i.e., accessing the header detail from the HostingXP blog. It is up to you where to do it inside a theme or plugin. However, make sure you are within a test environment to necessary text over a live site.
$response = wp_remote_head( 'https://HostingXP.com/blog/' );
var_dump( $response )
From the response we receive below, the body section is vacant. This is because we use the HEAD method here, and all the headers are displayed. To take hold of just the headers with no other array members, the wp_remote_retrieve_headers(,) function can be used.
array (size=5)
'headers' =>
array (size=13)
'server' => string 'nginx' (length=5)
'date' => string 'Wed, 22 Jul 2015 14:22:07 GMT' (length=29)
'content-type' => string 'text/html; charset=UTF-8' (length=24)
'connection' => string 'close' (length=5)
'vary' => string 'Accept-Encoding' (length=15)
'x-pingback' => string 'https://HostingXP.com/xmlrpc.php' (length=29)
'x-powered-by' => string 'HHVM/3.8.0' (length=10)
'link' => string '; rel="https://github.com/WP-API/WP-API"' (length=68)
'x-frame-options' => string 'DENY' (length=4)
'x-content-type-options' => string 'nosniff' (length=7)
'strict-transport-security' => string 'max-age=31536000' (length=16)
'x-HostingXP-cache' => string 'HIT' (length=3)
'content-encoding' => string 'gzip' (length=4)
'body' => string '' (length=0)
'response' =>
array (size=2)
'code' => int 200
'message' => string 'OK' (length=2)
'cookies' =>
array (size=0)
empty
'filename' => null
Understanding APIs:
The most significant obstruction I perceive for any developer is the total amount of new stuff which they need to include exactly. In the absence of the new stuff, the API call cannot function. It is essential to know what HTTP is, the way to make requests, and how to properly validate. Without knowing these aspects, every call will be unsuccessful. Now let’s go through an example through the Twitter API because they hold excellent documentation.
In the example, we will look at the Application-only Authentication since it is a simple flow. You will go through a few steps below which are the same as what Twitter recommends. Before starting, make an application on Twitter.
You must be able to append the code below anywhere in a plugin or theme. Keep in mind to use a test site.
Step-1: Encoding Consumer Key And Secret:
After you create an application, you must have a secret key and a consumer key at hand. For ease of understanding, let’s create constants that contain this information.
define( 'TWITTER_CONSUMER_KEY', '12disnir382jeqwdasd23wdasi' );
define( 'TWITTER_CONSUMER_SECRET', '23wdajskduhtrq2c32cuq9r8uhuf' )
The 3 steps for making an encoded version of the constants are included in the docs:
-
URL encode the consumer key as well as the consumer secret
-
Concatenate them using a colon
-
Base64 encode the entire string
In PHP, it is quite simple to do, as below:
$key = urlencode( TWITTER_CONSUMER_KEY );
$secret = urlencode( TWITTER_CONSUMER_SECRET );
$concatenated = $key . ':' . $secret;
$encoded = base64_encode( $concatenated );
Step-2: Receiving a Bearer Token:
In place of using your password, you can send your encoded string to Twitter. Consequently, you will get a temporary pass that is legitimate for a predefined time (TTL). For that, we will make an HTTP request, and Twitter says the following points:
-
The request should be an HTTP POST request.
-
The request should contain an Authorization header along with the value of Basic.
-
The request should contain a Content-Type header along with the value of application/x-www-form-urlencoded;charset=UTF-8.
-
The request’s body should be grant_type=client_credentials.
Let’s begin with the basics. Since we will require a POST request, we will use wp_remote_post(). This function accepts 2 parameters. The first one is URL whereas the second contains optional arguments. The first parameter is
https://api.twitter.com/oauth2/token. The second parameter will be used to manage every other requirement.
$args = array(
'headers' => array(
'Authorization' => 'Basic ' . $encoded,
'Content-Type' => 'application/x-www-form-urlencoded;charset=UTF-8'
),
'body' => 'grant_type=client_credentials'
);
$response = wp_remote_post( 'https://api.twitter.com/oauth2/token', $args );
Headers should be added as an array and the header type as the key, the value of the array member. Keep in mind the body must be a string. When it works successfully, you will observe a response same as following:
array (size=5)
'headers' =>
array (size=23)
'cache-control' => string 'no-cache, no-store, must-revalidate, pre-check=0, post-check=0' (length=62)
'content-disposition' => string 'attachment; filename=json.json' (length=30)
'content-encoding' => string 'deflate' (length=7)
'content-length' => string '142' (length=3)
'content-type' => string 'application/json;charset=utf-8' (length=30)
'date' => string 'Wed, 22 Jul 2015 14:47:37 GMT' (length=29)
'expires' => string 'Tue, 31 Mar 1981 05:00:00 GMT' (length=29)
'last-modified' => string 'Wed, 22 Jul 2015 14:47:37 GMT' (length=29)
'ml' => string 'A' (length=1)
'pragma' => string 'no-cache' (length=8)
'server' => string 'tsa_b' (length=5)
'set-cookie' => string 'guest_id=v1%3A14375720938219946; Domain=.twitter.com; Path=/; Expires=Fri, 21-Jul-2017 14:47:37 UTC' (length=100)
'status' => string '200 OK' (length=6)
'strict-transport-security' => string 'max-age=631138519' (length=17)
'x-connection-hash' => string 'd8b10926f99dwef93rd7edbe5a71a97a' (length=32)
'x-content-type-options' => string 'nosniff' (length=7)
'x-frame-options' => string 'SAMEORIGIN' (length=10)
'x-response-time' => string '34' (length=2)
'x-transaction' => string 'ef0ebwefweece62ef' (length=16)
'x-tsa-request-body-time' => string '0' (length=1)
'x-twitter-response-tags' => string 'BouncerCompliant' (length=16)
'x-ua-compatible' => string 'IE=edge,chrome=1' (length=16)
'x-xss-protection' => string '1; mode=block' (length=13)
'body' => string '{"token_type":"bearer","access_token":"AAAAAAAAAAAAAAAAAAAAAFoafQAAAAAAqg%2BxmuH83hjsod6crH5bKTUX9Arc%3D5dWpp0XCTDjyiXxMC7LDLg8JbzPdGlCsJi2R1qjY1FMksTAFyG"}' (length=155)
'response' =>
array (size=2)
'code' => int 200
'message' => string 'OK' (length=2)
'cookies' =>
array (size=1)
0 =>
object(WP_Http_Cookie)[303]
public 'name' => string 'guest_id' (length=8)
public 'value' => string 'v1:143757645770219946' (length=21)
public 'expires' => int 1500648457
public 'path' => string '/' (length=1)
public 'domain' => string '.twitter.com' (length=12)
'filename' => null
The key underline of these is the access token that is present in the response’s body. Let’s retrieve that now we use our practical WordPress functions. For ease of understanding, we will continue on from our earlier example. We can use the below code to capture the access token:
$body = wp_remote_retrieve_body( $response );
$body = json_decode( $body, true );
$access_token = $body['access_token'];
Step-3: Using Bearer Token:
The eventual step is to utilize this bearer token in every other API call. It is necessary to append it in form of the ‘Authorization’ header with the value as Bearer [bearer_token]. Now let’s make a simple API call that will access the latest tweets via the user_timeline path.
$url = 'https://api.twitter.com/1.1/statuses/user_timeline.json?screen_name=danielpataki&count=3';
$args = array(
'headers' => array(
'Authorization' => 'Bearer ' . $access_token,
),
);
$response = wp_remote_get( $url, $args );
$tweets = json_decode( wp_remote_retrieve_body($response), true
After this, the $tweets variable will hold an array of tweets. It is possible to use different properties of this array to show the tweet. Also, you can use these properties to control the data.
Conclusion:
Connection to external services is easy through WordPress HTTP API. Lots of new APIs are created using the same REST principles. When you learn each of these principles, you can quickly discover the others.
Whenever the documentation requests you to use the body section, make sure to use the body. When these requests call for headers, you remember to add as many as required. Subsequently, look at the response, transform it to an array, capture the data you want, and use it.
More Reading:


 Over the years, I found a remarkable feature entitled ‘Cache Everything’ through a newsletter of Cloudflare in my mailbox.

 When you accidentally enable only page rule, it will lead to some issue in your WordPress. Make sure to read this before proceeding further. This is because it needs specific logical settings to let things work efficiently.
The same is applicable just for a standard blog. Implement it if you understand the thing you are doing.
After successfully following this guide for several blogs, there remains the odd of committing errors. Also, it might not be suitable for every WordPress having a dynamic frontend, mainly I don’t suggest for the Forum or WooCommerce.
The present guide should not be implemented other than responsive theme where the mobile and desktop theme is varying. Moreover, you must not serve the WebP images via
When you accidentally enable only page rule, it will lead to some issue in your WordPress. Make sure to read this before proceeding further. This is because it needs specific logical settings to let things work efficiently.
The same is applicable just for a standard blog. Implement it if you understand the thing you are doing.
After successfully following this guide for several blogs, there remains the odd of committing errors. Also, it might not be suitable for every WordPress having a dynamic frontend, mainly I don’t suggest for the Forum or WooCommerce.
The present guide should not be implemented other than responsive theme where the mobile and desktop theme is varying. Moreover, you must not serve the WebP images via 

 In case you do not wish to represent your blog posts on the front page of your website, you can set a static homepage. This kind of page showcases content that does not change often. On a WordPress site, there can be a homepage and a distinct blog page.
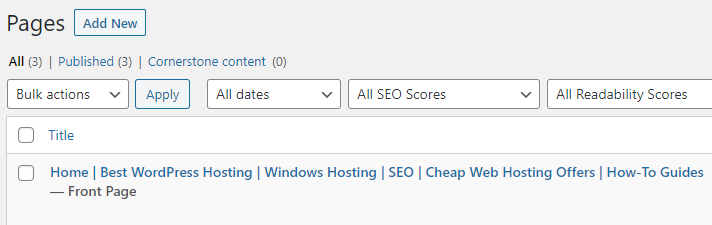
For the creation of your homepage, log in to your admin dashboard. So, follow the below path:
Pages > Add New
Give a name to your WordPress homepage, and then click on the ‘Publish’ button. Now repeat these steps another time to make your blog page.
By now, your pages are ready, so you can inform WordPress for what purpose they are to be used.
Follow the below path:
Settings > Reading page
In case you do not wish to represent your blog posts on the front page of your website, you can set a static homepage. This kind of page showcases content that does not change often. On a WordPress site, there can be a homepage and a distinct blog page.
For the creation of your homepage, log in to your admin dashboard. So, follow the below path:
Pages > Add New
Give a name to your WordPress homepage, and then click on the ‘Publish’ button. Now repeat these steps another time to make your blog page.
By now, your pages are ready, so you can inform WordPress for what purpose they are to be used.
Follow the below path:
Settings > Reading page
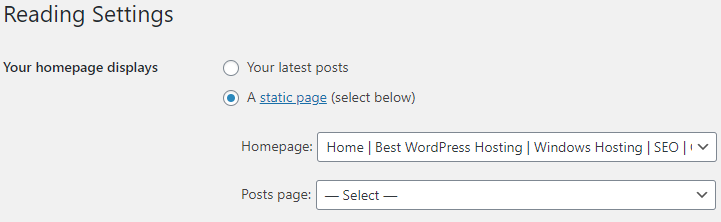 Now in the ‘Your Homepage Displays’ options, choose ‘A static page.’ After that, from the dropdown menus, select your homepage and posts page.
When you are carrying out such steps, you might need to place your website in maintenance mode. Doing this shows visitors a message that you set instead of a general error page or a nonfunctioning website. In case you already receive some amount of traffic to your website, it is important to consider this before modifying your homepage.
For the setup of this feature, you can use the WP Maintenance Mode plugin.
This plugin allows you to convey a custom message to the visitors of your site. Also, it enables you to make a custom message, which allows the visitors to know that your site will resume working quickly.
3 Methods to Change Your WordPress Homepage:
Now your homepage is already set up, so it is now time to design it and include some content.
Look at the 3 various tools to accomplish this task:
Now in the ‘Your Homepage Displays’ options, choose ‘A static page.’ After that, from the dropdown menus, select your homepage and posts page.
When you are carrying out such steps, you might need to place your website in maintenance mode. Doing this shows visitors a message that you set instead of a general error page or a nonfunctioning website. In case you already receive some amount of traffic to your website, it is important to consider this before modifying your homepage.
For the setup of this feature, you can use the WP Maintenance Mode plugin.
This plugin allows you to convey a custom message to the visitors of your site. Also, it enables you to make a custom message, which allows the visitors to know that your site will resume working quickly.
3 Methods to Change Your WordPress Homepage:
Now your homepage is already set up, so it is now time to design it and include some content.
Look at the 3 various tools to accomplish this task:
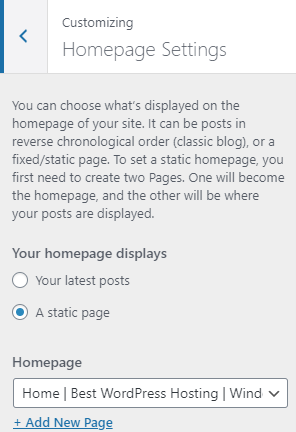 Several WordPress themes will offer you a fundamental homepage design along with a few options for modifying it. It is easy to access such options through the Theme Customizer.
Beginning from your admin area, you need to click on the Appearance > Customize to open the tool. It is found that the corresponding customizer presents you with a live preview when you are editing your homepage. Henceforth, you can observe how your modifications influence the look of your website.
But such modifications will not take effect unless you click on the ‘Publish’ button. Hence, you can give it a try.
Based on your theme, there may be varied options for the modifications you can implement. You can navigate through the menu tabs, or you can also click on any area through a blue pencil icon for making edits:
If your theme contains numerous templates for different pages of your website, you can start by exploring each template.
Certain themes provide you options for the position to include your sidebar. Alternatively, you can completely discard that element to see a full-width page:
There may be some parts of the homepage that you would not use. You can discard them using the theme customizer.
This is easy to implement by searching for the element within the menu, and then you need to click on the eye icon beside the name of the section:
It is possible to bring back any parts you have removed previously by clicking on the same icon. Also, you can drag the items inside the column if you want to modify their order.
Several WordPress themes will offer you a fundamental homepage design along with a few options for modifying it. It is easy to access such options through the Theme Customizer.
Beginning from your admin area, you need to click on the Appearance > Customize to open the tool. It is found that the corresponding customizer presents you with a live preview when you are editing your homepage. Henceforth, you can observe how your modifications influence the look of your website.
But such modifications will not take effect unless you click on the ‘Publish’ button. Hence, you can give it a try.
Based on your theme, there may be varied options for the modifications you can implement. You can navigate through the menu tabs, or you can also click on any area through a blue pencil icon for making edits:
If your theme contains numerous templates for different pages of your website, you can start by exploring each template.
Certain themes provide you options for the position to include your sidebar. Alternatively, you can completely discard that element to see a full-width page:
There may be some parts of the homepage that you would not use. You can discard them using the theme customizer.
This is easy to implement by searching for the element within the menu, and then you need to click on the eye icon beside the name of the section:
It is possible to bring back any parts you have removed previously by clicking on the same icon. Also, you can drag the items inside the column if you want to modify their order.
 If there are no menus yet, you will be asked to make one. Alternatively, you can choose the ‘Create Menu’ button. Keep in mind that your menu needs a name to differentiate it from other menus you may create.
The succeeding step is to include pages in the menu. Either you can add them separately, or checkmark ‘Auto adds pages’ boxes for automatic addition of all top-level pages.
If you like to choose the pages manually, choose the ‘View All’ tab in the left column. Now check to mark the boxes you want to include and then click on the ‘Add to Menu’ button:
It is easy to automatically add the top-level pages or choose the pages on your own.
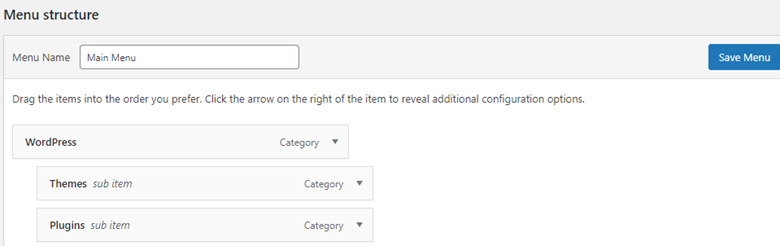
After adding your pages to the menu, you can set the sequence in which they will show up. This is easy to accomplish by just dragging and dropping the menu items in the place.
If you prefer to include some items inside others to make a dropdown menu, it is possible. This allows you to include more links in your navigation. When you do it, the appearance will be clutter-free.
You need to drag the child page below and somewhat to the parent page’s right part.
Lastly, based on your theme, there may be a few options on the menu’s position to be shown on your page.
Famous options highlight the footer, over the top part of the page, and sidebars (right or left). In case the default menu options are not sufficient for you, you can use some other plugins to expand your menu features.
If there are no menus yet, you will be asked to make one. Alternatively, you can choose the ‘Create Menu’ button. Keep in mind that your menu needs a name to differentiate it from other menus you may create.
The succeeding step is to include pages in the menu. Either you can add them separately, or checkmark ‘Auto adds pages’ boxes for automatic addition of all top-level pages.
If you like to choose the pages manually, choose the ‘View All’ tab in the left column. Now check to mark the boxes you want to include and then click on the ‘Add to Menu’ button:
It is easy to automatically add the top-level pages or choose the pages on your own.
After adding your pages to the menu, you can set the sequence in which they will show up. This is easy to accomplish by just dragging and dropping the menu items in the place.
If you prefer to include some items inside others to make a dropdown menu, it is possible. This allows you to include more links in your navigation. When you do it, the appearance will be clutter-free.
You need to drag the child page below and somewhat to the parent page’s right part.
Lastly, based on your theme, there may be a few options on the menu’s position to be shown on your page.
Famous options highlight the footer, over the top part of the page, and sidebars (right or left). In case the default menu options are not sufficient for you, you can use some other plugins to expand your menu features.


 If you are into SEO or digital marketing for a long time, you will understand the intricacies that the genre stands for. You would be well aware of the fact that mobile-friendliness has been one of the primary metrics that Google checks out for determining the ranking for your site.
Google recently enforced a couple of new changes in the way it indexes web content. These changes are bound to drastically affect your search engine rankings – whether for good or bad. That would be something beyond the scope of this post.
So what is Mobile first indexing? The explanation should be clear enough from the name itself. Mobile first indexing would simply mean that Google will use mobile versions of the websites for indexing and ranking your websites.
This is in sharp contrast to the earlier times where the desktop version took precedence over the mobile version of a website. Most of the tools even today are configured to analyze your site based on the desktop version.
In any case, we would expect it to change quite soon, what with the focus of Google on the mobile-friendliness of a website.
If you are into SEO or digital marketing for a long time, you will understand the intricacies that the genre stands for. You would be well aware of the fact that mobile-friendliness has been one of the primary metrics that Google checks out for determining the ranking for your site.
Google recently enforced a couple of new changes in the way it indexes web content. These changes are bound to drastically affect your search engine rankings – whether for good or bad. That would be something beyond the scope of this post.
So what is Mobile first indexing? The explanation should be clear enough from the name itself. Mobile first indexing would simply mean that Google will use mobile versions of the websites for indexing and ranking your websites.
This is in sharp contrast to the earlier times where the desktop version took precedence over the mobile version of a website. Most of the tools even today are configured to analyze your site based on the desktop version.
In any case, we would expect it to change quite soon, what with the focus of Google on the mobile-friendliness of a website.
 Well, mobile optimization of websites has begun for over a few months now. Most of the sites have turned mobile friendly. In any case, check if your site is entirely user-friendly when visited through a mobile browser.
Googlebot will crawl your website as a smartphone browser. It will index whatever it finds. The ranking of your website will be dependent upon what the smartphone user-agent on the Googlebot finds on your site. That should include the speed of the website as well.
If your site looks and displays the same both on desktop and mobile, it will not make any specific difference to you. You will not be affected if you have opted for making your website mobile-friendly.
If you do not have separate versions for the mobile and desktop, the change should not affect you much. The mobile and desktop versions will remain the same. However, you would need to ensure that the desktop version is well optimized for the mobile screen. There are times where you have opted for a design that adjusts to the screen that the content is rendered. Even in those cases, you will not find any considerable difference.
Make sure your site is mobile friendly if you are using separate URLs for mobile and desktop. The indexing from the mobile site will take precedence over the desktop version, and if your mobile version has nay issues for speed or any other similar problems, you will end up finding your ranking severely affected.
Well, mobile optimization of websites has begun for over a few months now. Most of the sites have turned mobile friendly. In any case, check if your site is entirely user-friendly when visited through a mobile browser.
Googlebot will crawl your website as a smartphone browser. It will index whatever it finds. The ranking of your website will be dependent upon what the smartphone user-agent on the Googlebot finds on your site. That should include the speed of the website as well.
If your site looks and displays the same both on desktop and mobile, it will not make any specific difference to you. You will not be affected if you have opted for making your website mobile-friendly.
If you do not have separate versions for the mobile and desktop, the change should not affect you much. The mobile and desktop versions will remain the same. However, you would need to ensure that the desktop version is well optimized for the mobile screen. There are times where you have opted for a design that adjusts to the screen that the content is rendered. Even in those cases, you will not find any considerable difference.
Make sure your site is mobile friendly if you are using separate URLs for mobile and desktop. The indexing from the mobile site will take precedence over the desktop version, and if your mobile version has nay issues for speed or any other similar problems, you will end up finding your ranking severely affected.
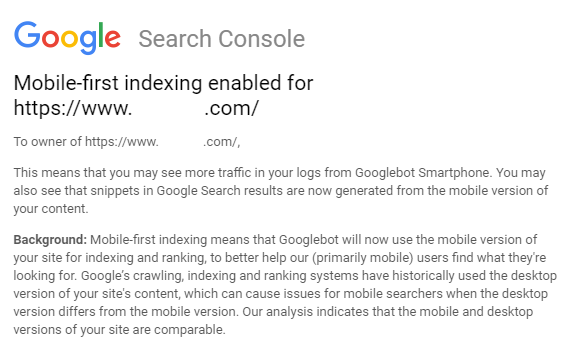 Google has issued the guidelines for enabling the mobile first indexing on the websites.
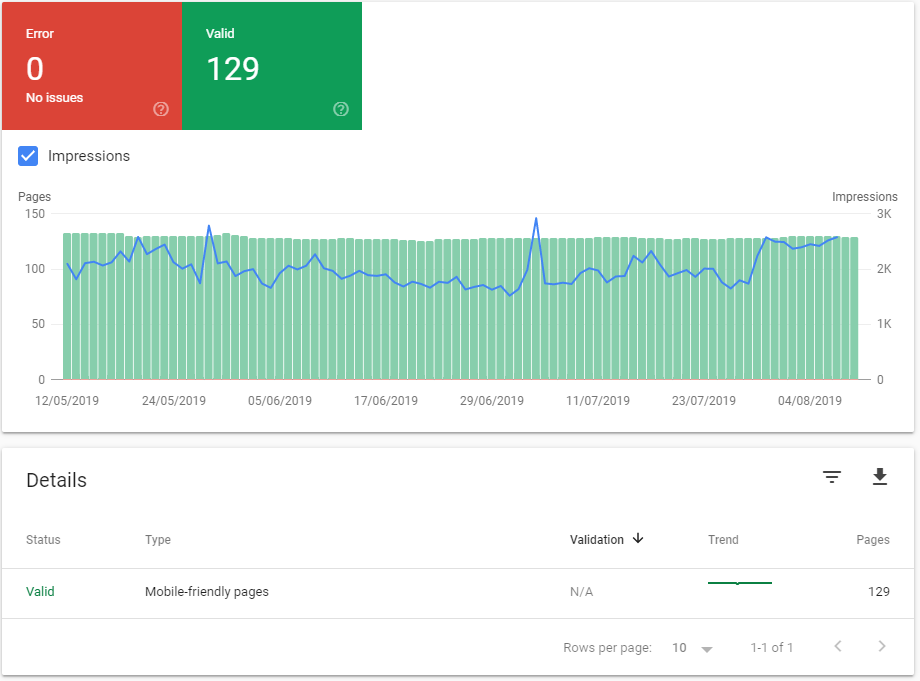
 That should confirm you whether your website has been enabled for the mobile first indexing as yet.
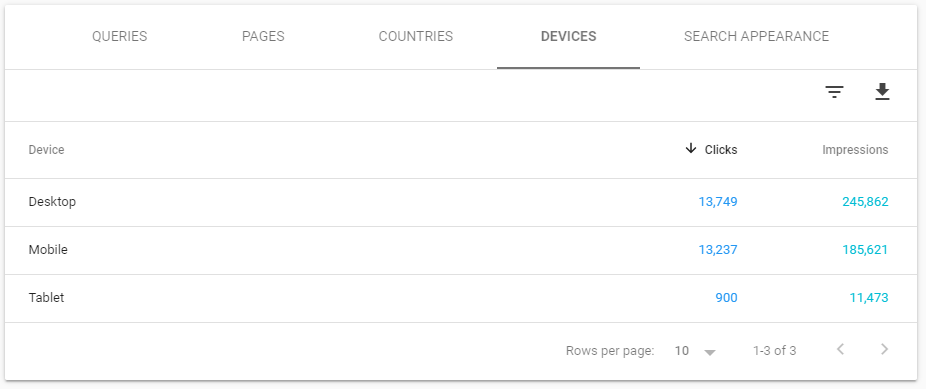
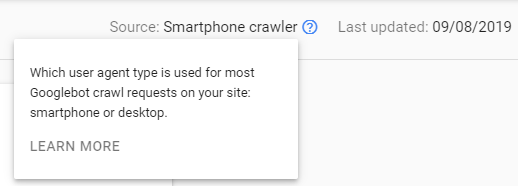
Another way you can check it would be to find which crawler is indexing your website. This again can be done with the help of Google Search Console. Follow the steps here below –
That should confirm you whether your website has been enabled for the mobile first indexing as yet.
Another way you can check it would be to find which crawler is indexing your website. This again can be done with the help of Google Search Console. Follow the steps here below –