
In this post, we explain how to add CAPTCHA in WordPress Login and Registration Forms.
Are you interested in adding CAPTCHA to your WordPress site’s login and registration forms? And are you interested in using CAPTCHAs to keep off bots and spammers from accessing your WordPress site? Well, the below article helps you to achieve this.
Also Read: Best WordPress Security Plugins
Generally, the WordPress login page and user registration page are major targets for spammers and hackers. The intention of these attackers is usually to obtain unauthorized access to your WordPress admin part to allocate malware. In some other cases, they may crash the whole network of websites hosted with a particular web hosting company to gather ransom.
In any such case, a breach can lead to pre-eminent damage to your website. But since the hackers use bots to quickly and successfully attacking your websites, it may feel that odds are loaded up against you.
Luckily, there is an easy-to-use tool that you can utilize to keep away spammers and bots from your WordPress site. The use of a Completely Automated Turing test to tell Computers and Humans Apart (CAPTCHA) is an easy way to enhance the security of your website.
The following guide familiarizes you with CAPTCHAs and the way they can assist in protecting your website against spam and hackers. The later section highlights the ways to add them to your website. Also, you will be introduced to a few of the finest WordPress CAPTCHA plugins.
One of the best ways to prevent such attacks is to use CAPTCHA that successfully blocks spambots and defends your site from getting hacked.
The below article will discuss how to include CAPTCHA within WordPress login and the registration form effortlessly. But before that, let us understand what this CAPTCHA is:
What is CAPTCHA?
 In simple terms, a CAPTCHA is a computer program utilized to differentiate between human and automated bot users. The same is done by carrying out a test that can be easy for a human to pass. The same test is difficult and nearly impossible for the automatic scripts to get through.
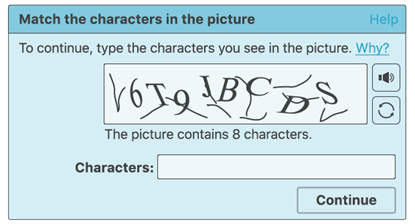
The CAPTCHAS can adopt a wide range of forms, and one of the most widespread ones is distorted text which you need to decode. Some other test demands you to choose images that can fulfill some specifications from a collection of low-resolution photos.
In these cases, usually, humans can easily complete the challenge presented. But, even the contemporary bots are not able to decipher the distorted or pieces of images. Once they are incapable of getting through the test, they would be blocked from accessing your site.
The same is inevitable since bots are utilized in various situations that can negotiate the security and integrity of your website. One of the most widespread hacking strategies is brute force attacks. It utilizes bots to frequently type in credentials inside your login form until they attain access to your website.
One more kind of cyber attack is cross-site scripting (XSS). In that, hackers implement the malicious code within your site through a form like your login page or the comments section. The same can lead to malware saved on your site, misplaced information, and other ill outcomes.
The bots are also useful for spamming your comments part with low-quality links, which damage your Search Engine Optimization (SEO) and daunt legitimate users. In addition to being annoying, spam makes your website look less protected and badly monitored.
All those places on your site where users can enter information, i.e., any form in your site, are susceptible to attacks from bots. The inclusion of a CAPTCHA before submissions of form deters non-humans from attaining access to your website or inserting malicious code within it.
Throughout the inception of CAPTCHA, users were prompted to enter the text they observe in an image. The corresponding image showcased random letters, numbers, or words in an unclear style.
Subsequently, a newer technology entitled reCAPTCHA was implemented. It represented random words in the form of a challenge and utilized the input from the user to digitalize books.
The mentioned technology got hold of by Google in the year 2009. Since then, it helps to digitalize thousands of books as well as complete New York Times archives.
But, such new CAPTCHAs were still irritating and damaged the user experience on the websites.
Though CAPTCHAs offer a wide range of advantages and protections to your website, it comes with some limitations. For instance, they can negatively influence User Experience (UX). By making users sluggish, such simple tests come into the way of visitors and rapidly fulfill their targets on your site.
Additionally, users suffering from visual impairments or a few other challenges like dyslexia may find it difficult to complete their CAPTCHAs. Unintentionally keeping human users away from the site is beneficial to anyone. This holds even if it prevents bots in the procedure.
In 2014, Google launched its No CAPTCHA reCAPTCHA, a successor to the image tests and distorted word it has continued to use since 2007. This novel system demands users to choose a checkbox beside the words “I’m not a robot” to verify their legitimacy.
It displays a simple checkbox for human users to click on easily. Some other wary traffic will show slightly more difficult CAPTCHA, like recognizing objects in the shown images.
When you add a CAPTCHA to your WordPress website, you get the freedom to select which kind of test to use. But bear in mind that executing Google reCAPTCHA v2 or v3 must help make your website more enjoyable and easily accessible.
Now let’s go through how WordPress websites can enhance security through CAPTCHA.
Reasons to Use CAPTCHA for WordPress Login and Registration:
WordPress login and registration pages serve as a simple target for hackers and spammers and malicious force attacks.
This is because WordPress is the most well-known website builder (CMS) prevalent in the world. This makes it a frequent target for malicious attempts.
The simplest solution to defend your WordPress site from attacks is to use a WordPress firewall plugin such as Sucuri. The same will block bad traffic from landing on your website and stops unwarranted access.
One more solution is implementing a secondary layer of password protection on the WordPress login and registration pages. But the issue with this method is you need to share that second password with every user. This would not scale for huge multi-author blogs or membership sites.
CAPTCHA offers a simpler alternative to such solutions. It uses AI technologies from Google to identify genuine visitors and offer CAPTCHA challenges to doubtful users.
Default vs. Custom WordPress Login and Registration Form
The default WordPress login and registration form offer a fundamental collection of features.
The login page enables users to easily access your website’s backend as per their relevant user roles and permissions.
With the help of the default WordPress registration form, visitors can make an account on your website. After they are registered, they can log in to the backend of your website and carry out precise tasks permitted by their user function.
Plenty of website owners wish to tailor the default WordPress login and registration page using their personal styles, logos, etc. They use several plugins to make up their own custom login and registration page to substitute the default ones.
The following section covers how to add captcha whether you use the default pages or custom pages.
You will be made familiar with the ways to set up reCAPTCHA for default and custom login and registration pages present in WordPress.
Now let’s start on how to add reCAPTCHA in the default WordPress login and the registration form.
How to add reCAPTCHA to Default WordPress Login and Registration Form:
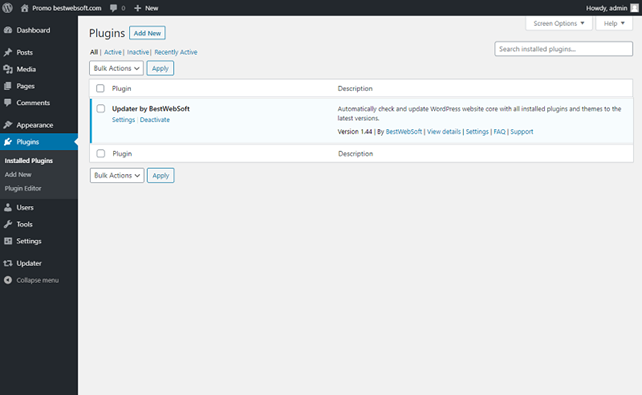
Firstly, you have to install and activate the Advanced noCAPTCHA & reCAPTCHA (v2 & V3) plugin.
After this plugin gets activated, follow the below path:
Settings > Advanced noCAPTCHA & Invisible CAPTCHA page available within our admin panel
Now WordPress will land you on the general settings page of the plugin.
From here on, you have to select a Google reCAPTCHA version and find out reCAPTCHA API keys to allow the service on your website.
It is recommended to use v2 since it is believed that v3 is not so stable, at least not yet!
To get those API keys, visit the reCAPTCHA website, and then click on the ‘Admin Console‘ button.
In the subsequent screen, Google will request to sign in to your account. After you have successfully logged in, you will observe the ‘Register a new site‘ page.
As a first step, enter the name of your website in the Label field. Now, choose a reCAPTCHA type. It is up to you to select reCAPTCHA v2 ‘I’m not a robot’ named checkbox.
Now, you have to mention your domain name within the Domains section. Ascertain that your domain name is devoid of ‘https://www.’
The Owners section displays your email address as well as allows you to add a new owner.
Once done, you have to check the box beside ‘Accept the reCAPTCHA Terms of Service.’ It is optional to check the ‘Send alerts to owners‘ box to get email alerts regarding doubtful traffic or captcha misconfiguration occurring on your site.
After this is done, click on the ‘Submit’ button.
Now, you will notice a success message and the site and secret keys that can be used on your website.
As a next step, open your WordPress dashboard and follow the below path:
Settings >Advanced noCAPTCHA & Invisible CAPTCHA page
This allows you to set up Google reCAPTCHA.
After you are landed on the plugin settings page, select the Google reCAPTCHA version. Because we have already registered our website for Google reCAPTCHA v2 ‘I’m not a robot,’ it is necessary to choose that option from the dropdown menu.
Now enter the site key and secret key given by Google reCAPTCHA before.
In the next step, you will find the ‘Enabled Forms‘ option. You need to check the box besides the forms wherein you wish to enable the Google reCAPTCHA. In this step, select the Login Form and Registration Form.
Once done, you have to scroll down the page to check other options. When done with selecting options, click on the ‘Save Changes’ button present at the bottom.
Now you have successfully included reCAPTCHA in the default WordPress login and registration form. If you want to preview it, you can open up your WordPress login URL inside your browser. For instance: www.website.com/wp-login.php.
If you wish to review the reCAPTCHA on the registration form, click on the Register link underneath the login form. Once done, the WordPress registration form would open, and also you can observe how reCAPTCHA functions.
Set-Up of reCAPTCHA in Custom WordPress Login and Registration Form:
The custom login and registration forms of WordPress provide new user-friendly membership possibilities to visitors of your website.
Firstly, you can enable users to either register or login into your website directly from the frontend. As a result, it enhances the user experience and allows you to retain the same design experience throughout the website.
Subsequently, it allows you to include your website logo and personalize the registration and login page according to your preference.
Making a custom WordPress login form and user registration form is quite simple using the intuitive WordPress form plugin named WPForms. This plug is the most user-friendly and being utilized by 2+ million websites.
For getting started, you need to install and activate the WPForms plugin over your WordPress site.
To create the custom WordPress user registration form, switch to at least the WPForms Pro plan.
Once activated, you have to open ‘Settings‘ from ‘WPForms.’ This will let you enter your WPForms license key. Actually, you will receive this key from your account area present on the WPForms website.
Once this is done, click on the reCAPTCHA option available at the upper part to organize reCAPTCHA for your customized WordPress forms. As the first step, select a reCAPTCHA type.
Because we have already selected v2 before, now we will select reCAPTCHA v3 in this step. However, the recommended option is still v2.
Now you will observe the secret key field and the site key field. For obtaining such keys, register your website on the Google reCAPTCHA website.
Now open the Google reCAPTCHA website and click on the Admin Console button present at the uppermost right corner.
Now Google will inquire you to sign in to the account. After that, you will notice the ‘Register a new site‘ page.
Now mention your website name and then choose the reCAPTCHA v3 option from the reCAPTCHA type option.
In the next step, mention your domain name but make sure it is without https://www.
Suppose you wish to add one more Gmail user in the form of the owner of the reCAPTCHA. After that, you could add the email address within the Owners section.
Now accept the ReCaptcha terms of service. It is also possible to check the box beside the ‘Send alerts to owners’ option to receive notification emails from Google regarding mistrustful traffic over your site.
After that is one, you need to click on the Submit button.
Now Google will display a success message accompanied by the site key and the secret key to supplement reCAPTCHA to your website.
By now, you possess the Google reCAPTCHA API keys. Follow the below path
WPForms > Settings ? reCAPTCHA
The reCAPTCHA page will open up in your WordPress dashboard.
In the settings page of the WPForms reCAPTCHA, mention the site key and secret key. Now save your settings.
After successfully adding the reCAPTCHA on WPForms, it is easy to enable the reCAPTCHA within the user registration form, your custom login form, or any forms created using WPForms.
Now let’s make a custom WordPress registration form.
Open ‘Addons’ page from ‘WPForms’. Now find out ‘User Registration Addon’ and then click on ‘Install Addon.’
WPForms will now download and set up the addon. After that, you will observe the User Registration Addon’s status to be ‘Active.’ This indicates that you are now ready to include a fresh user registration form.
Now follow the bellow path to start the WPForms Builder:
WPForms > Add New
From the WPForms setup page, you need to choose the ‘User Registration Form’ template.
Once done, WPForms automatically creates a custom user registration form and also opens the Form Setup page.
It is now easy to personalize your form with new fields or edit the available field options. In case you prefer the default form, then use it without creating any modifications.
Now click on the Settings option to organize your form settings as well as enable the Google reCAPTCHA.
Within the General Settings page, it is possible to modify your form name, include a form description, and also edit the Submit button text, etc. In the base, you will notice the checkboxes containing Enable Google v3 reCAPTCHA box.
Just check the box to enable the Google reCAPTCHA within your user registration form. When this is done, click on the Save button available in the upper right corner.
You can close the form builder by simply clicking on the ‘Close’ button beside the Save button.
Finally, you made a custom WordPress user registration form as well as included reCAPTCHA to it.
The next task you have to do is to include the custom user registration form on your website. It is possible to add forms to your pages, posts, or any widget-ready area. For instance, the below section describes how to make a new page and include its form.
Follow this path:
Pages > Add New
This opens up a new page from your WordPress dashboard, allowing you to create a new page. On the page’s screen, click on the ‘Add New Block’ icon, and choose the WPForms block.
Now you can observe the WPForms widget already added to your page edit screen. Choose the Custom User Registration Form which you created before. Once done, the widget automatically loads the form within the page editor.
Subsequently, you can add other vital content and post the page.
You can now open the page on your web browser to observe the custom user registration form along with Google reCAPTCHA implemented.
Because reCAPTCHA v3 is already selected, you will not notice a Google reCAPTCHA checkbox such as ‘I’m not a robot.’ The reason is the reCAPTCHA v3 functions in the background. However, you will still observe a tiny badge at the lowermost right corner.
The method of building a custom login form is nearly the same. However, the mere difference is that you have to select the User Login Form template available from the WPForms setup page.
Subsequently, the entire process is identical.
————————————–
Adding a CAPTCHA to Your Login Page:
Generally, your login page is a key target for Cross-Site Scripting (XSS) attacks and brute force.
For the addition of a CAPTCHA into it using the Google Captcha plugin, follow this path:
Google Captcha > Settings > General > Enable reCAPTCHA for inside WordPress
Now choose ‘Login Form‘ within ‘WordPress Default‘.
Now your login page stays protected.
Including a CAPTCHA on Your Password Reset Page:
When hackers’ attempts to log in to your website go futile, they might be landed on a page wherein users could reset their passwords. For the addition of a CAPTCHA to secure this page, follow this path within your WordPress dashboard:
Google Captcha > Settings > General > Enable reCAPTCHA form
Now choose the ‘Reset password form’ from the ‘WordPress Default’ list.
Securing Your WooCommerce Login Page using a CAPTCHA:
Your WooCommerce Login page is equally vulnerable to a malicious attack like your core WordPress page. For protecting it using Google Captcha, you will require the premium version of the plugin. Once you are ready, follow the below path within your WordPress dashboard:
Google Captcha > Settings > General > Enable reCAPTCHA
At this point, you can choose the ‘WooCommerce Login form’ from the ‘External Plugins’ list.
Including a CAPTCHA on Your Contact Form:
It is possible to protect your contact form using a CAPTCHA identical to the others already discussed above. But many different contact form plugins can integrate with Google CAPTCHA, like:
-
Contact Form 7
-
Ninja Forms
-
Jetpack Contact Form
It is necessary to activate any of the above tools on your site to add a CAPTCHA to your contact form. Now follow the below path:
Google Captcha > Settings > General > Enable reCAPTCHA
Now click on the checkbox for your chosen plugin:
Doing this will terminate the process. One more contact form plugin is available for use on your WordPress website; you may need to use a different CAPTCHA plugin that combines with it. Also, few form builder plugins include CAPTCHAs on their own, like WPForms.
Summary:
Keeping your site free from malicious bots is inevitable if you intend to protect your users, your content, your users, and the reputation of your brand. One of the simplest approaches to deter their activities is to add a CAPTCHA into the forms of your WordPress site.
The addition of CAPTCHA to your WordPress needs these 3 steps:
-
Setup and activate a WordPress CAPTCHA plugin.
-
Make your Google reCAPTCHA and include it on your site.
-
Organize your settings to secure key areas.
